
8.1 Welcome to a New Chapter
In this chapter, we embark on creating a knowledge base—a comprehensive module designed to help us manage and organize documents, tasks, and information seamlessly. By designing and implementing a tree-structured document collection, we’ll establish an efficient system for tracking document status, managing attachments, and linking related tasks.
8.2 Exploring Database Design
8.2.1 Initial Design and Creating the Document Collection
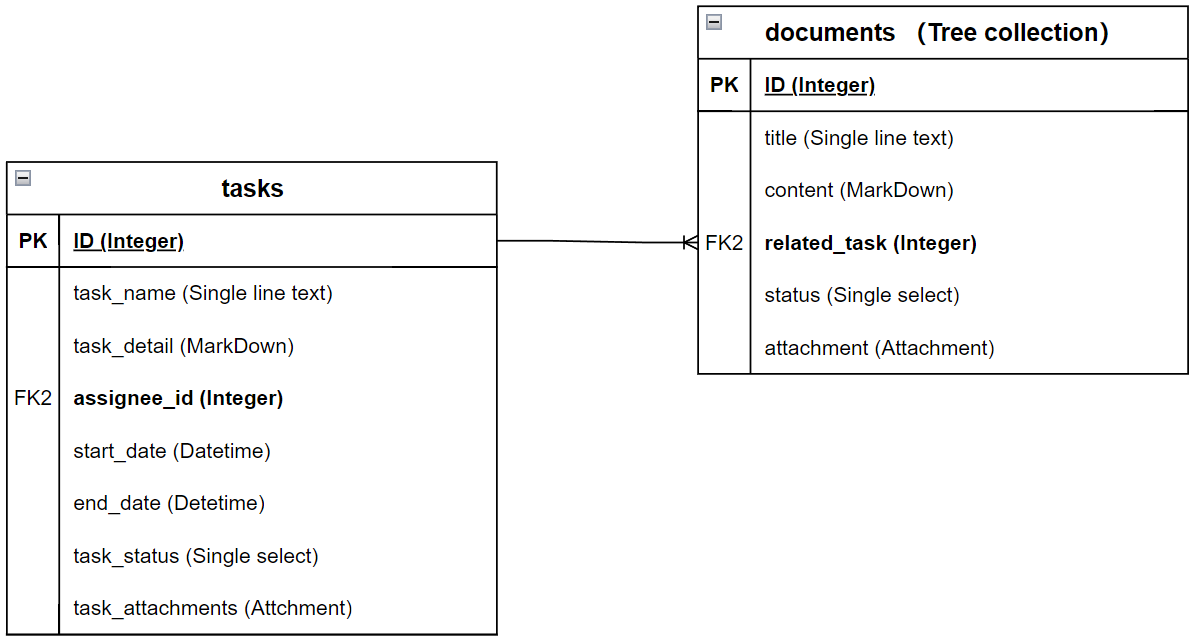
We’ll begin with a straightforward database design by building a “Document Collection” to catalog all document information. Key fields in the Document Collection include:
- Title: Single line text.
- Content: Markdown(Vditor).
- Document Status: Single select, with options including Draft, Published, Archived, and Deleted.
- Attachment: Attachment, Allows adding files and images to enrich document content.
- Related Task: A many-to-one relationship field to link the document with a task for easy reference in task management.
As our system evolves, we’ll continue to add fields for more detailed document management.
8.2.2 Constructing a Tree Structure for Directory Management
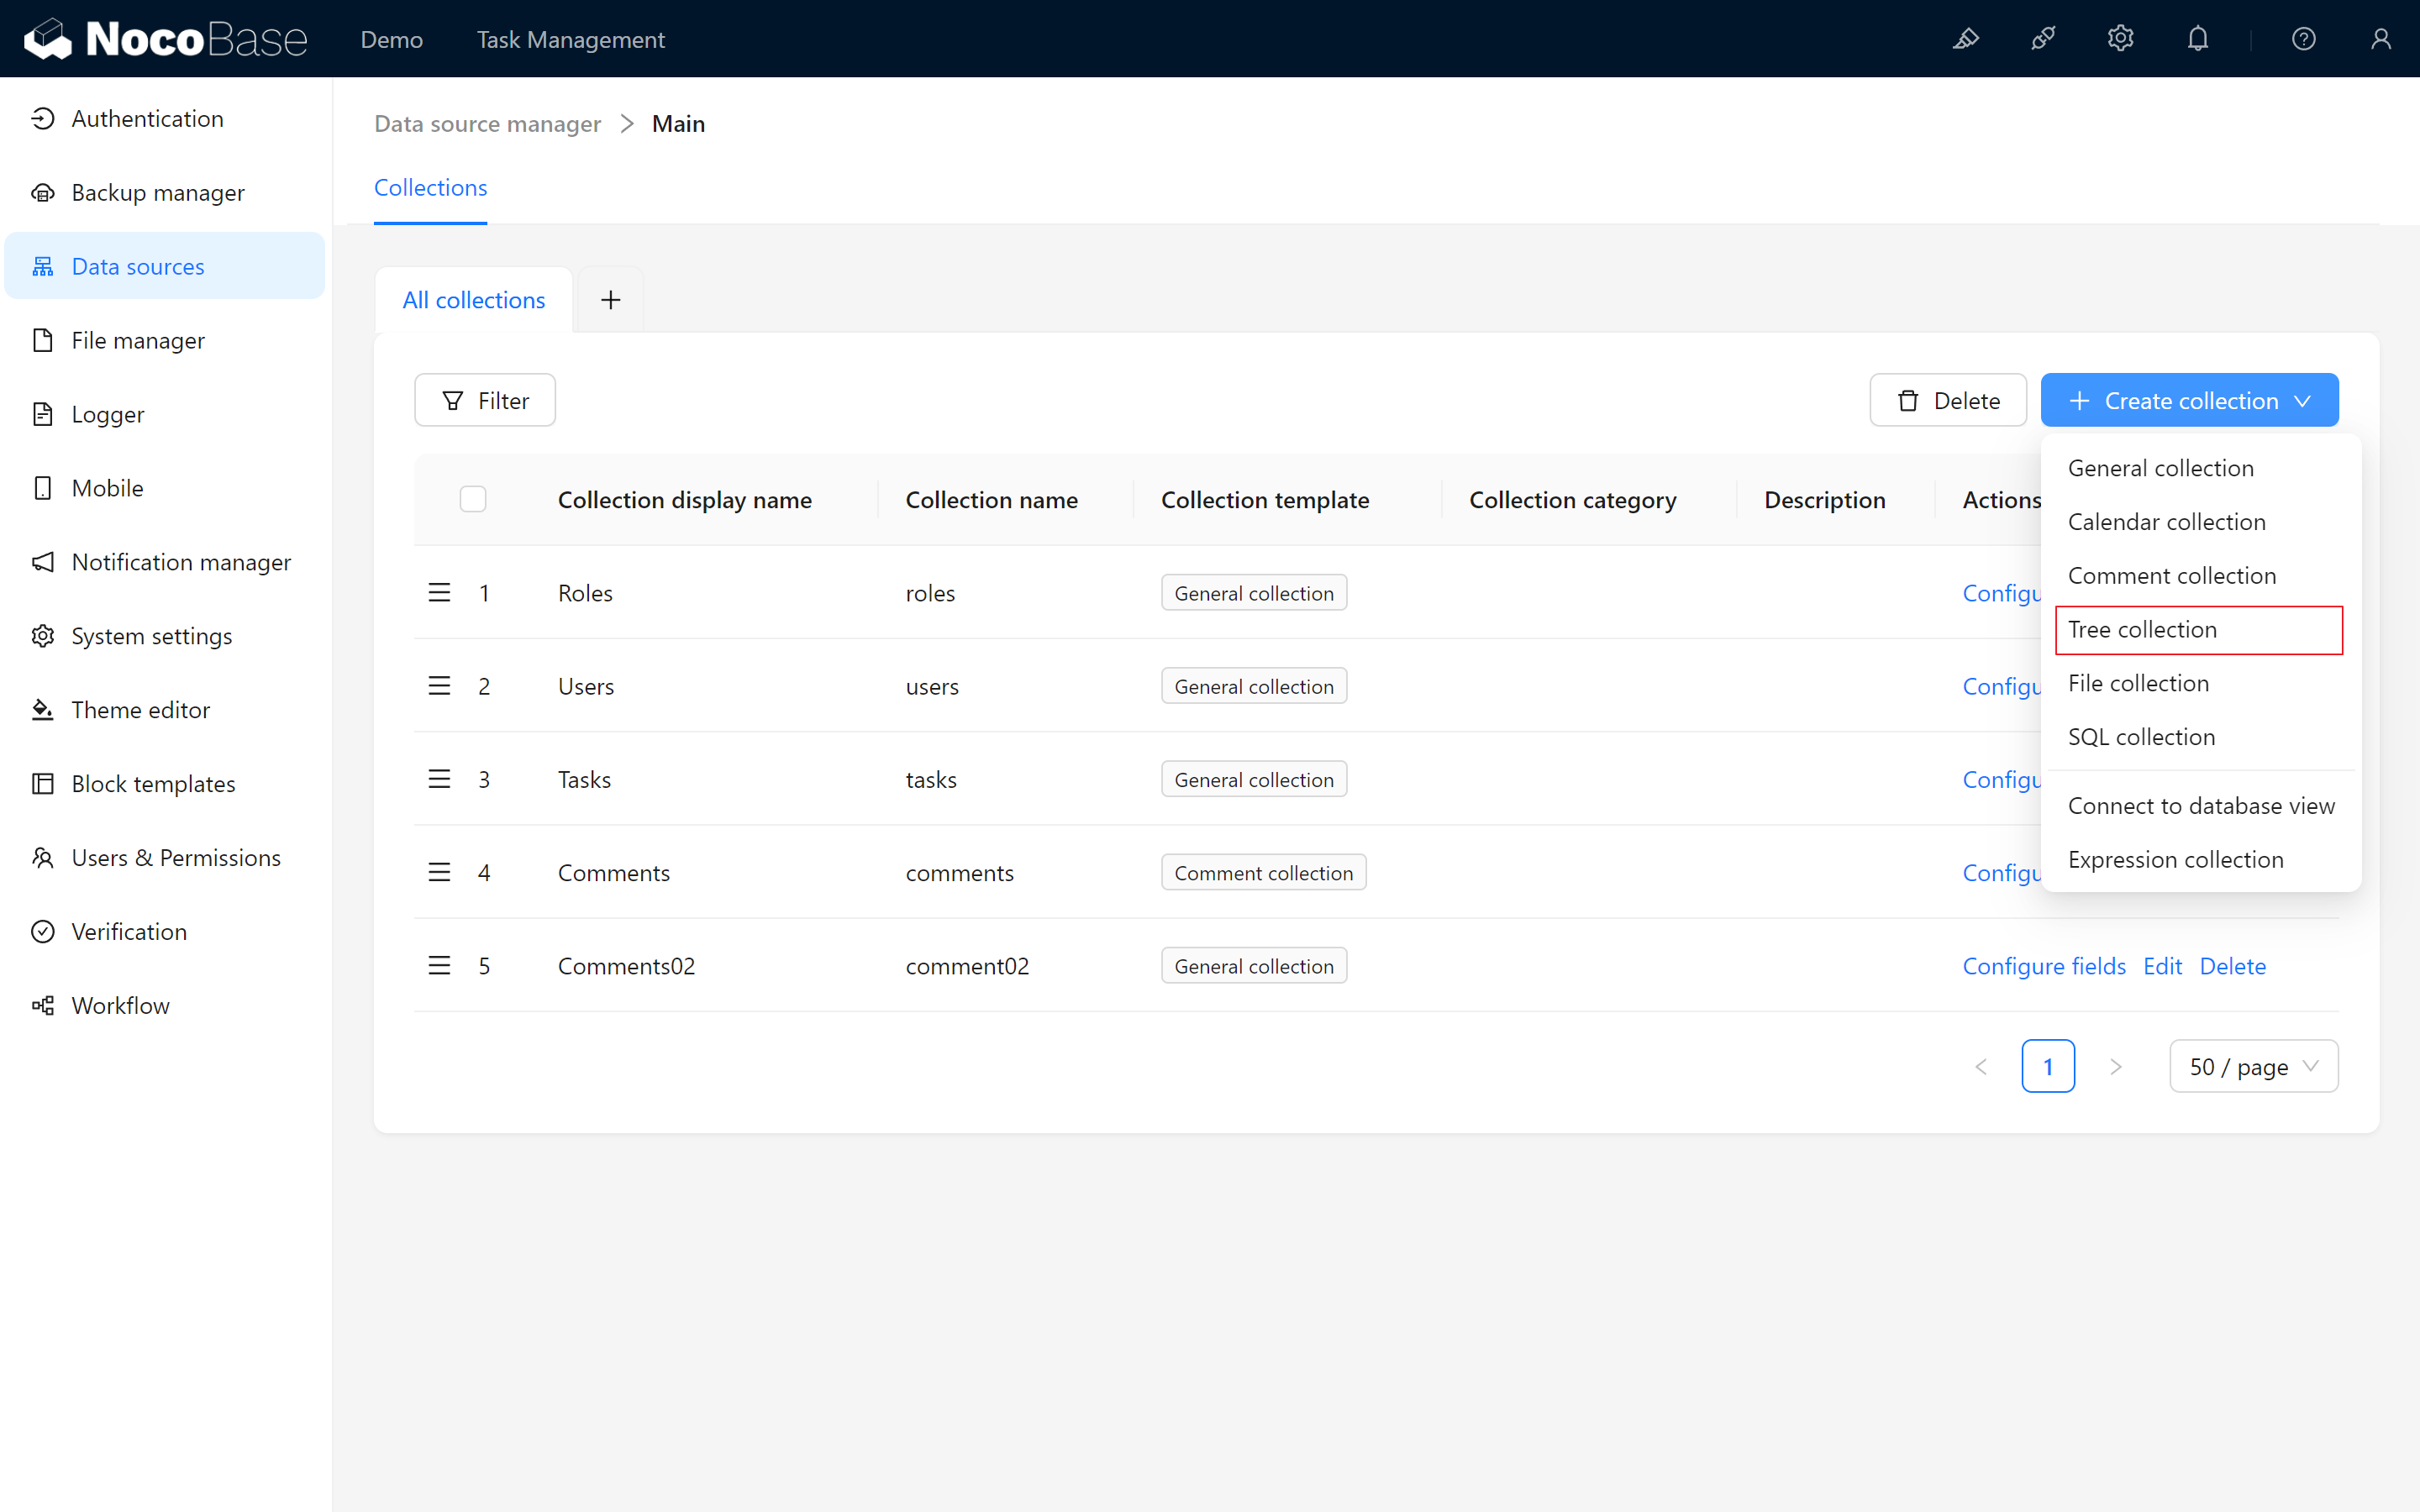
A tree collection (provided by the plugin plugin-collection-tree), is a collection structure mirrors a tree, where each data item may have one or more child items, and those child items can, in turn, have their own descendants.
To ensure organization and hierarchy, we’ll structure our Document Collection as a Tree collection, allowing for intuitive parent-child classification. This setup automatically generates the following fields:
- Parent ID: Identifies the parent document for the current document.
- Parent: A many-to-one field establishing parent-child relationships.
- Children: A one-to-many field that enables viewing all child documents under a parent document.
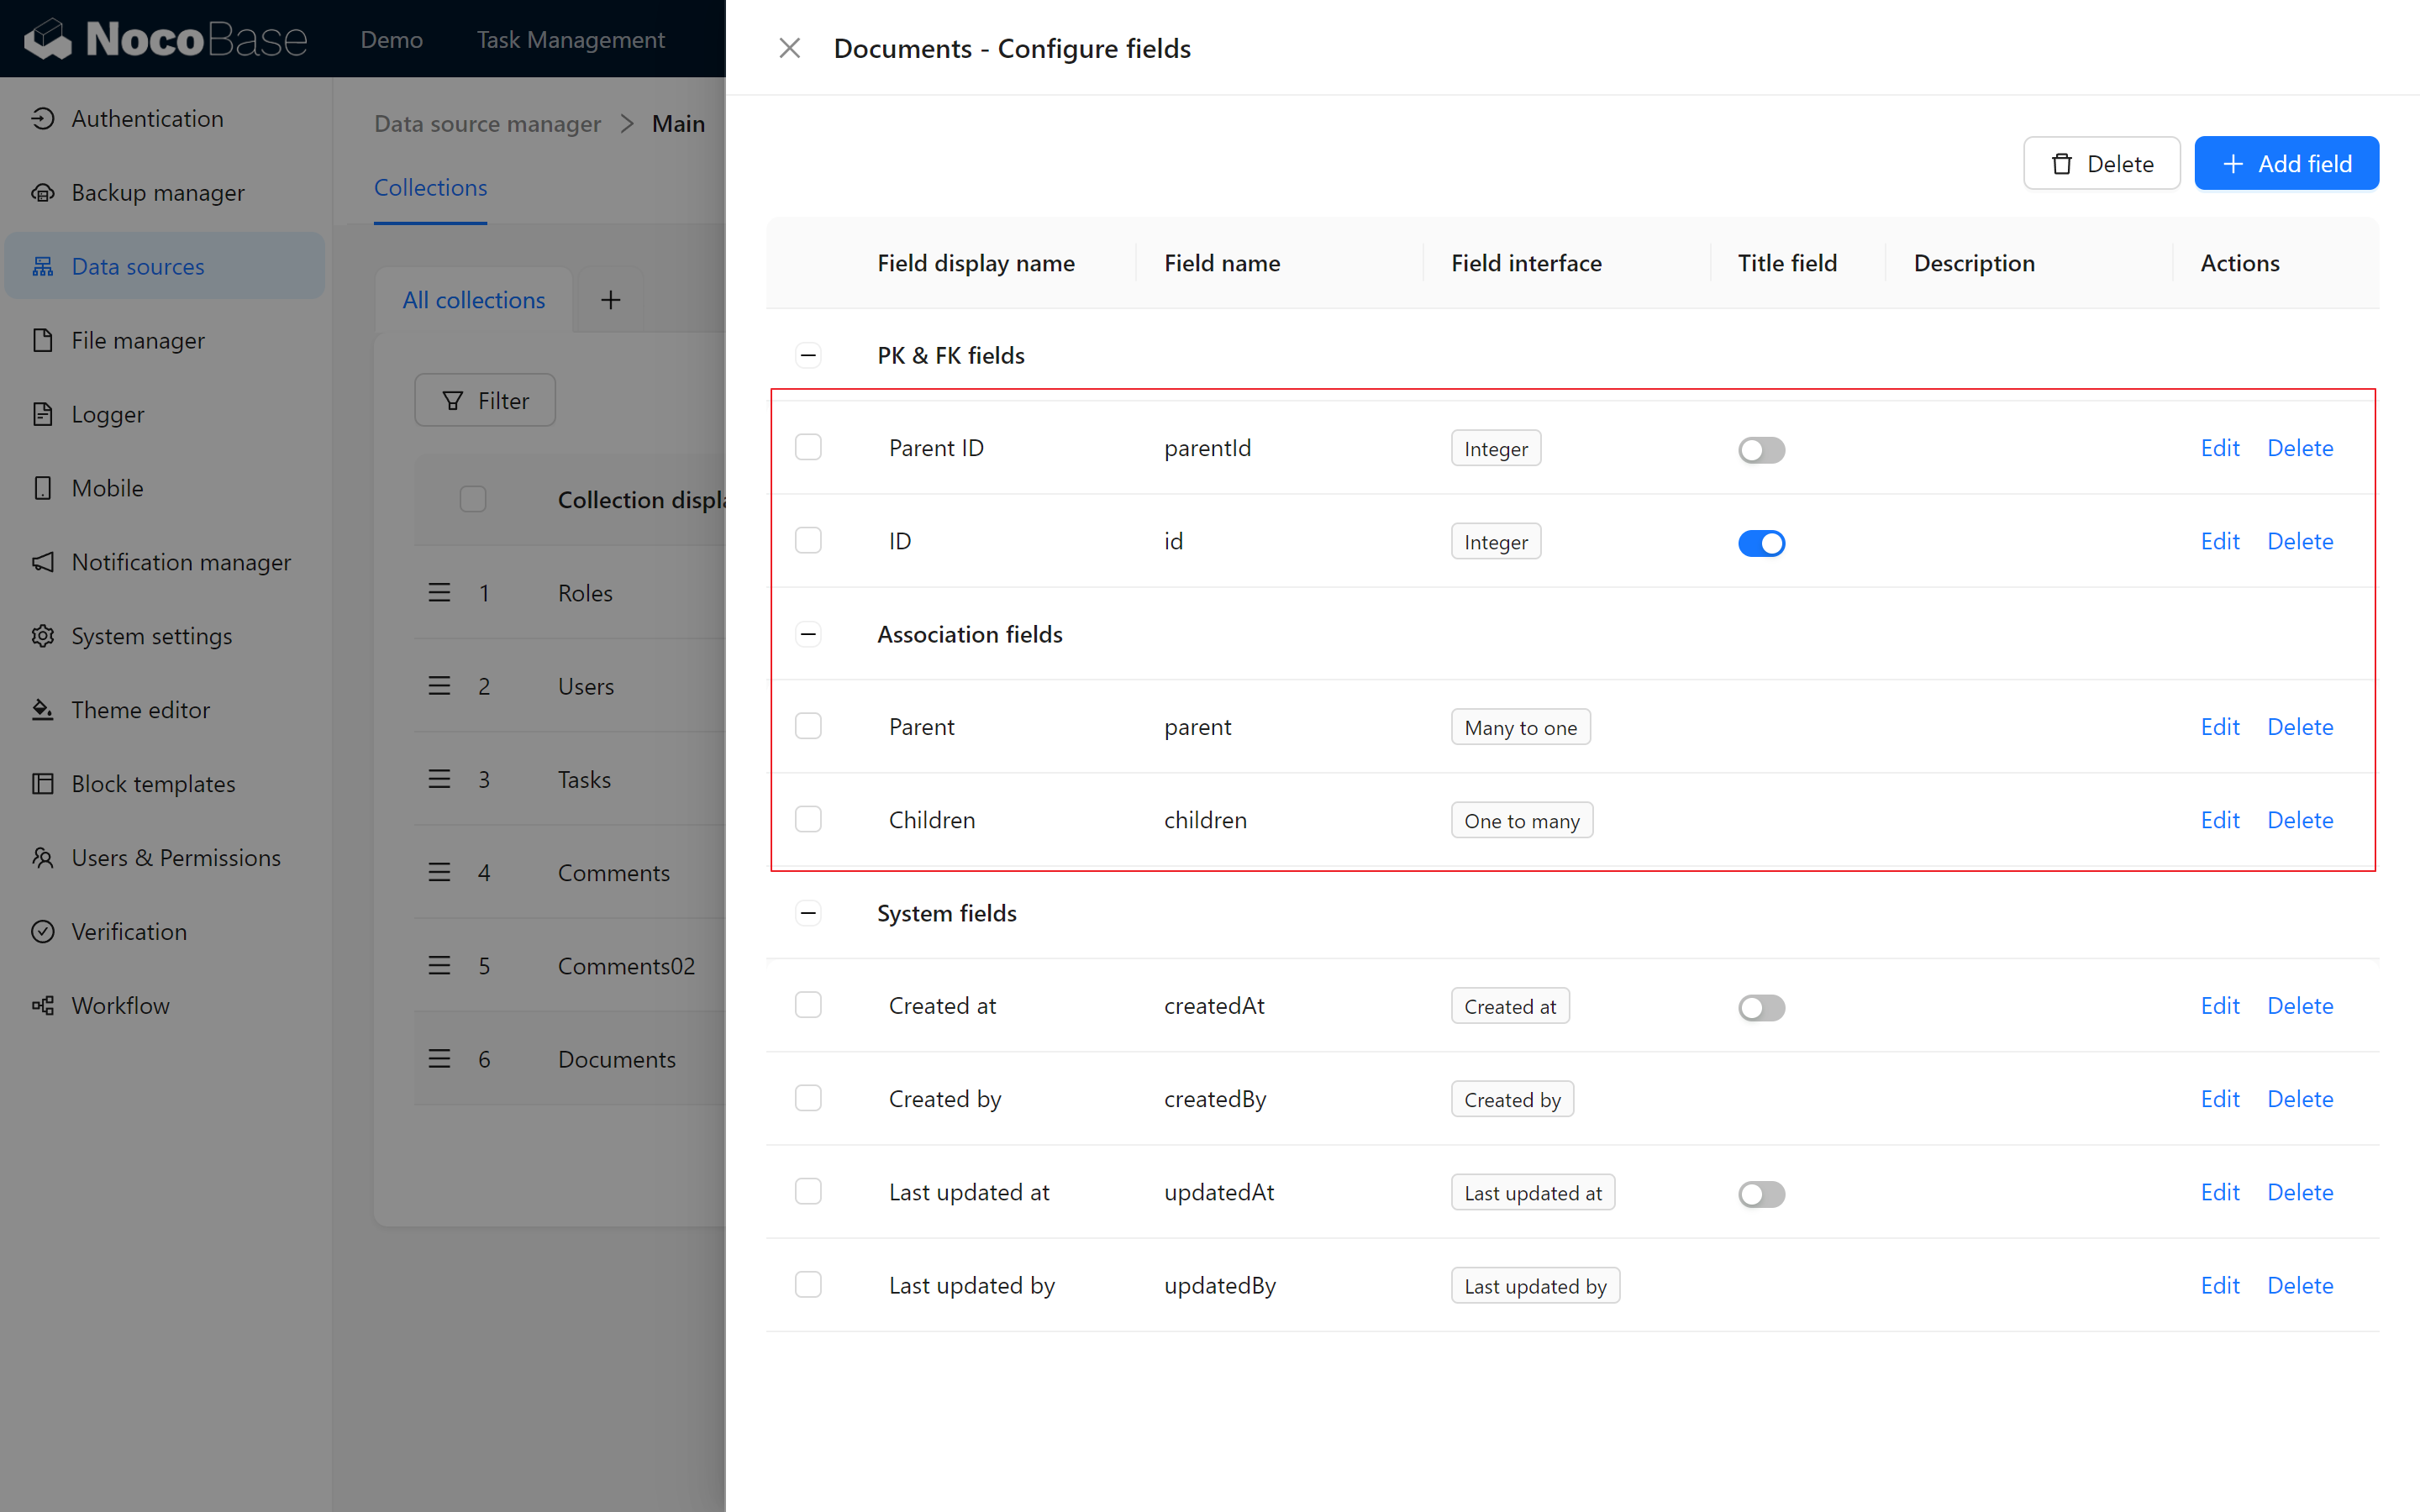
These fields are essential to maintaining the directory hierarchy, so it’s recommended not to alter them.
We’ll also establish an association with the Task Collection (Many-to-One), complete with inverse field, so that document lists can be directly created within the task association popup.
8.3 Creating the Document Management Page
8.3.1 Adding a New Document Management Menu
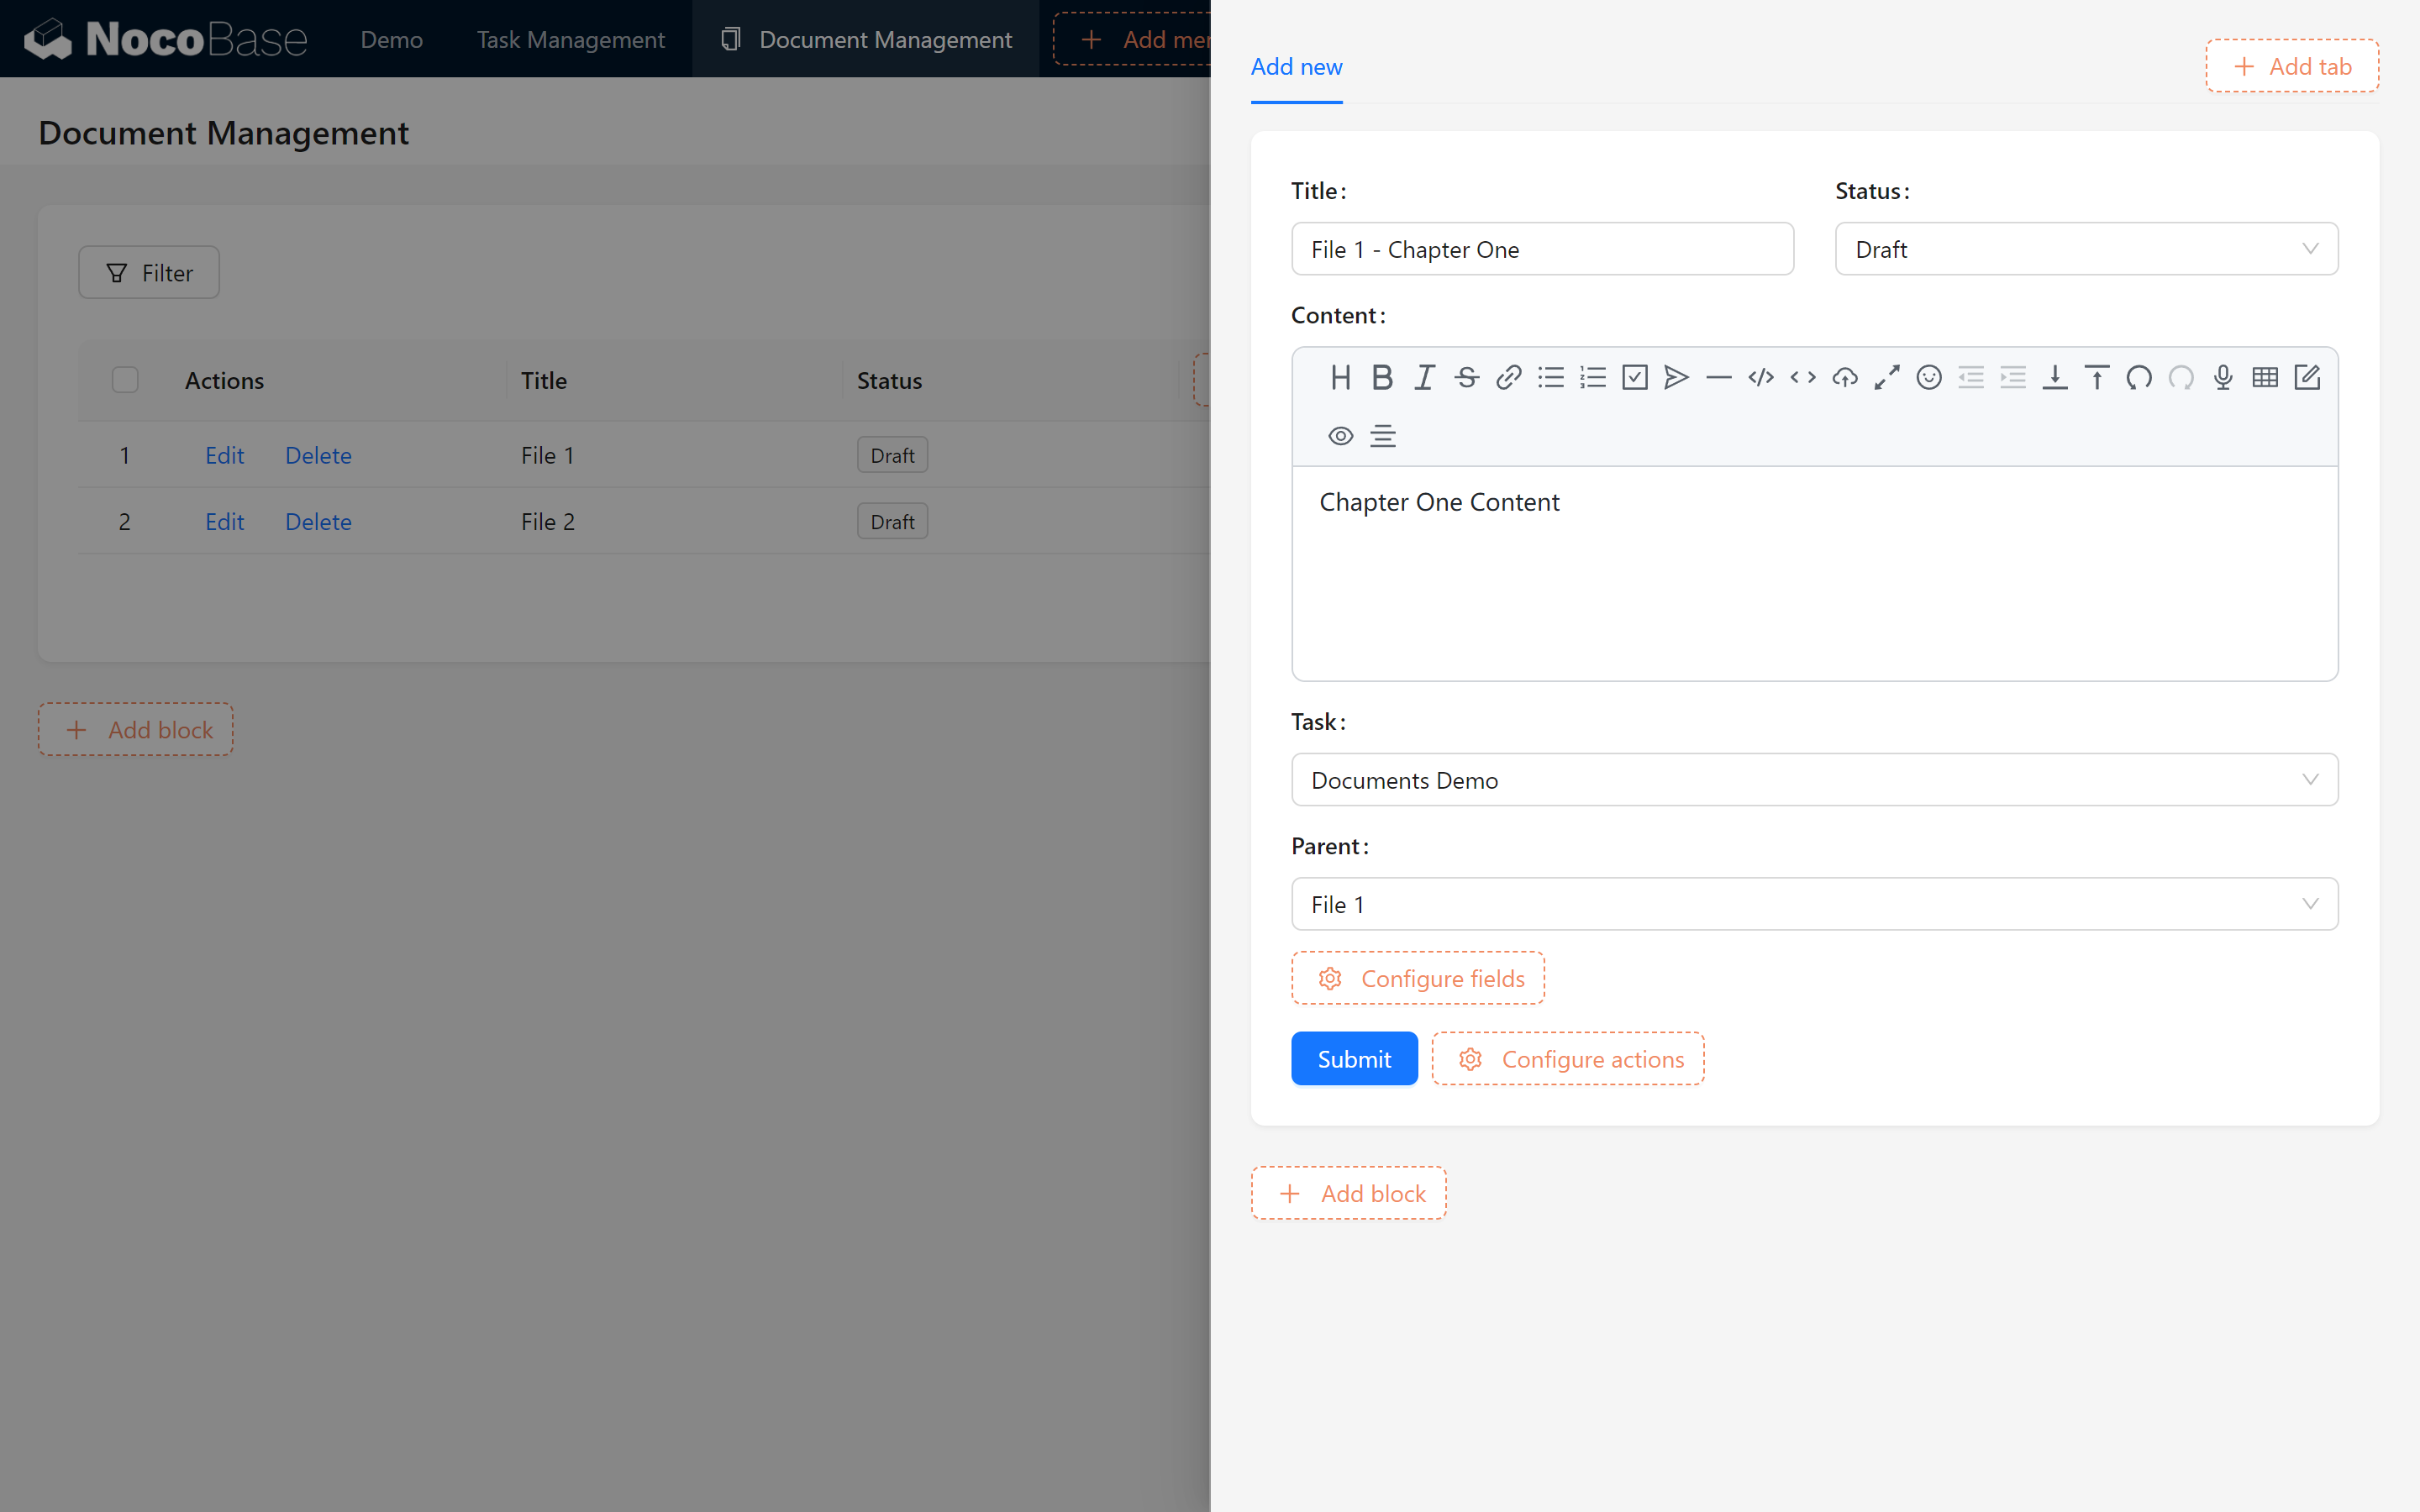
In the main system menu, add a new page—“Document Management”, then select an appropriate icon. Next, create a table block for our Document Collection, enabling basic actions like Add, Delete, Edit, and Search, and input test data to validate the design of the data collection.
Exercise
- Add a parent document named “Document 1” on the Document Management page.
- Under “Document 1,” add a child document named “Chapter 1.”
8.3.2 Converting to a Tree Table View
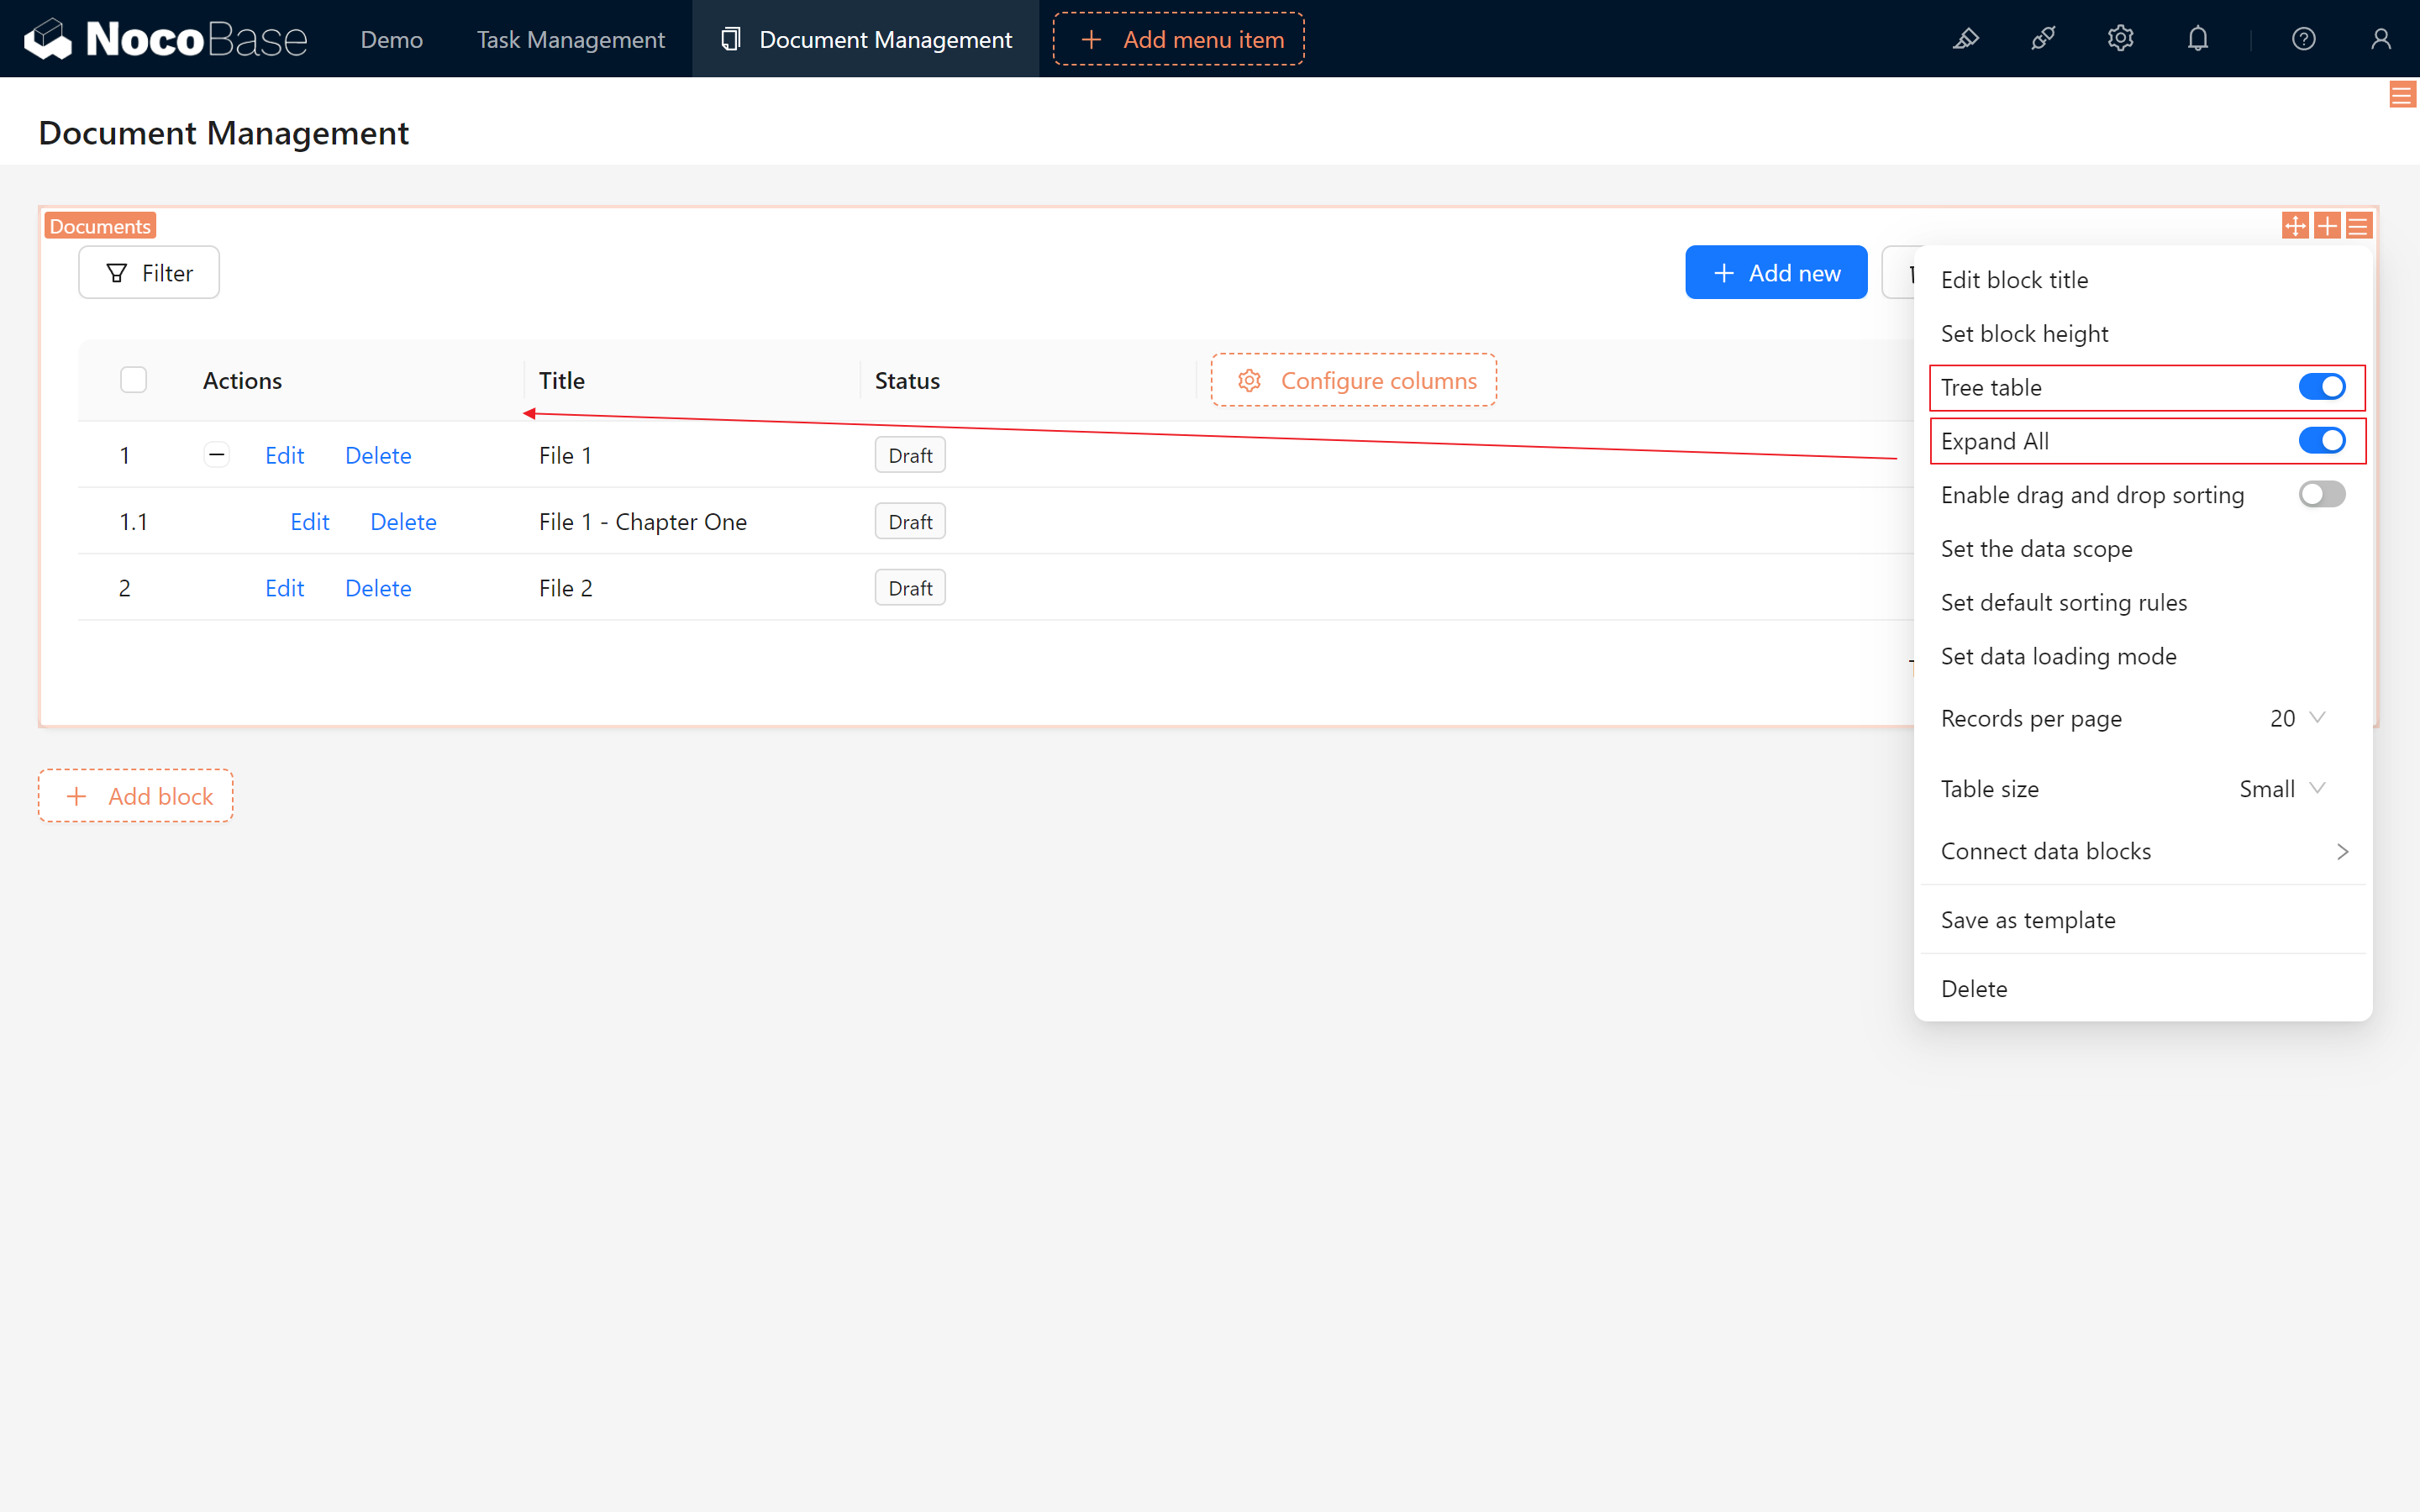
I know you’re probably wondering why it’s not a catalog tree structure.
By default, the table block displays as a regular table. Here’s how to convert it to a tree table view:
-
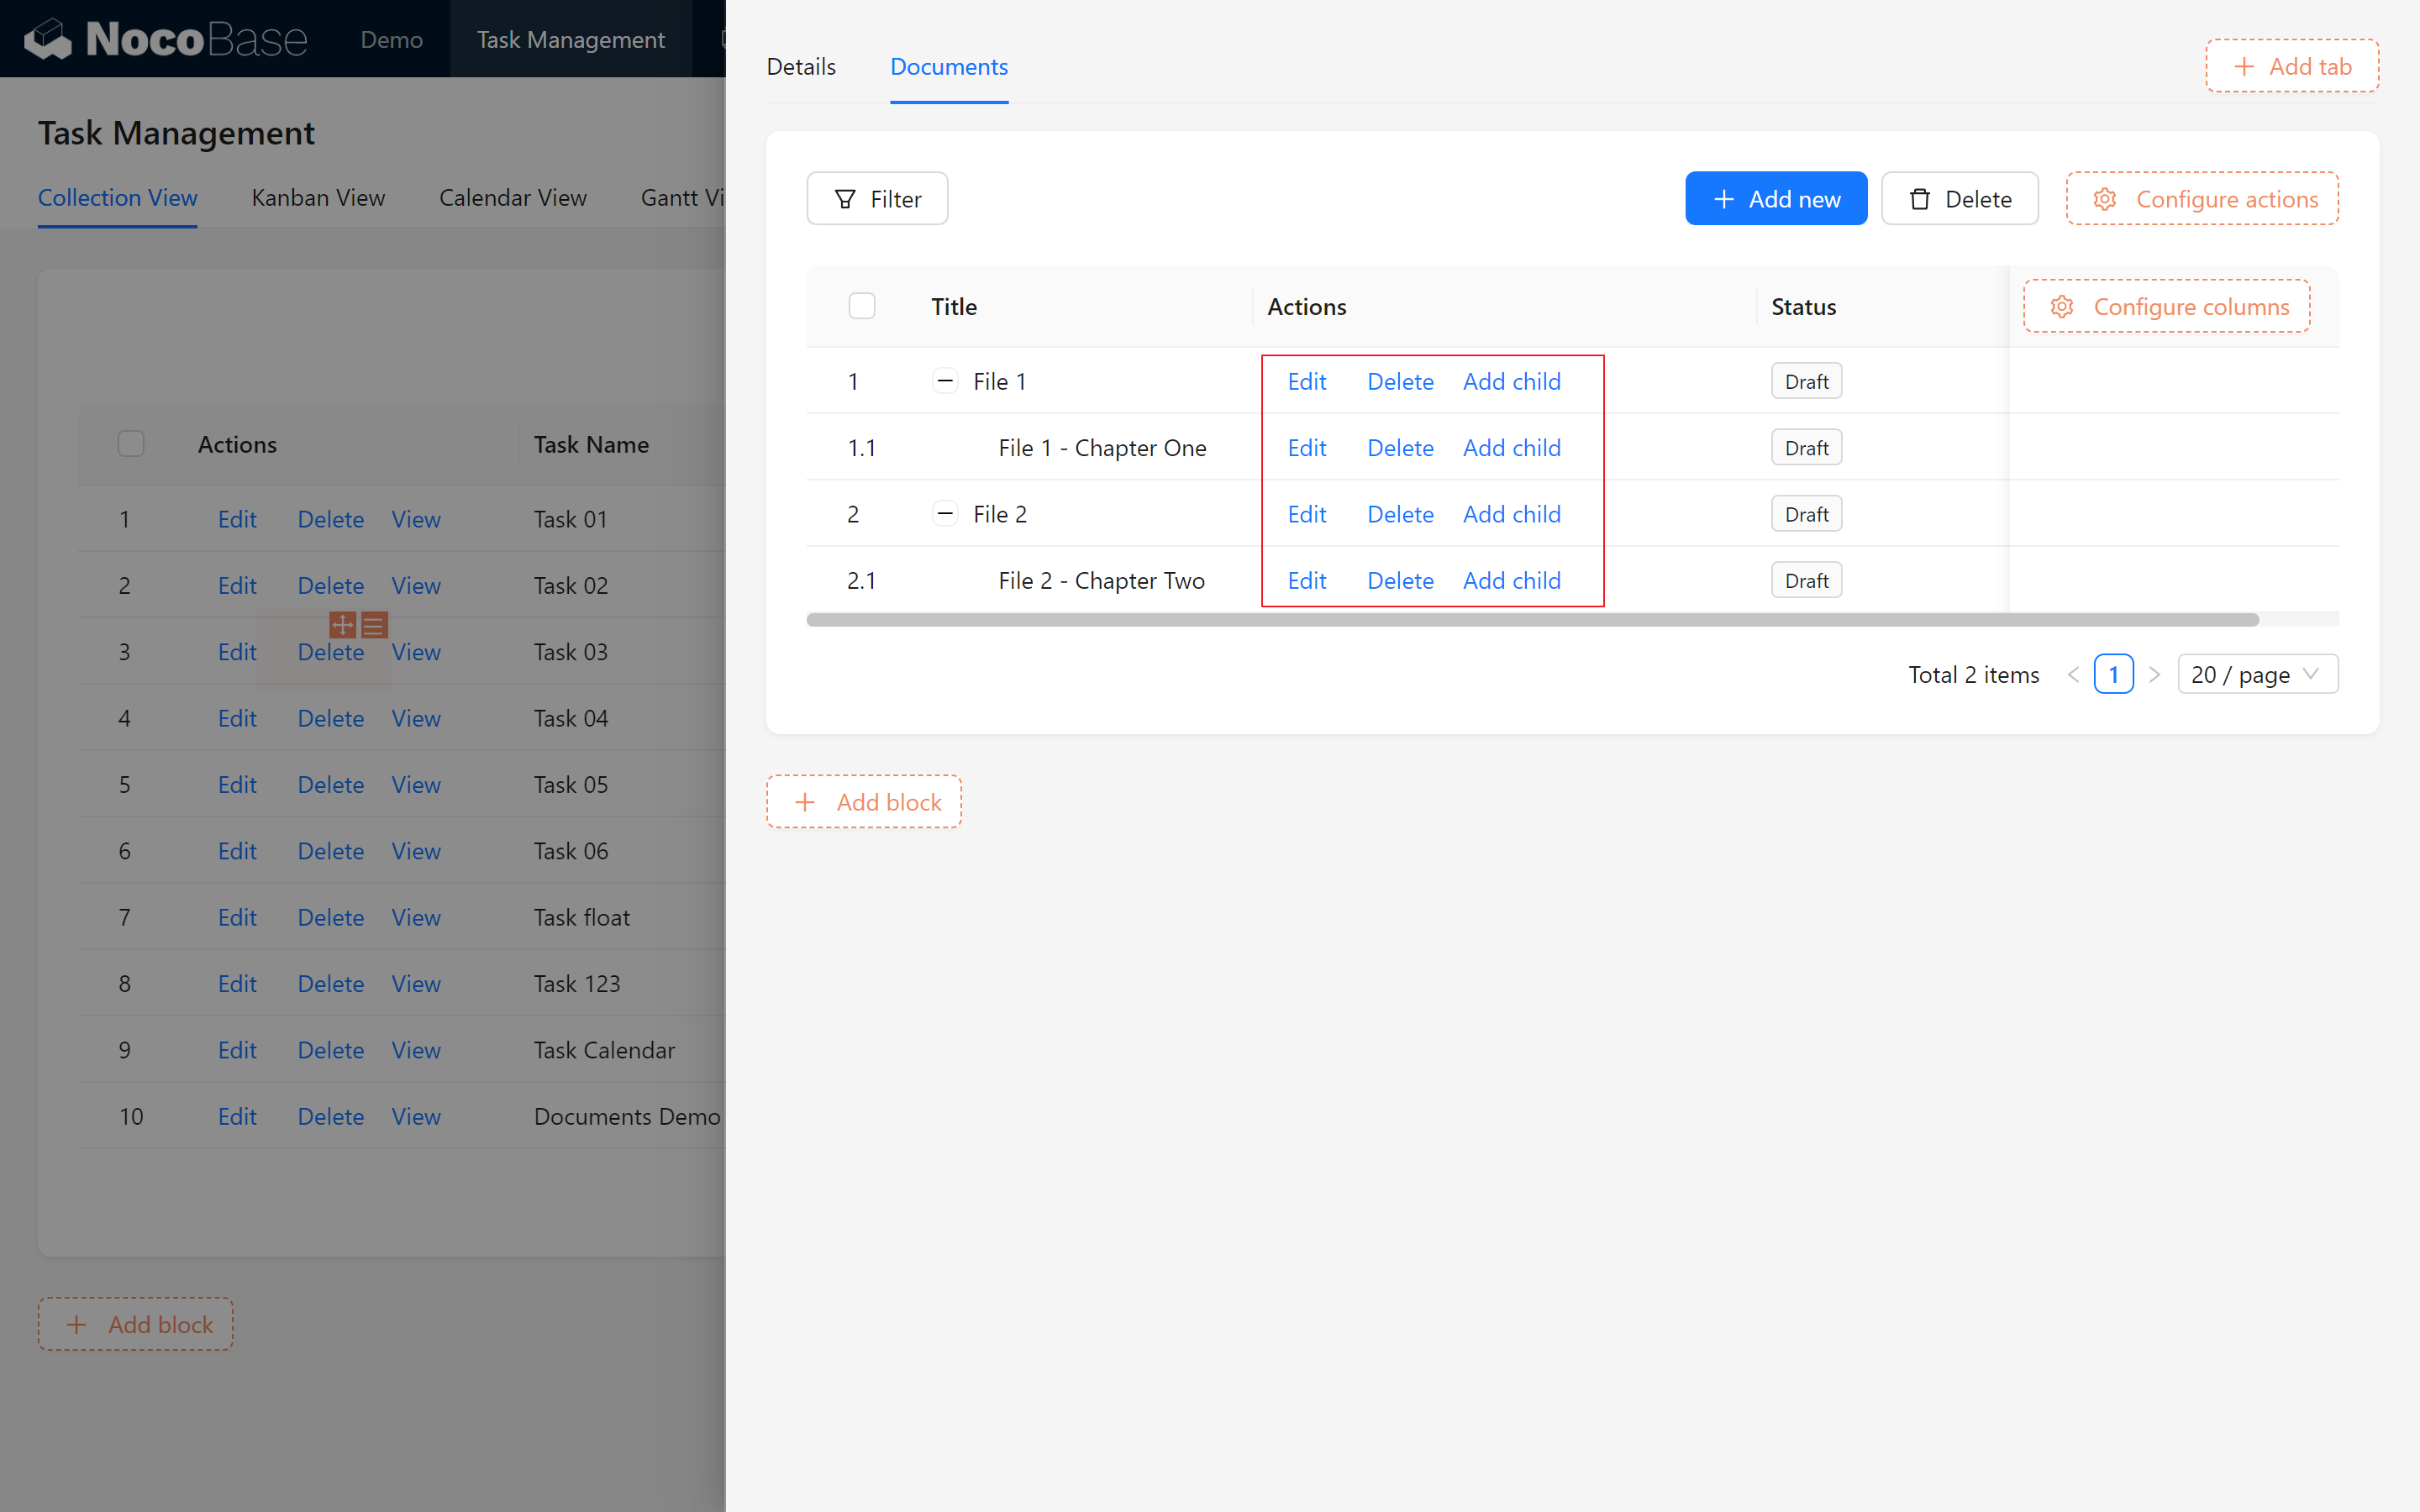
Click on the top right corner of the table block > Tree Table.
You will notice that the moment you select it, a “Expand All” toggle appears below the Tree Table.
At the same time, the previously created “Chapter One” disappears.
-
Click on the “Expand All” option below the Tree Table to activate it.
Now, we can see the parent-child structure of the document displayed more intuitively, allowing us to easily view and expand all document levels.
Let’s proceed with the “Add Sub-record” action.
Tree table conversion complete!

8.3.3 Configuring “Add Child Record”
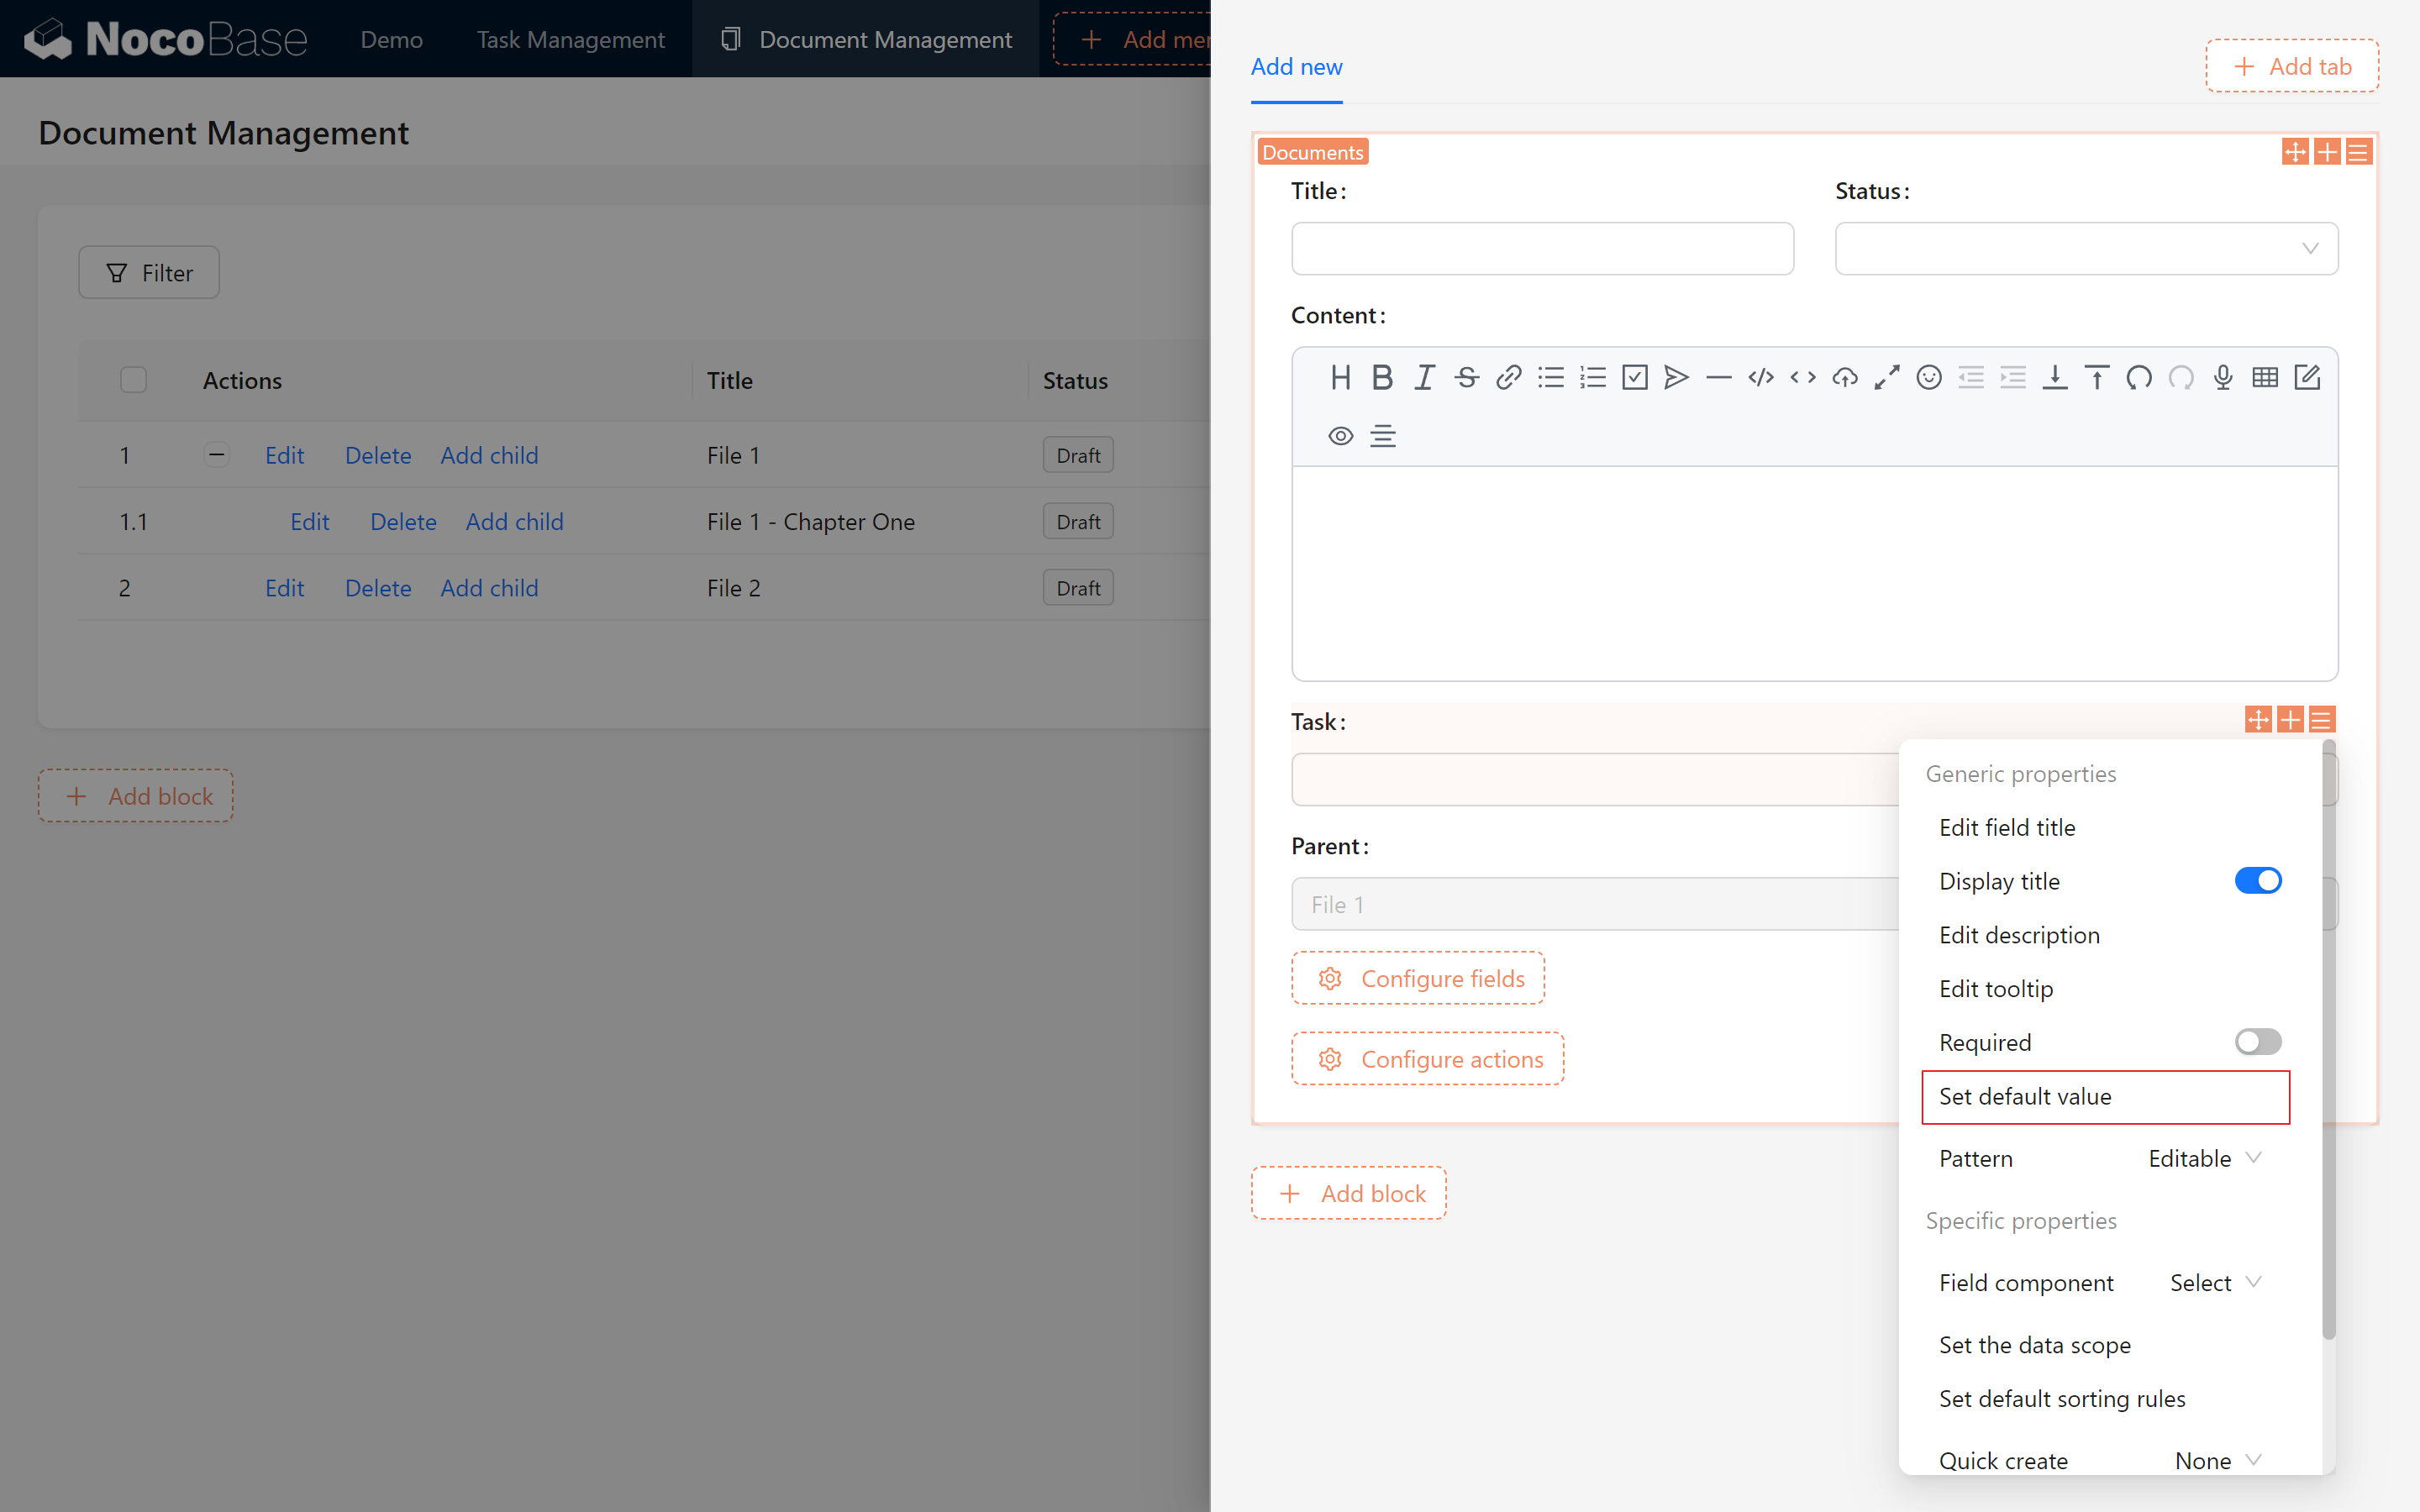
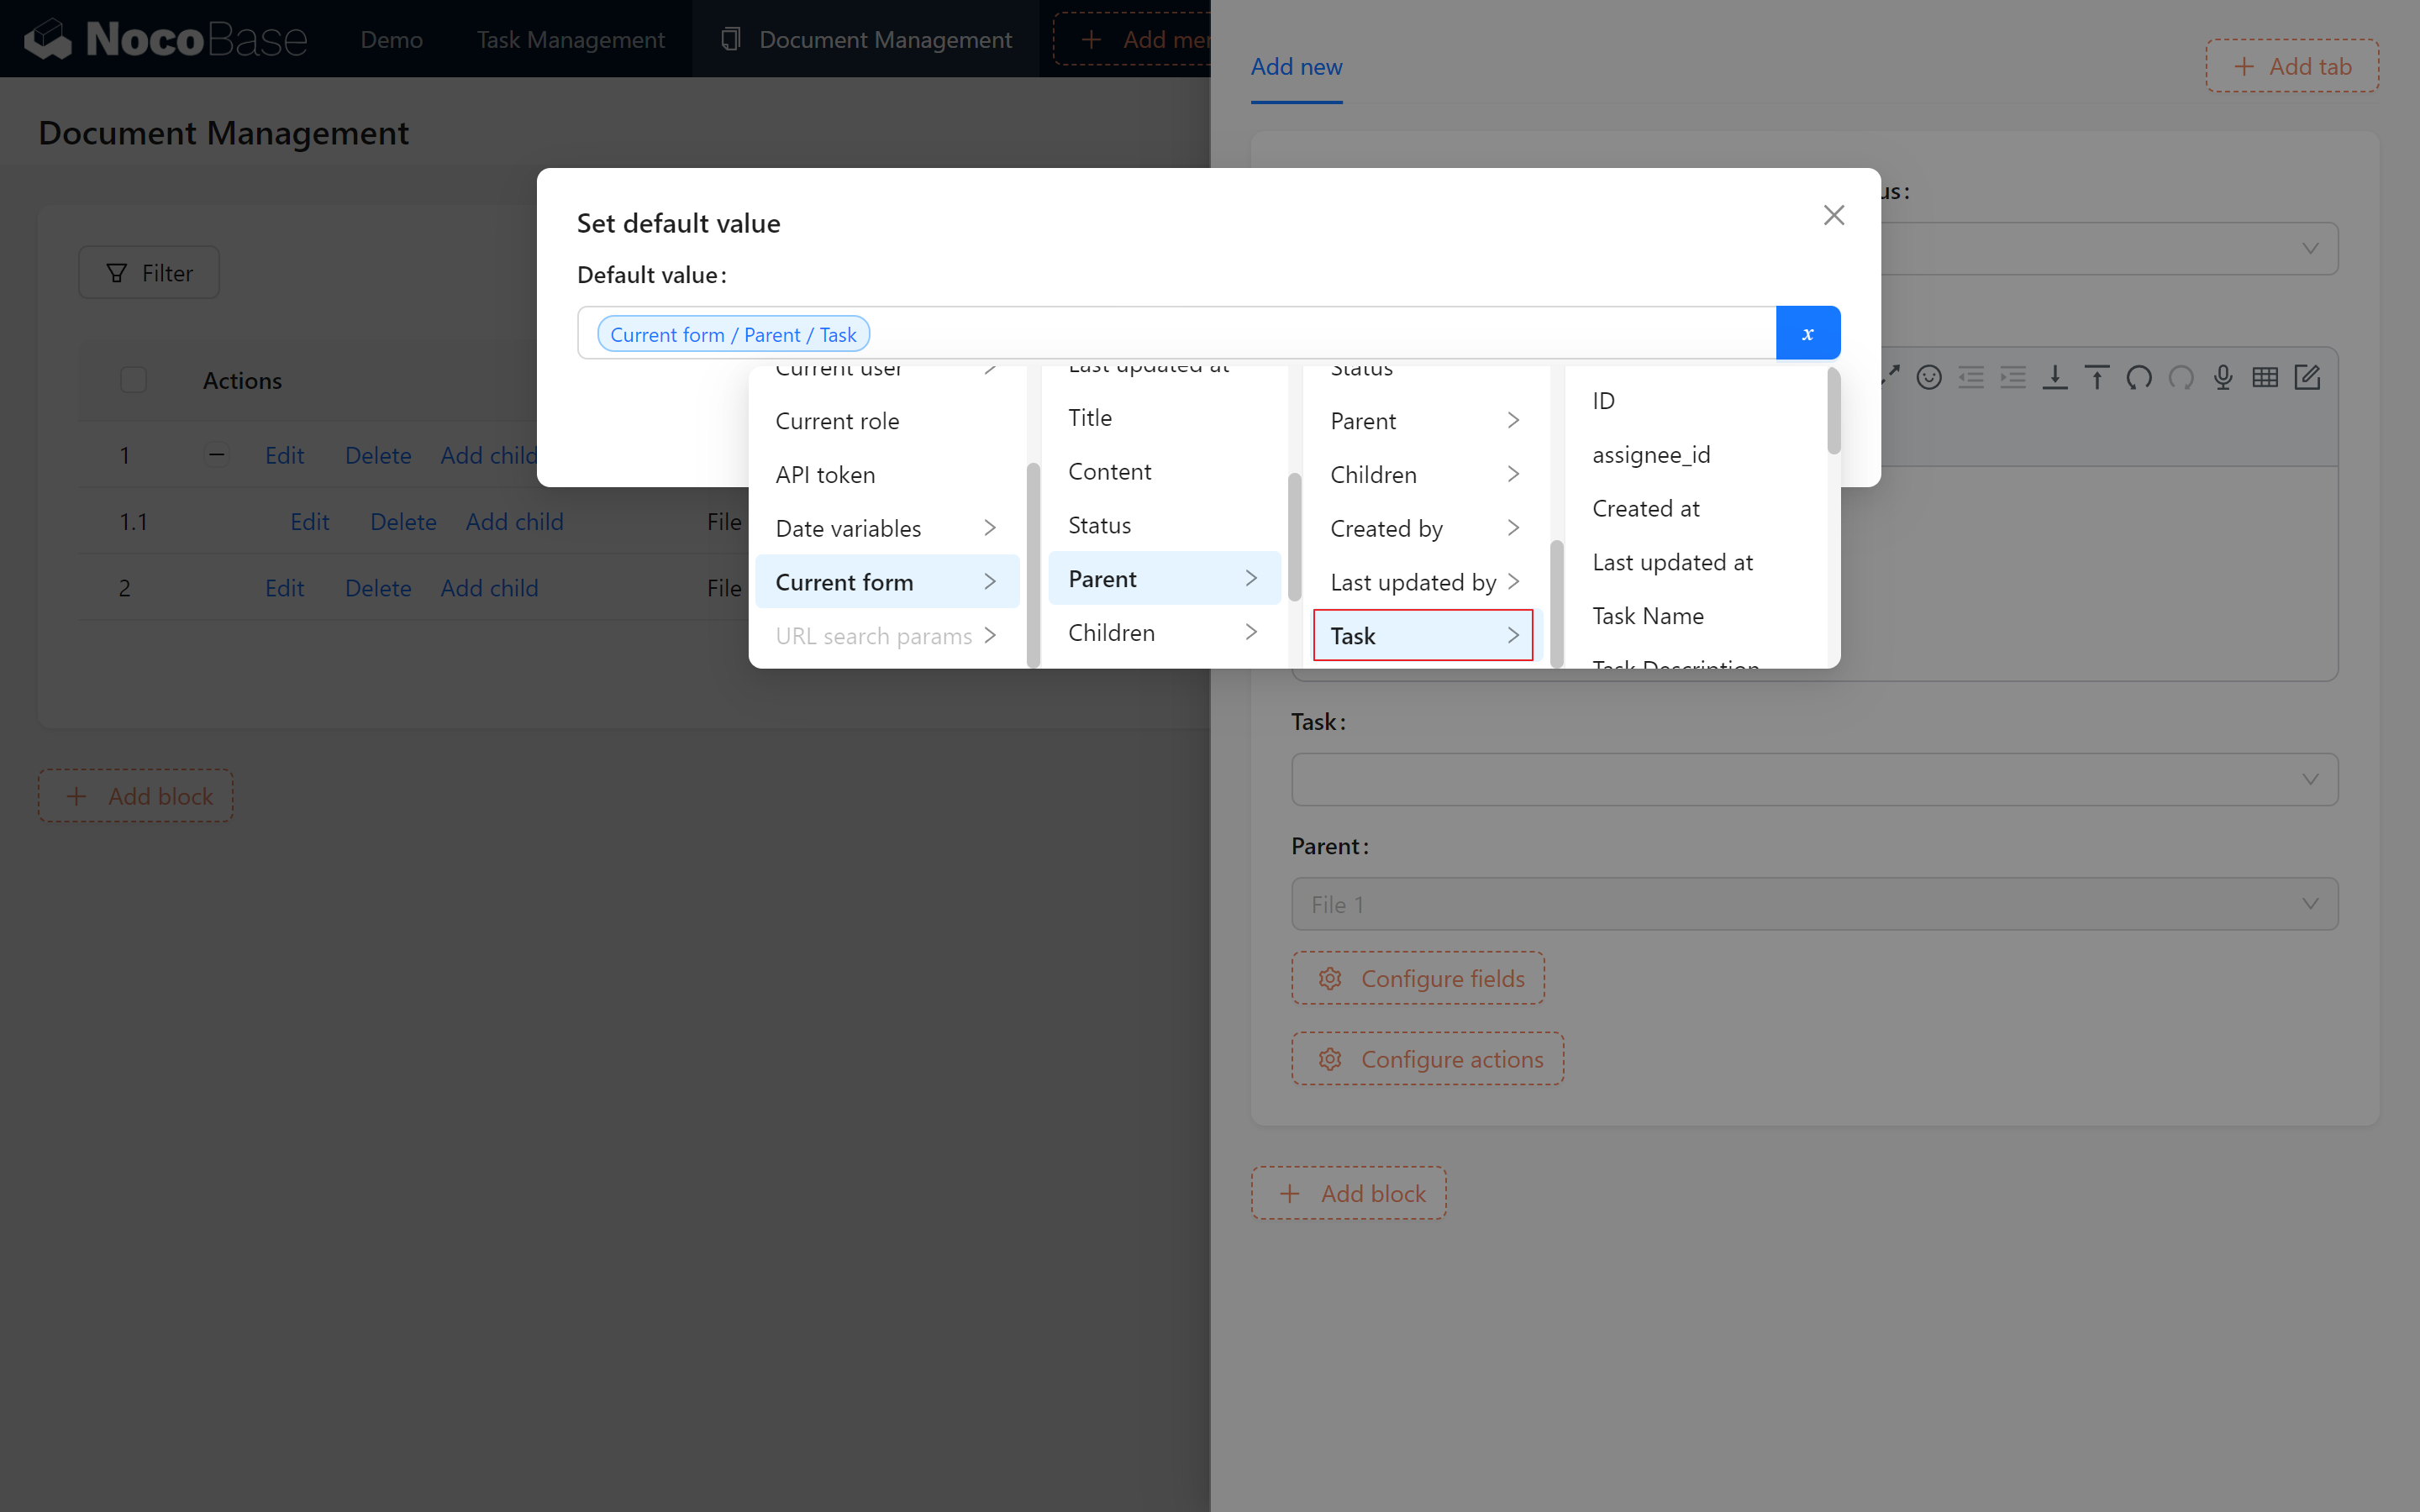
To add child records, we’ll configure the necessary elements. When the Parent Record field is selected, it defaults to “read-only” as new entries are created within the current document directory.
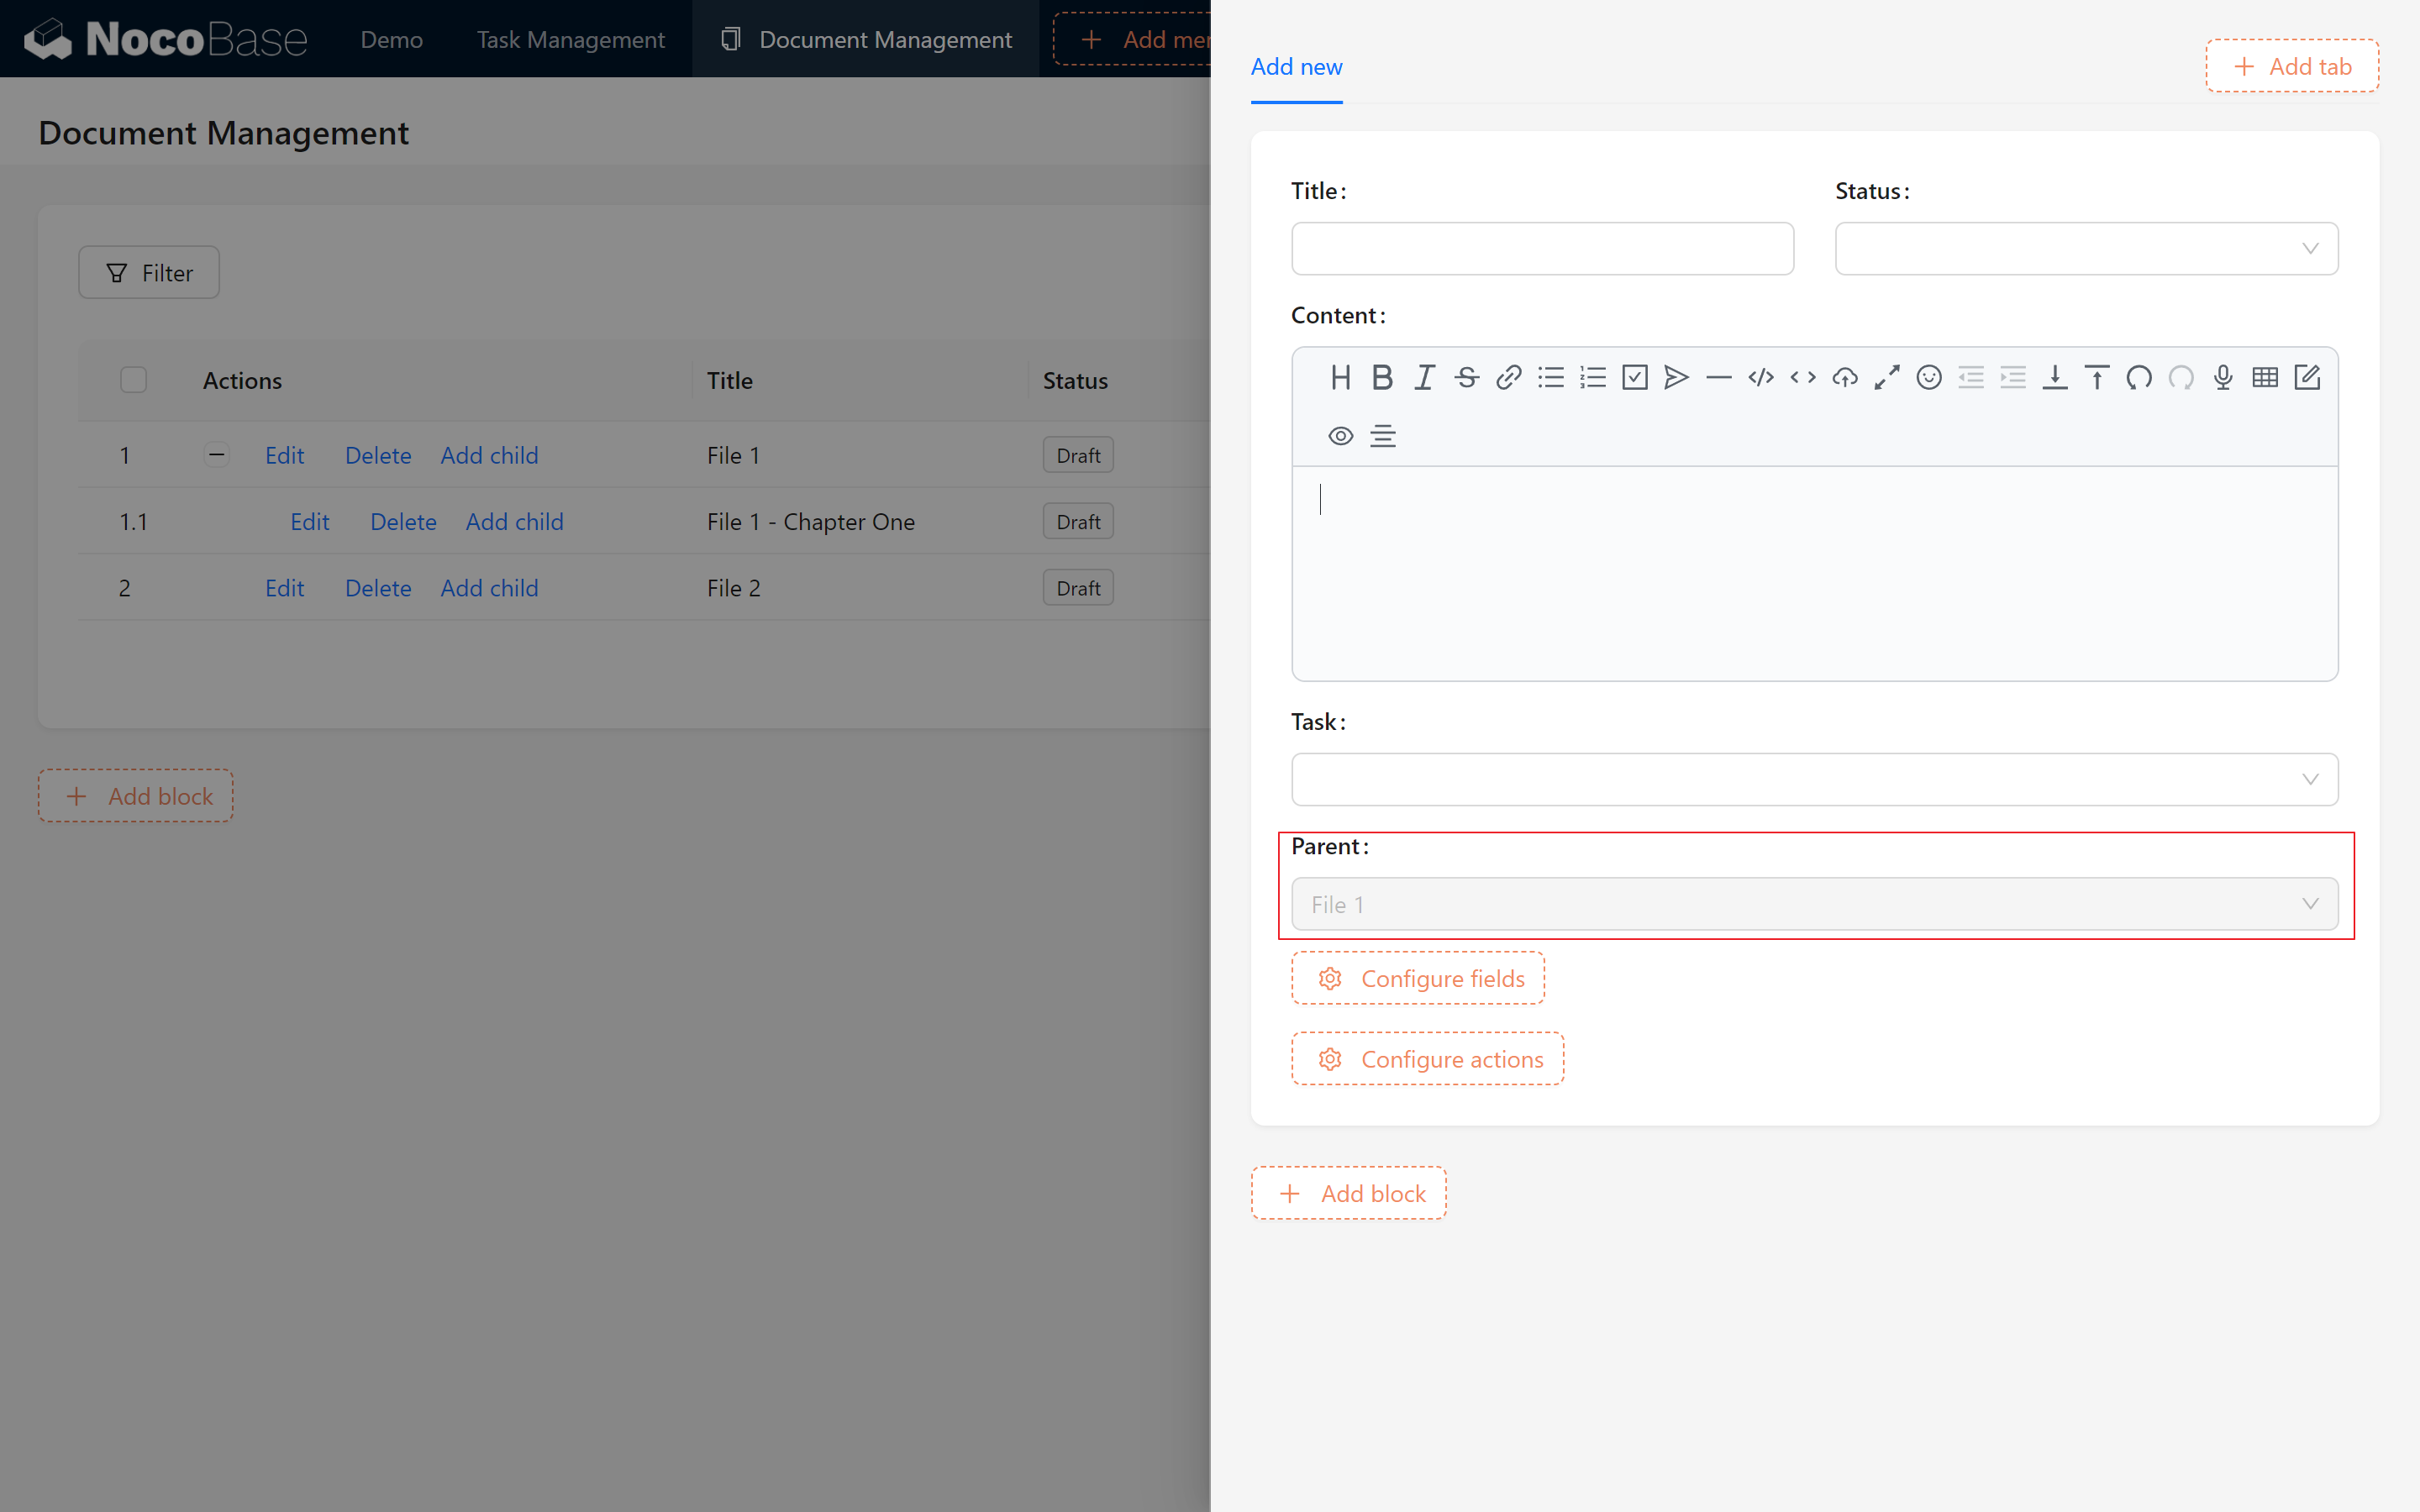
If there is too much task data, you might find it particularly troublesome to assign related tasks. We can set a default value for task filtering, making it equal to the tasks associated with the parent record.
The default value may not take effect immediately, let’s close and click again to see that it has been auto-filled~!
8.4 Configuring Form Templates and Task Associations
8.4.1 Creating Table and Form Templates
To ease future management, save the Document Table along with its create/edit forms as templates for reuse on other pages.

8.4.2 Displaying a Copied Document Table
In the Task view popup, add a new tab titled “Documents.” Within this tab, add a form block > Other Records > Documents > “Copy Template” > and import the previously created document table template. (Ensure you select Copy Template).

This method streamlines document list creation.
8.4.3 Adjusting Task Associations
Since we copied an external table template, it’s not yet linked with the Task Collection. You might notice it displays all document data, which isn’t ideal.
This situation is quite common. If we have not created a corresponding relationship field but still need to display related data, we must manually link the two. (Note: We use a copy of the template, not a reference template; otherwise, all changes we make will synchronize with other tables block!)
- Data Display Association
We click on the top right corner of the table block and Set the data scope” to:
【Task/ID】= 【Current Popup Record/ID】
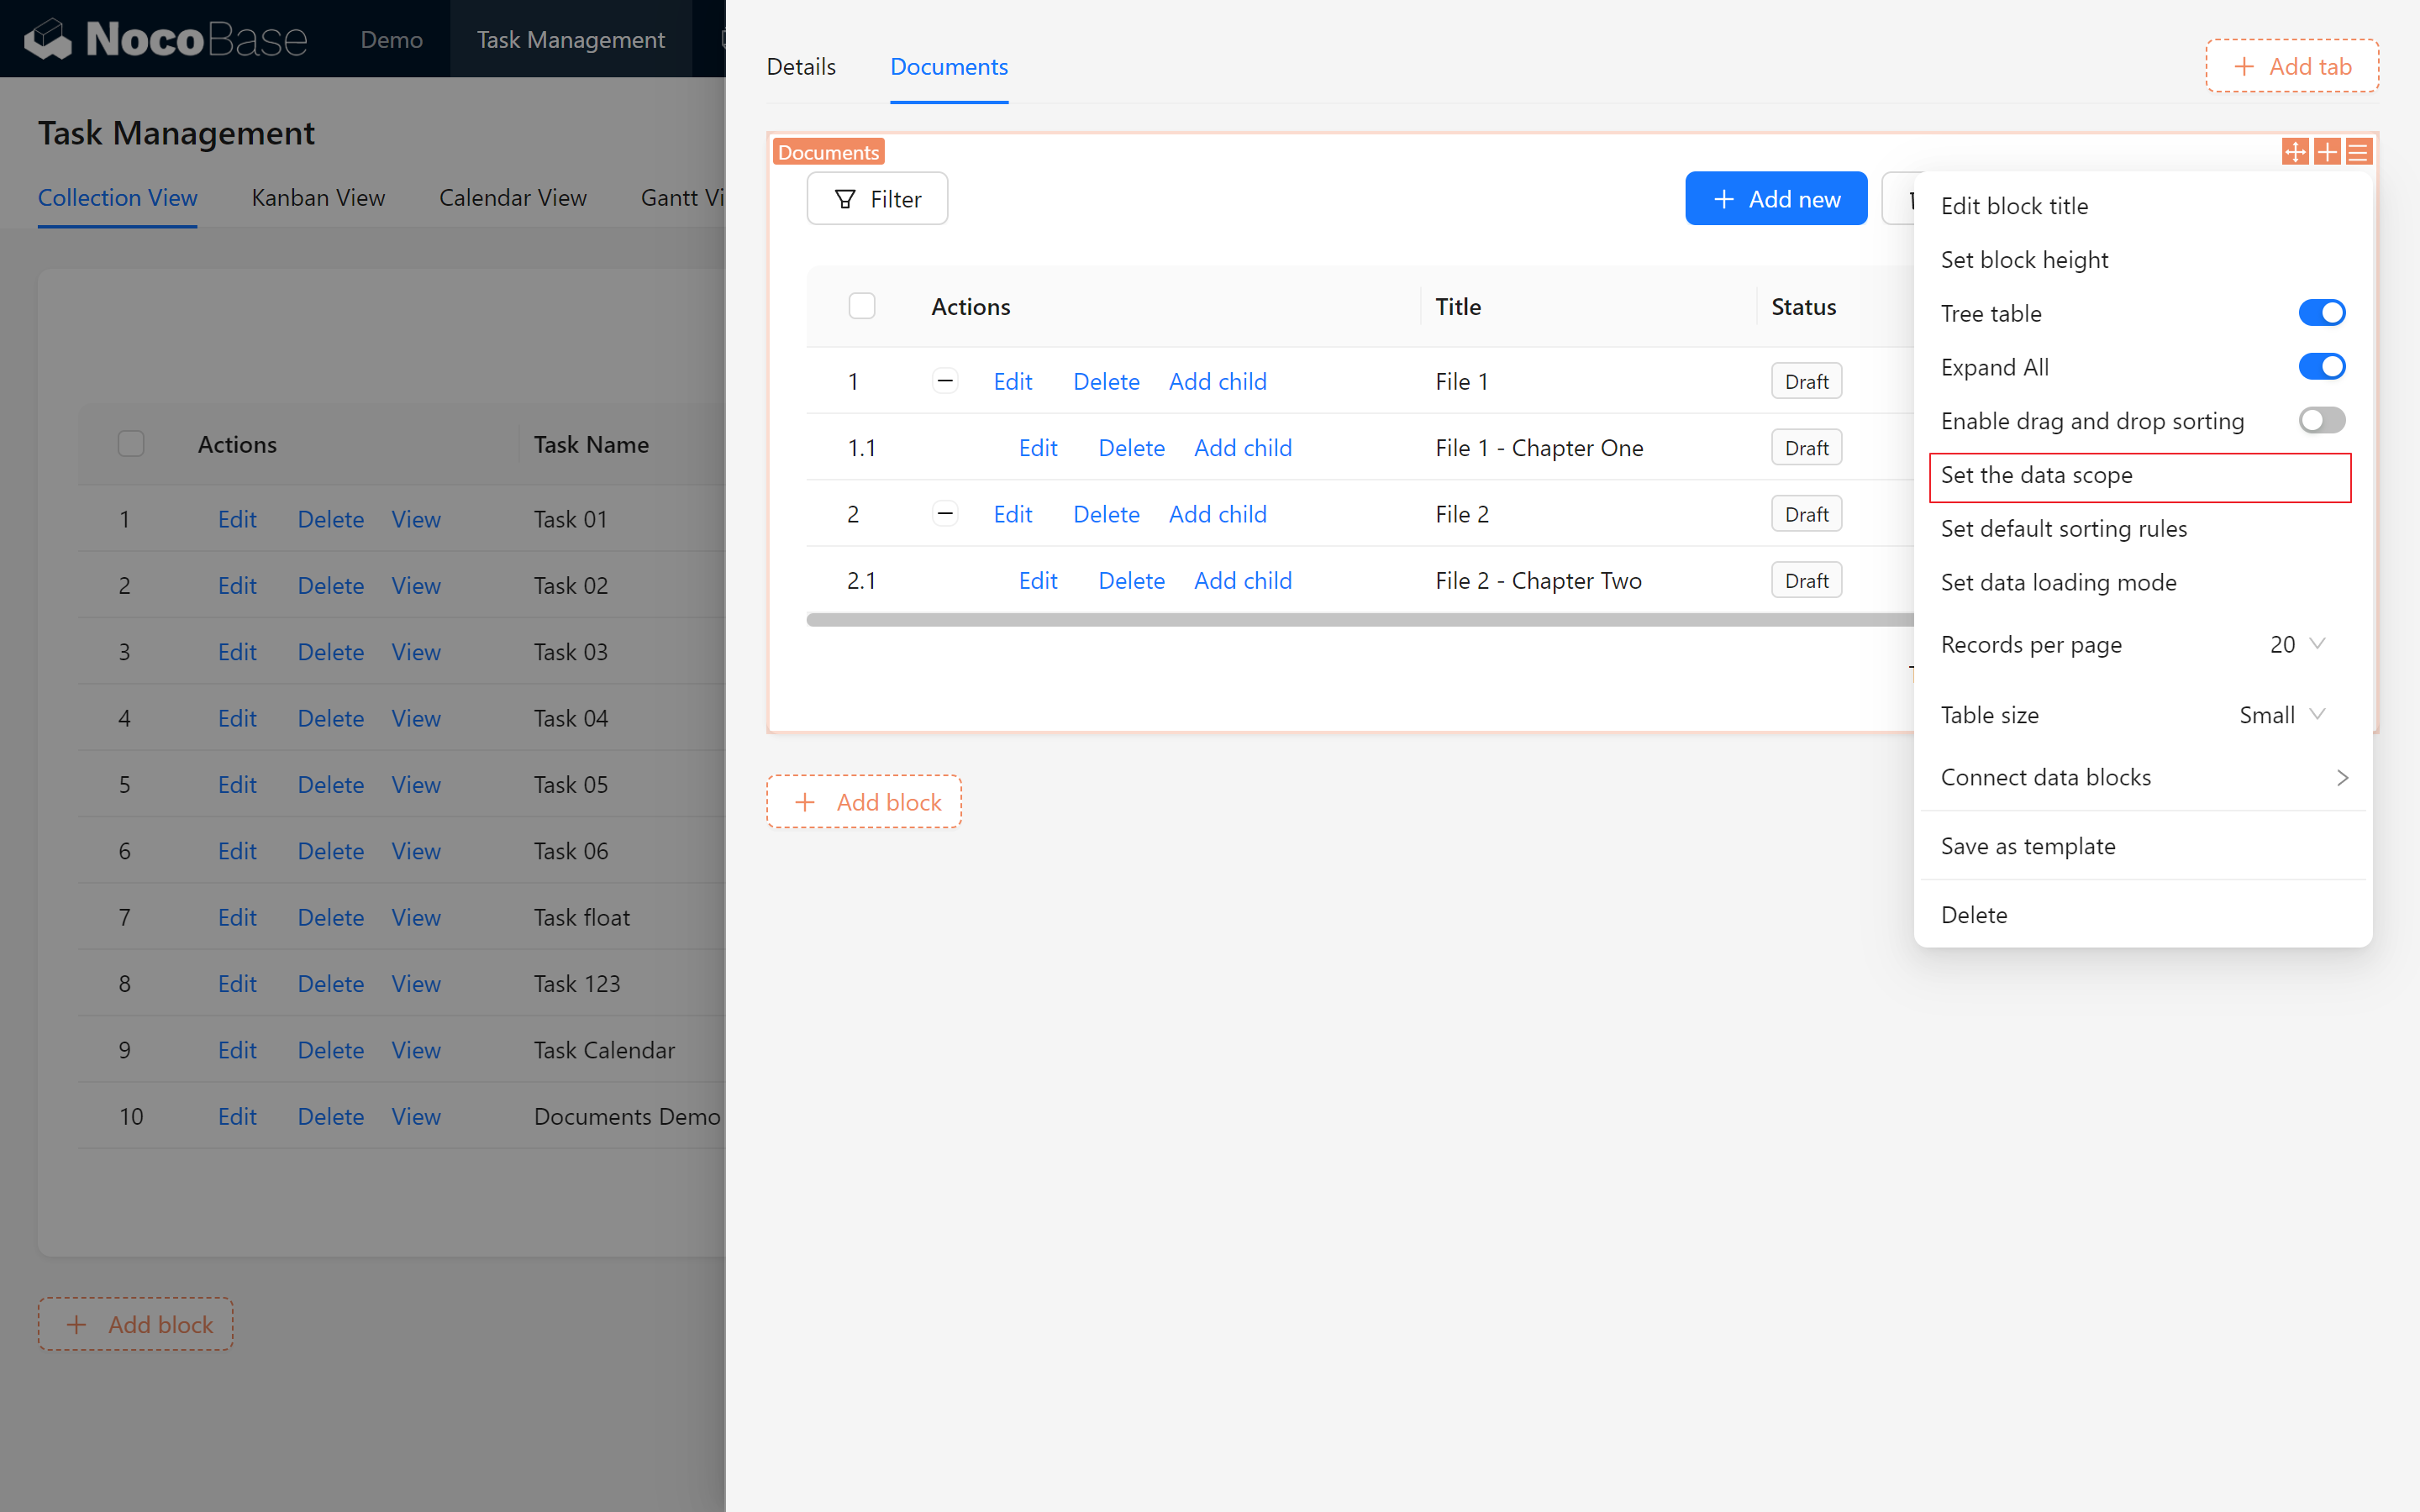
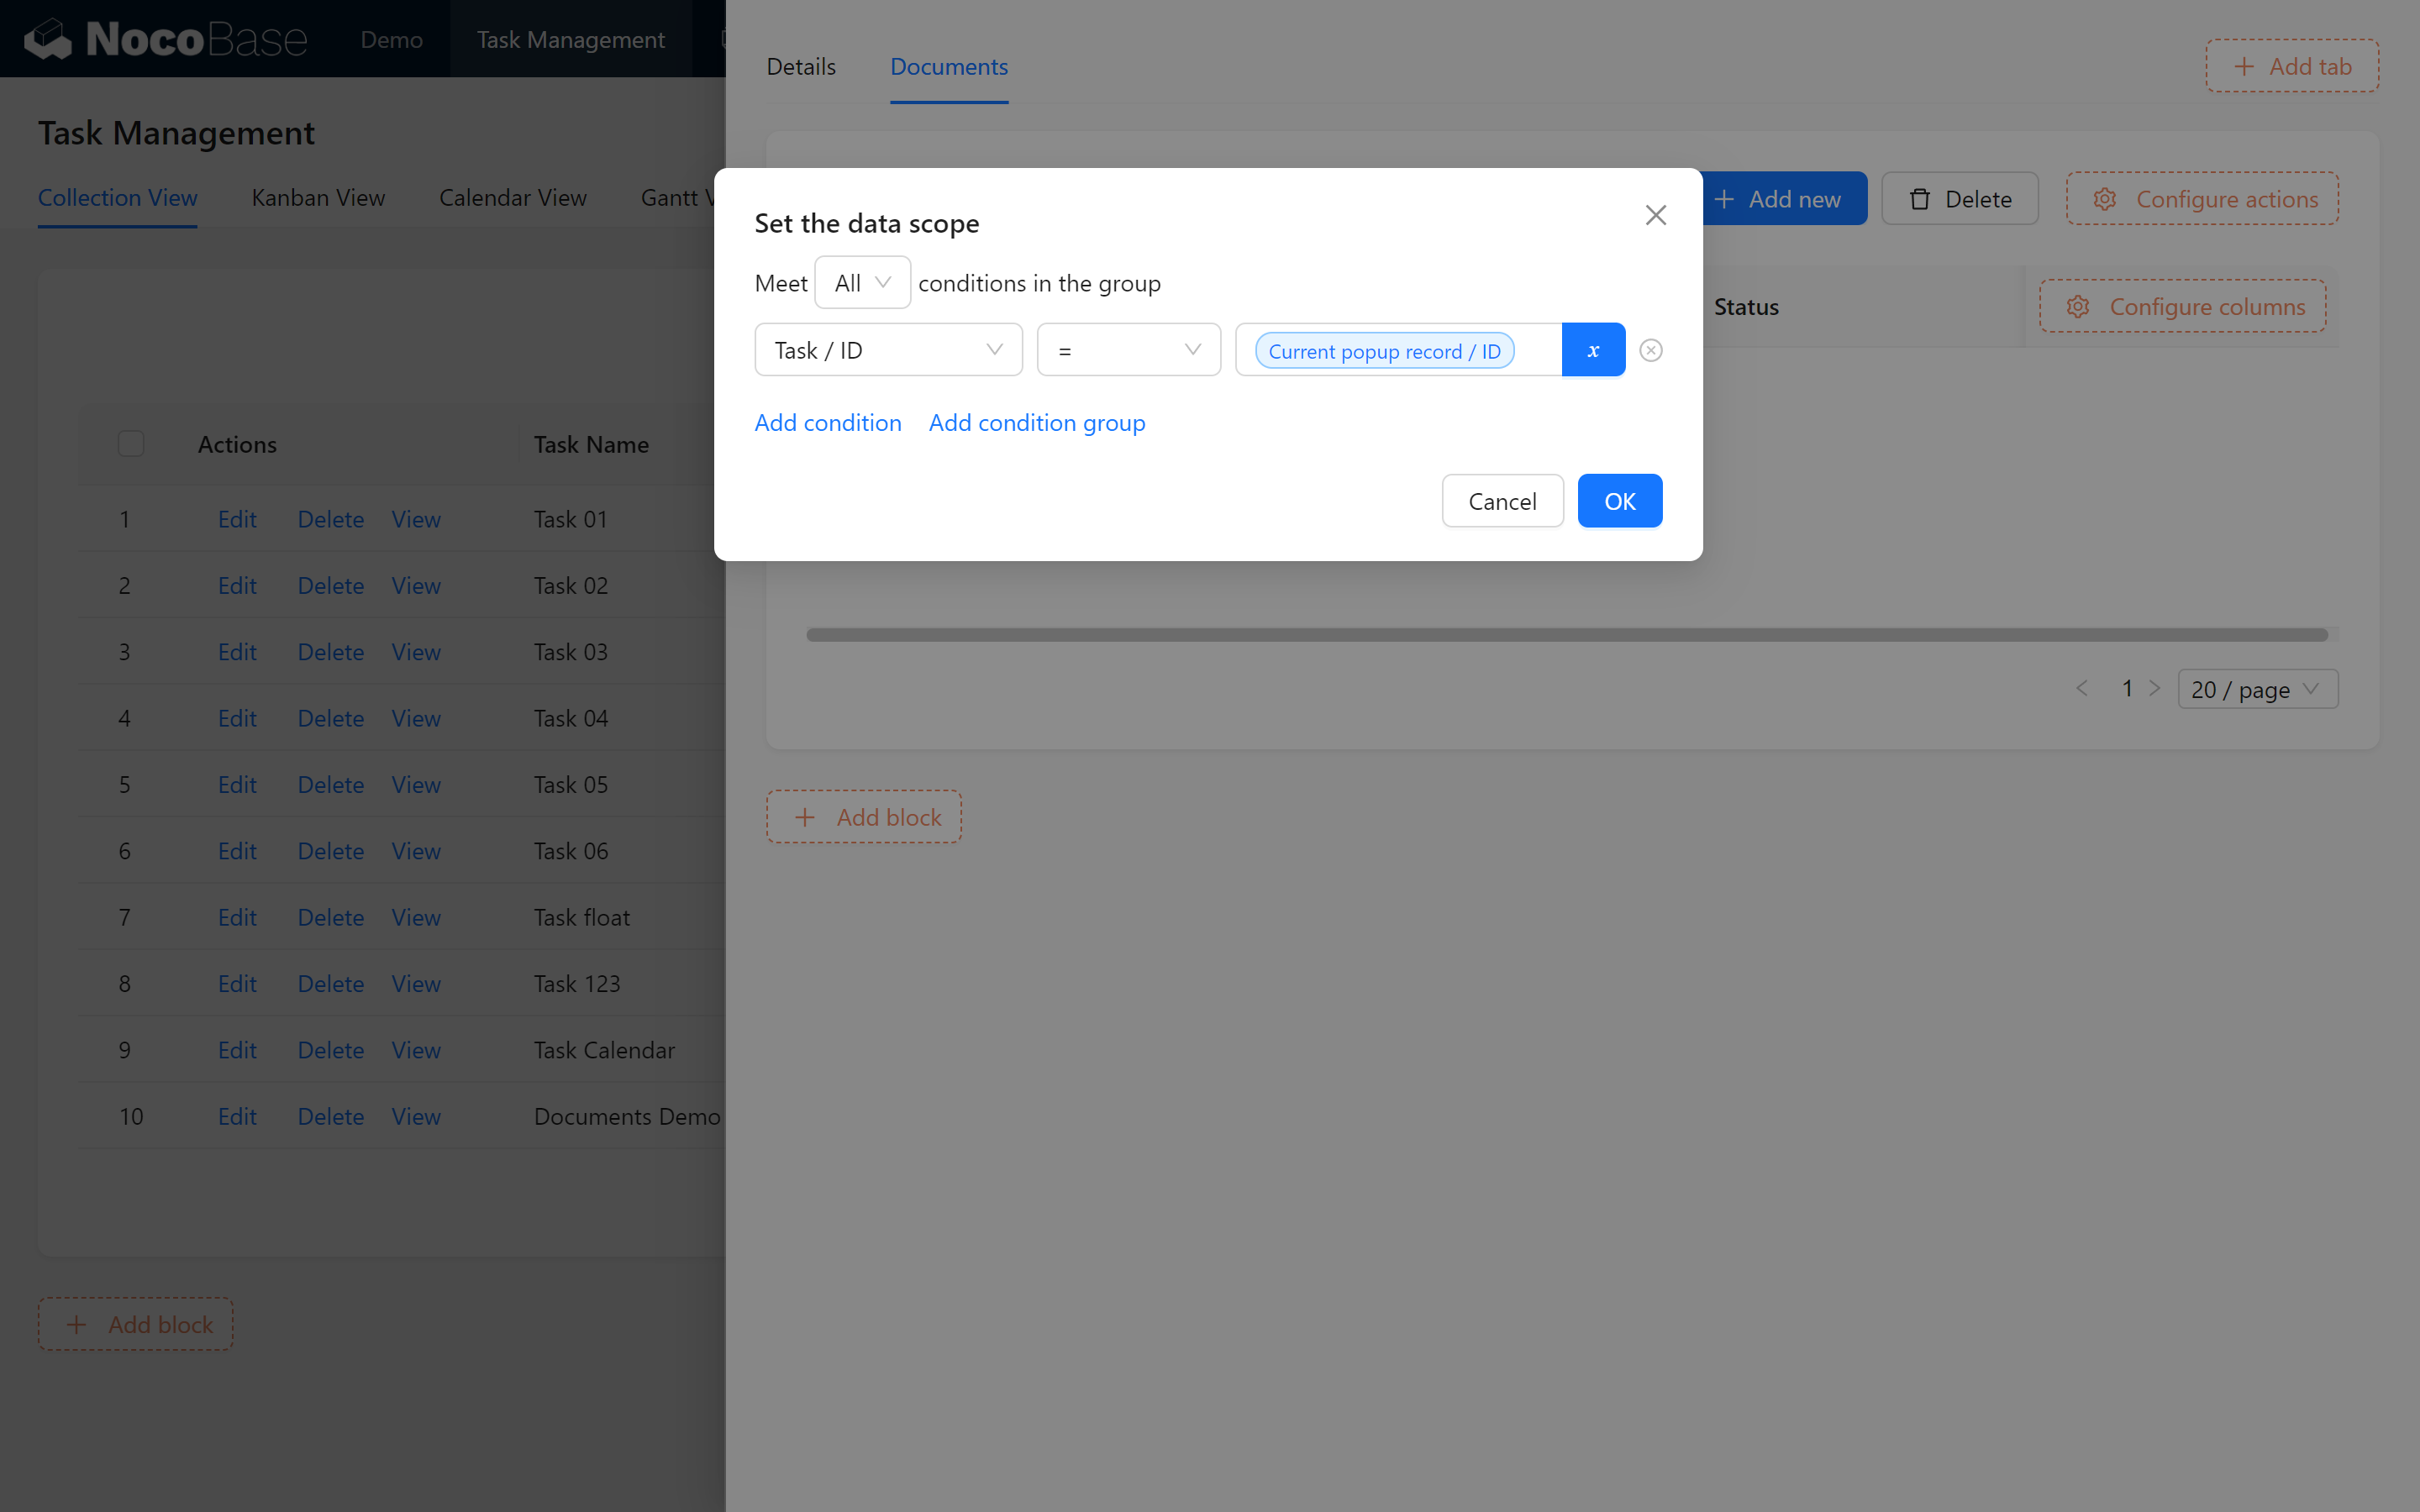
Successfully, the documents retained within the table are those associated with our task.
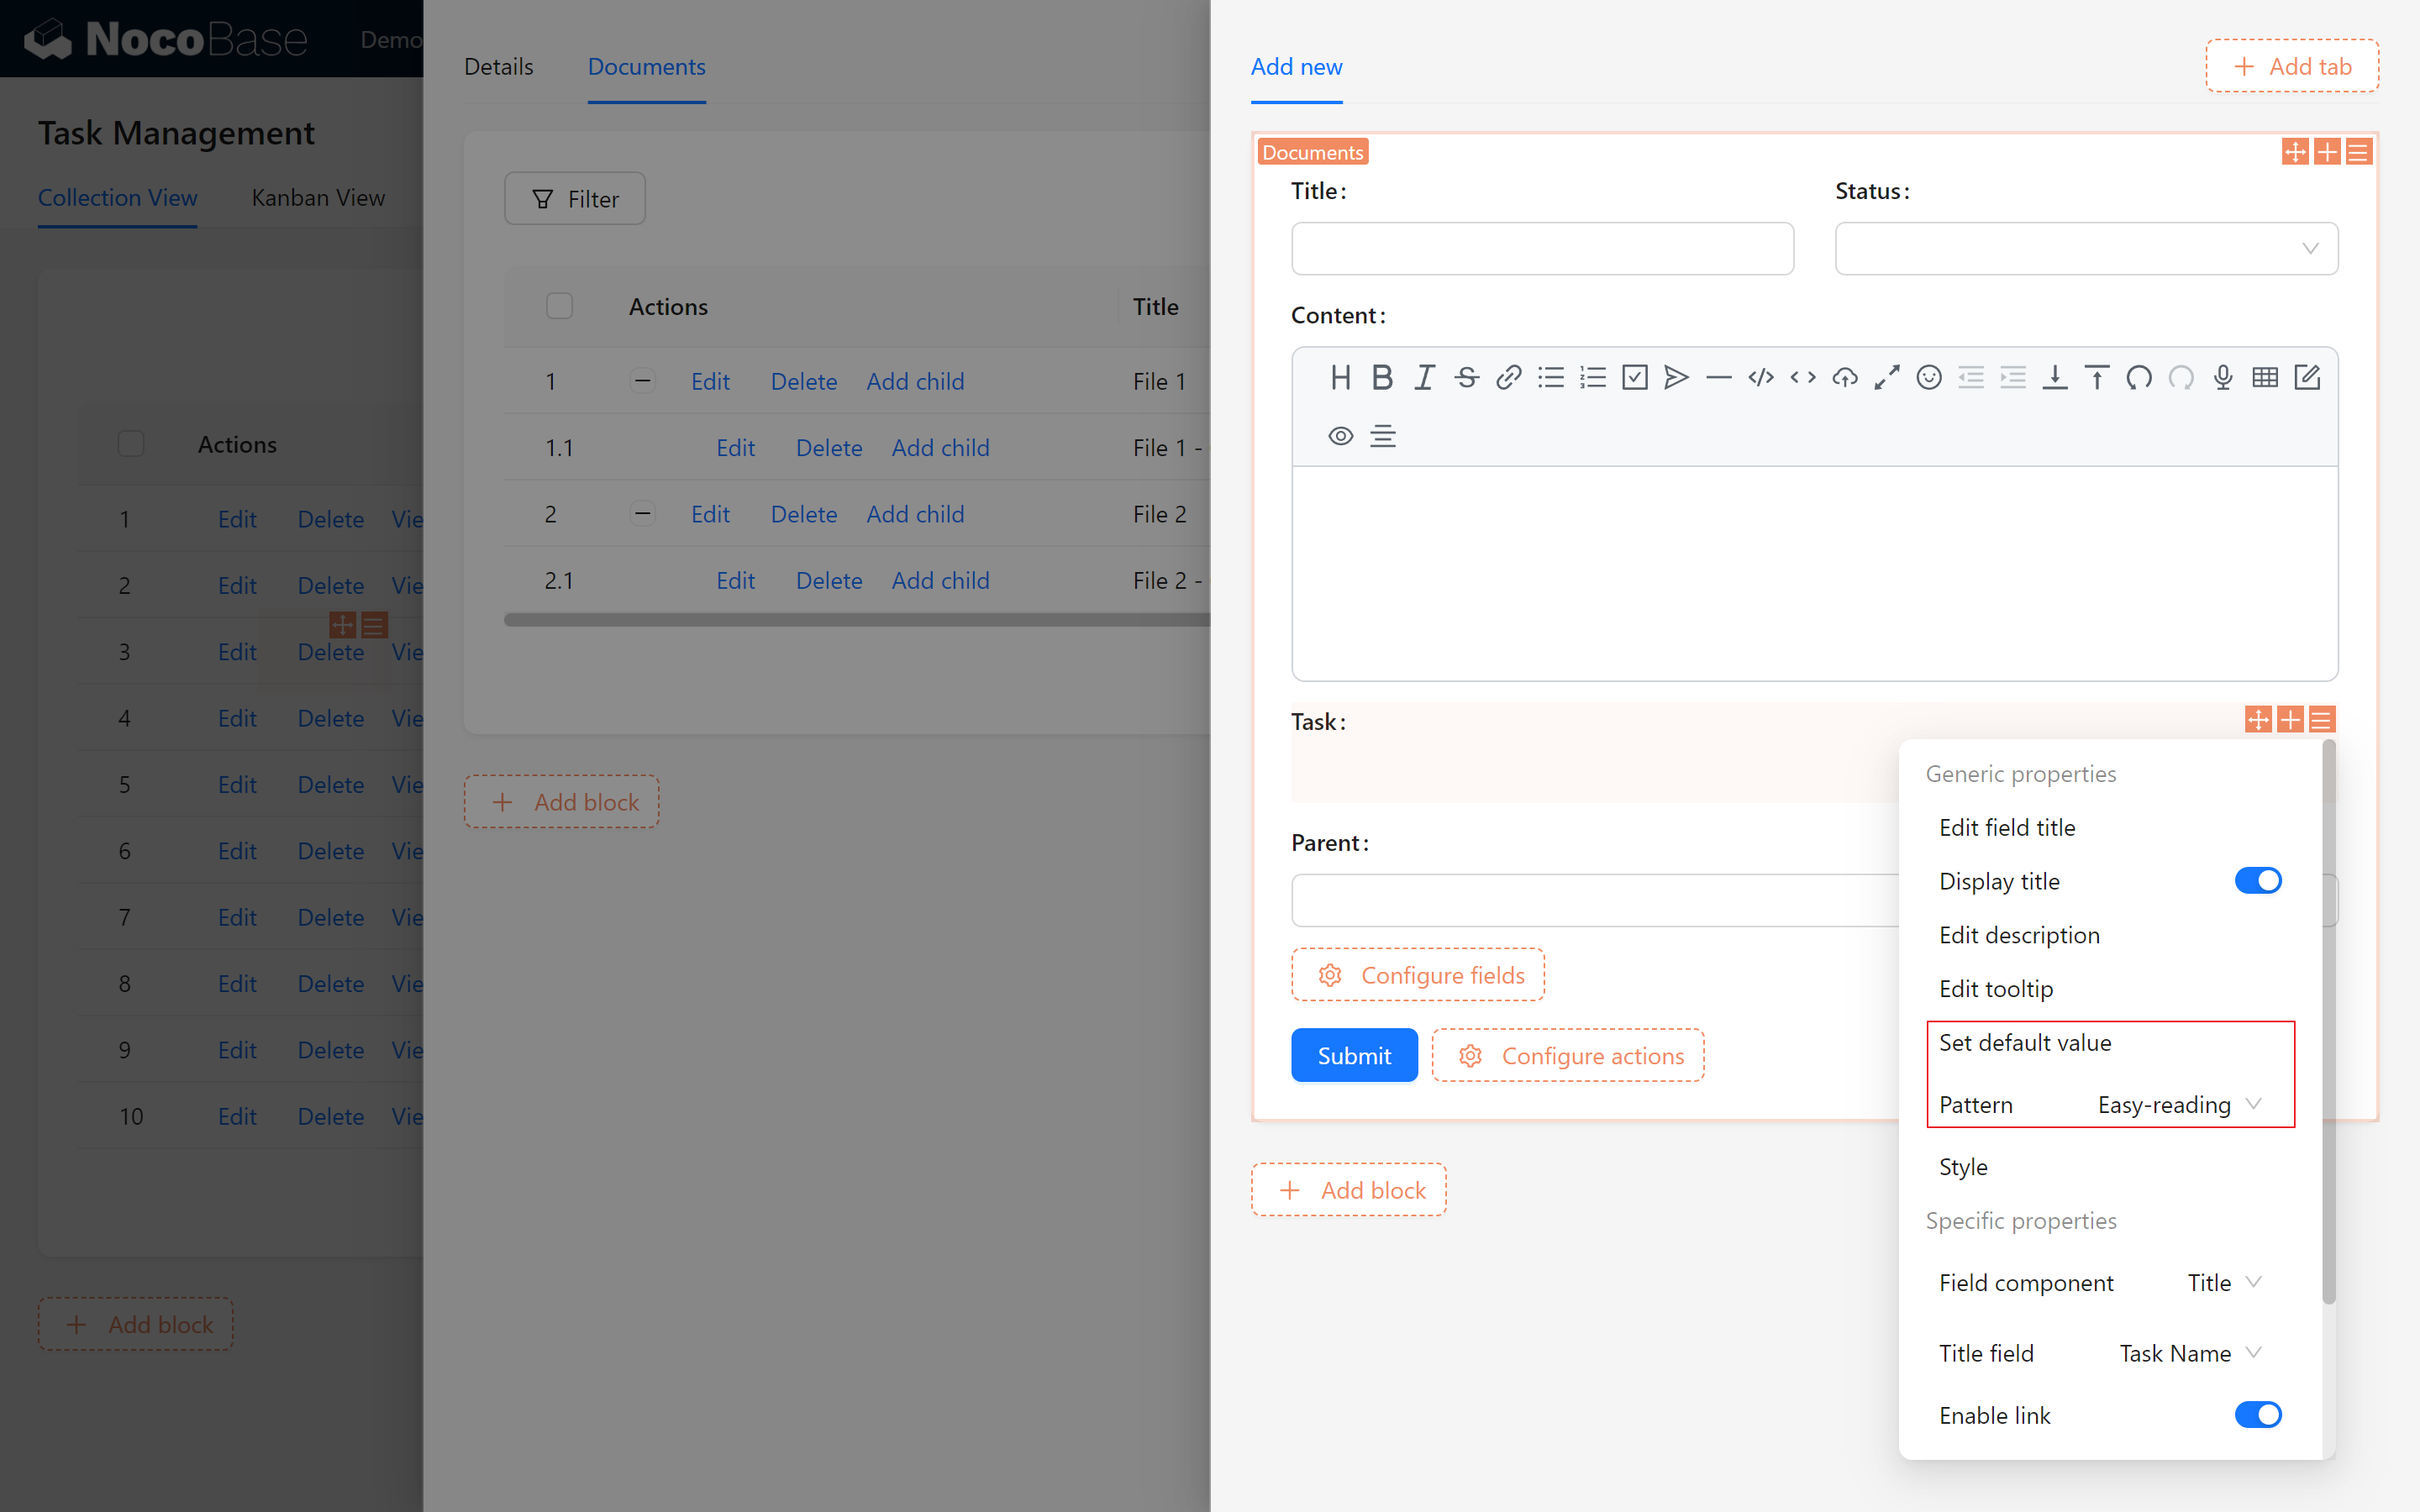
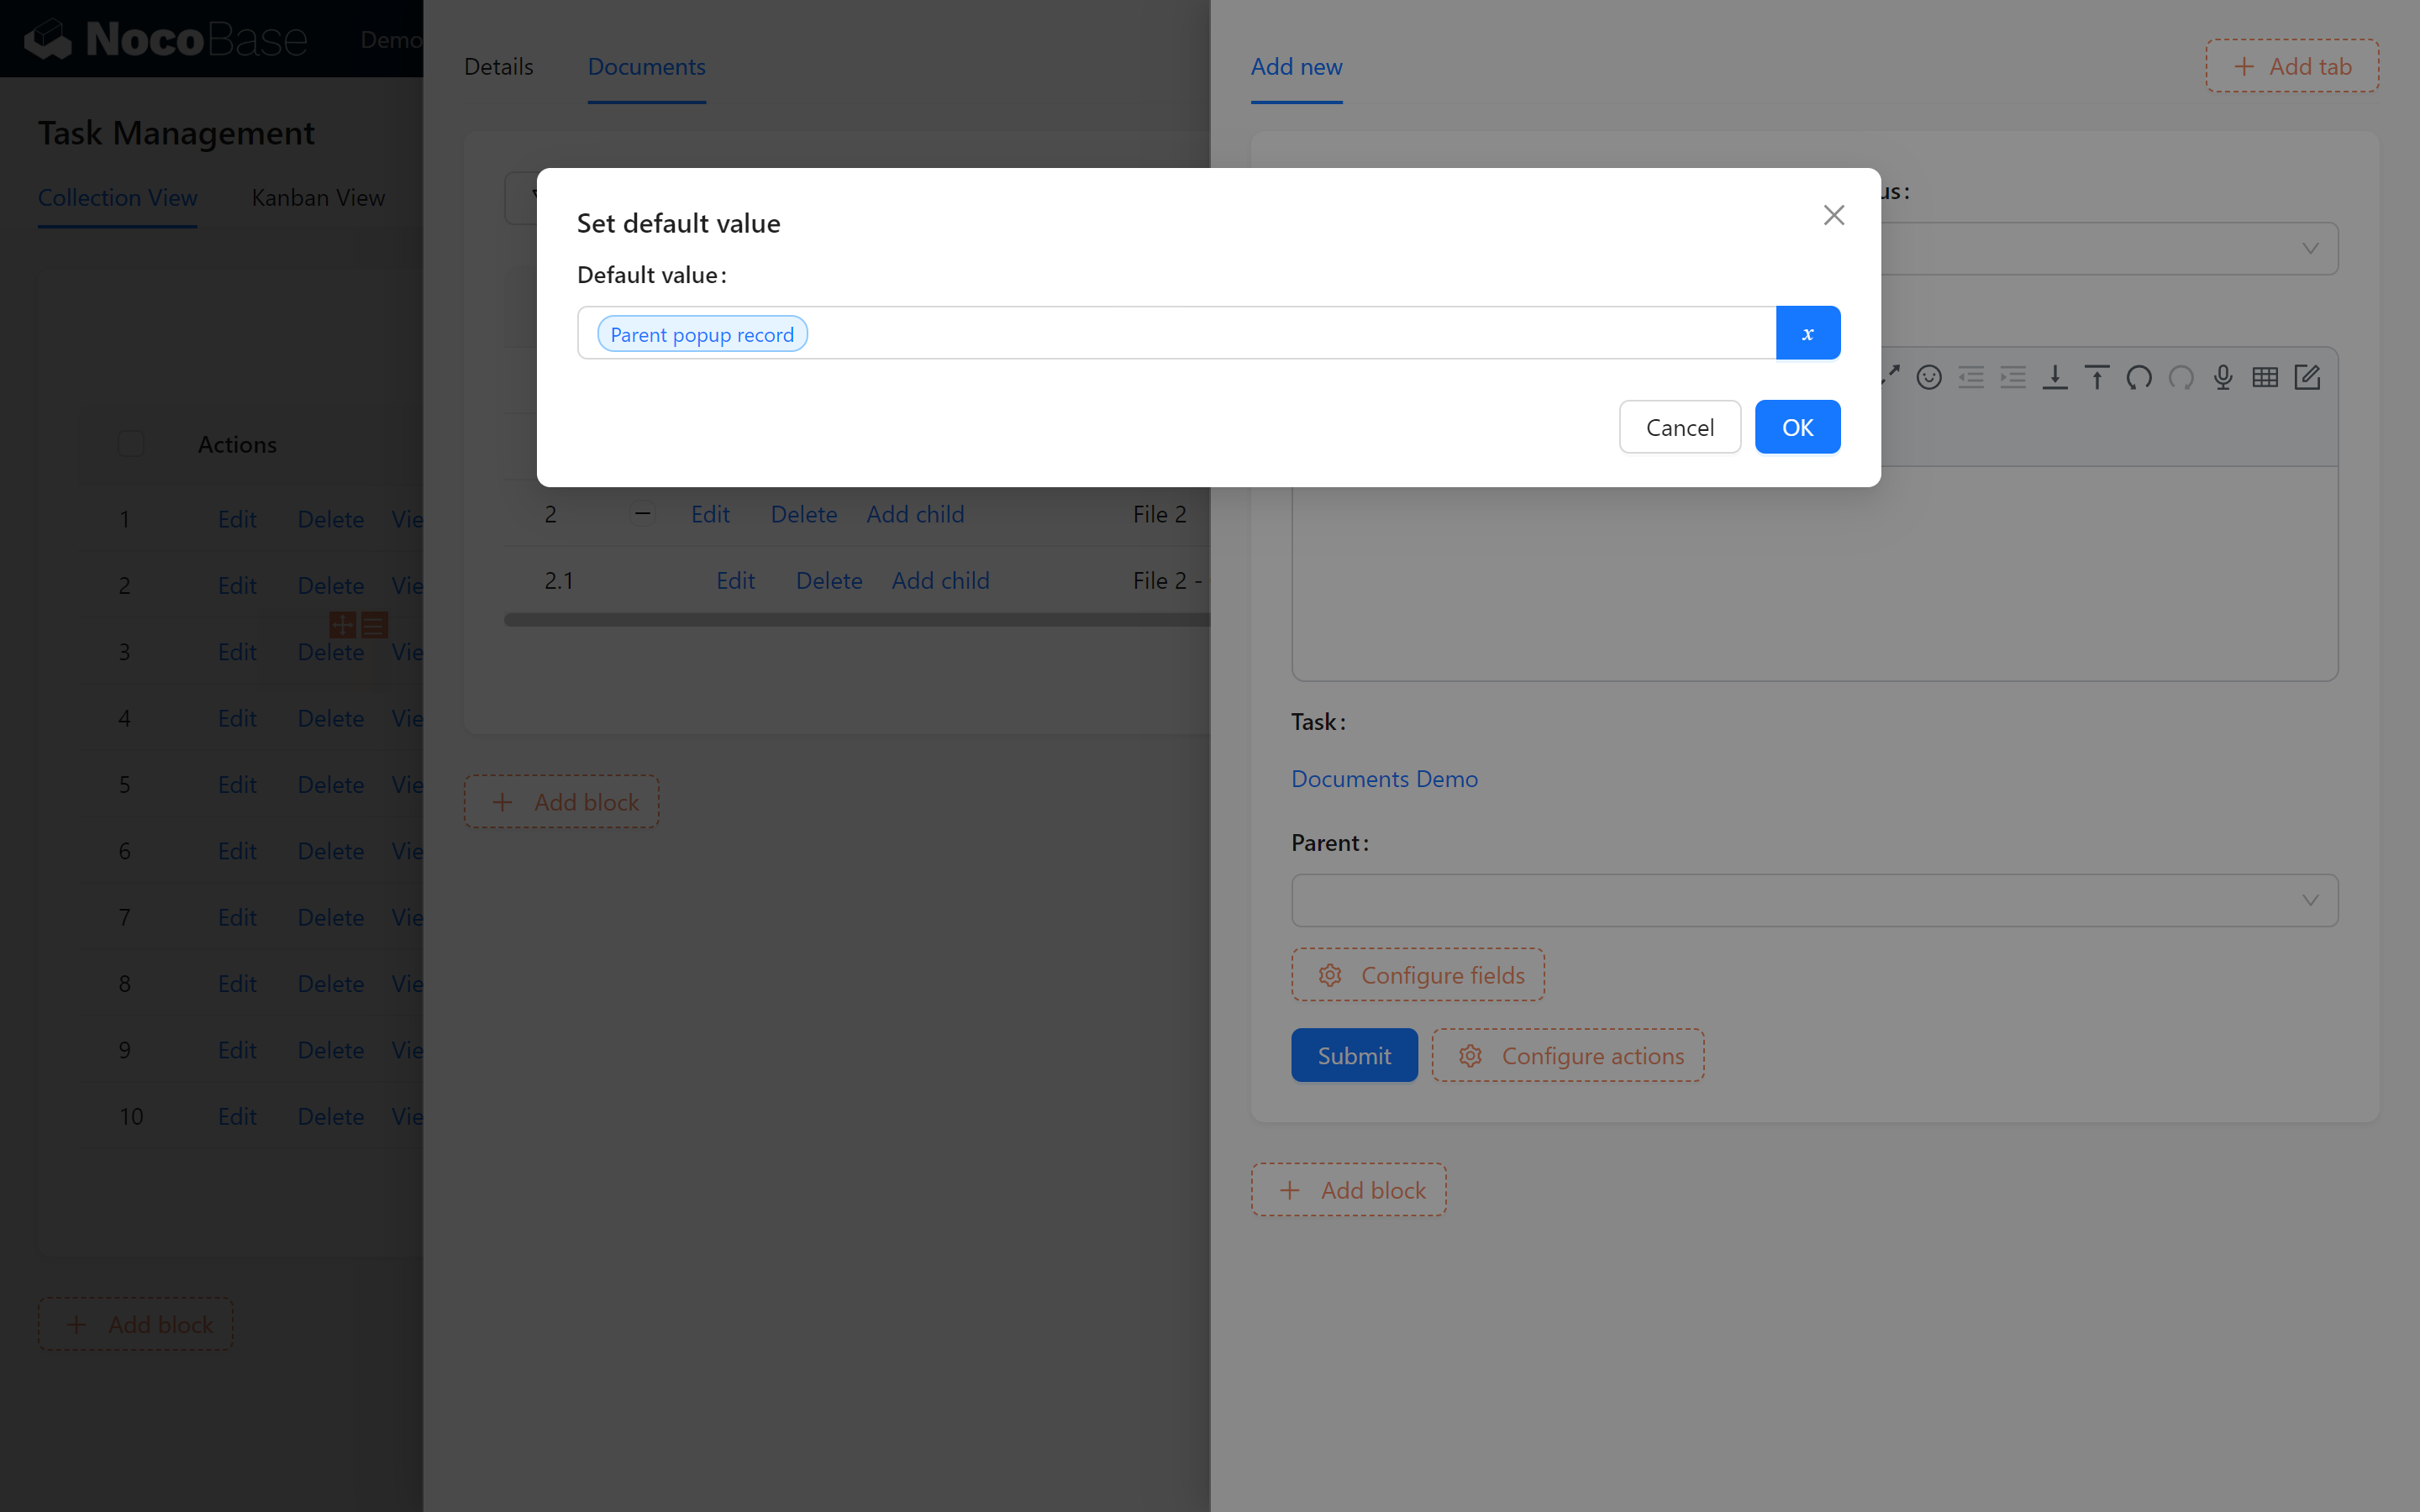
- Add form block association.
Enter the Add Block screen:
For fields related to associated tasks, set the default value to > [Parent Popup Record].
The parent popup is part of the “View” operation for the current task data and will directly link to the corresponding task data.
Setting it to read-only (view mode)indicates that only the current task can be linked within this popup.
Done! Now, newly added and displayed items will all be associated with the document of the current task.
If you’re attentive, you might add the association filter in “Edit” and “Add Subtask.”
To make the tree structure clearer and the Actions Column neater, let’s move the title to the first column.
8.5 Filtering and Searching in Document Management
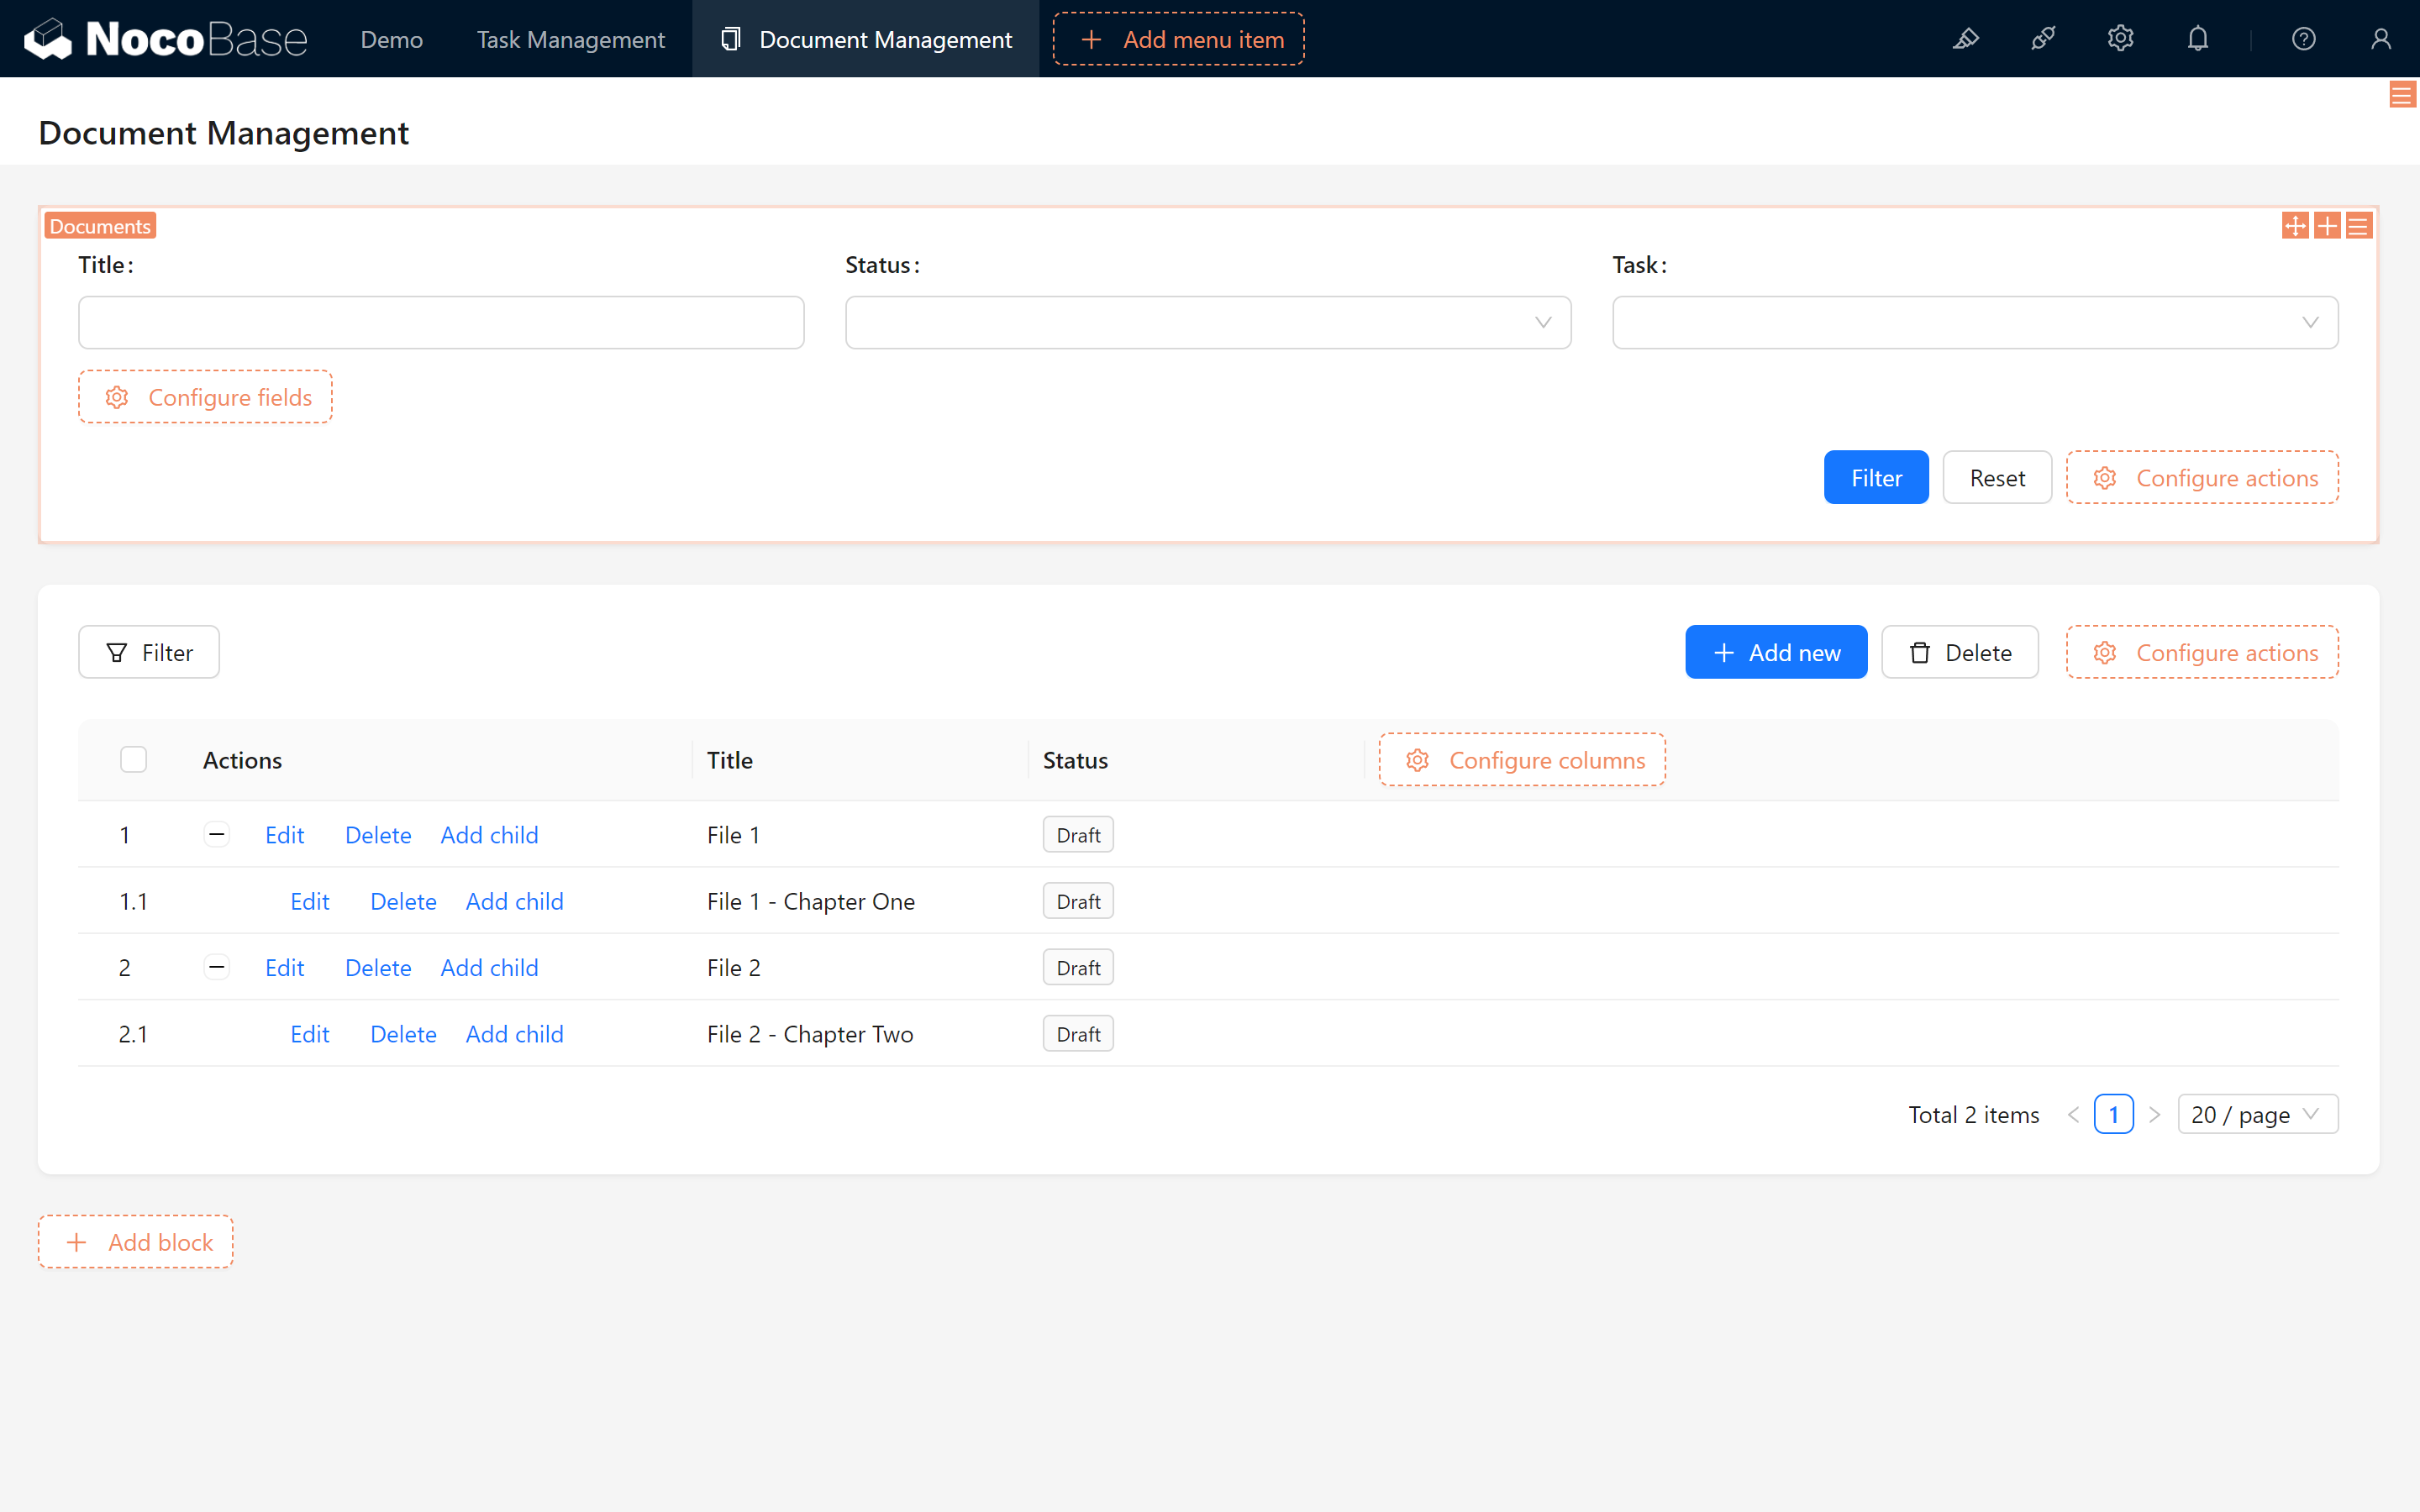
8.5.1 Adding a Filter Block
Add a filter block to Documents to enable advanced search options.
- Add a filter block on the Document Management page.
- Select the form for filtering and drag it to the top.
- Check fields such as Title, Status, and Task as filter criteria.
- Add “Filter” and “Reset” actions.
This filter form acts as a search box, allowing for rapid document retrieval with keyword entry.

8.5.2 Connecting Data Blocks
At this point, you may notice that clicking yields no result. We need one final step: linking blocks with search functionality to each other.
-
Click on Settings in the upper right corner of the block and select Connecting Data Blocks.
Here, you’ll see a list of available blocks that can be linked. Since we created a document form, it will search for all data blocks related to the document table (there’s only one on this page) and display them as options. No need to worry about getting confused, as moving the mouse over an option will automatically focus the screen on the corresponding block. -
Click to enable the block you want to link and test the search.
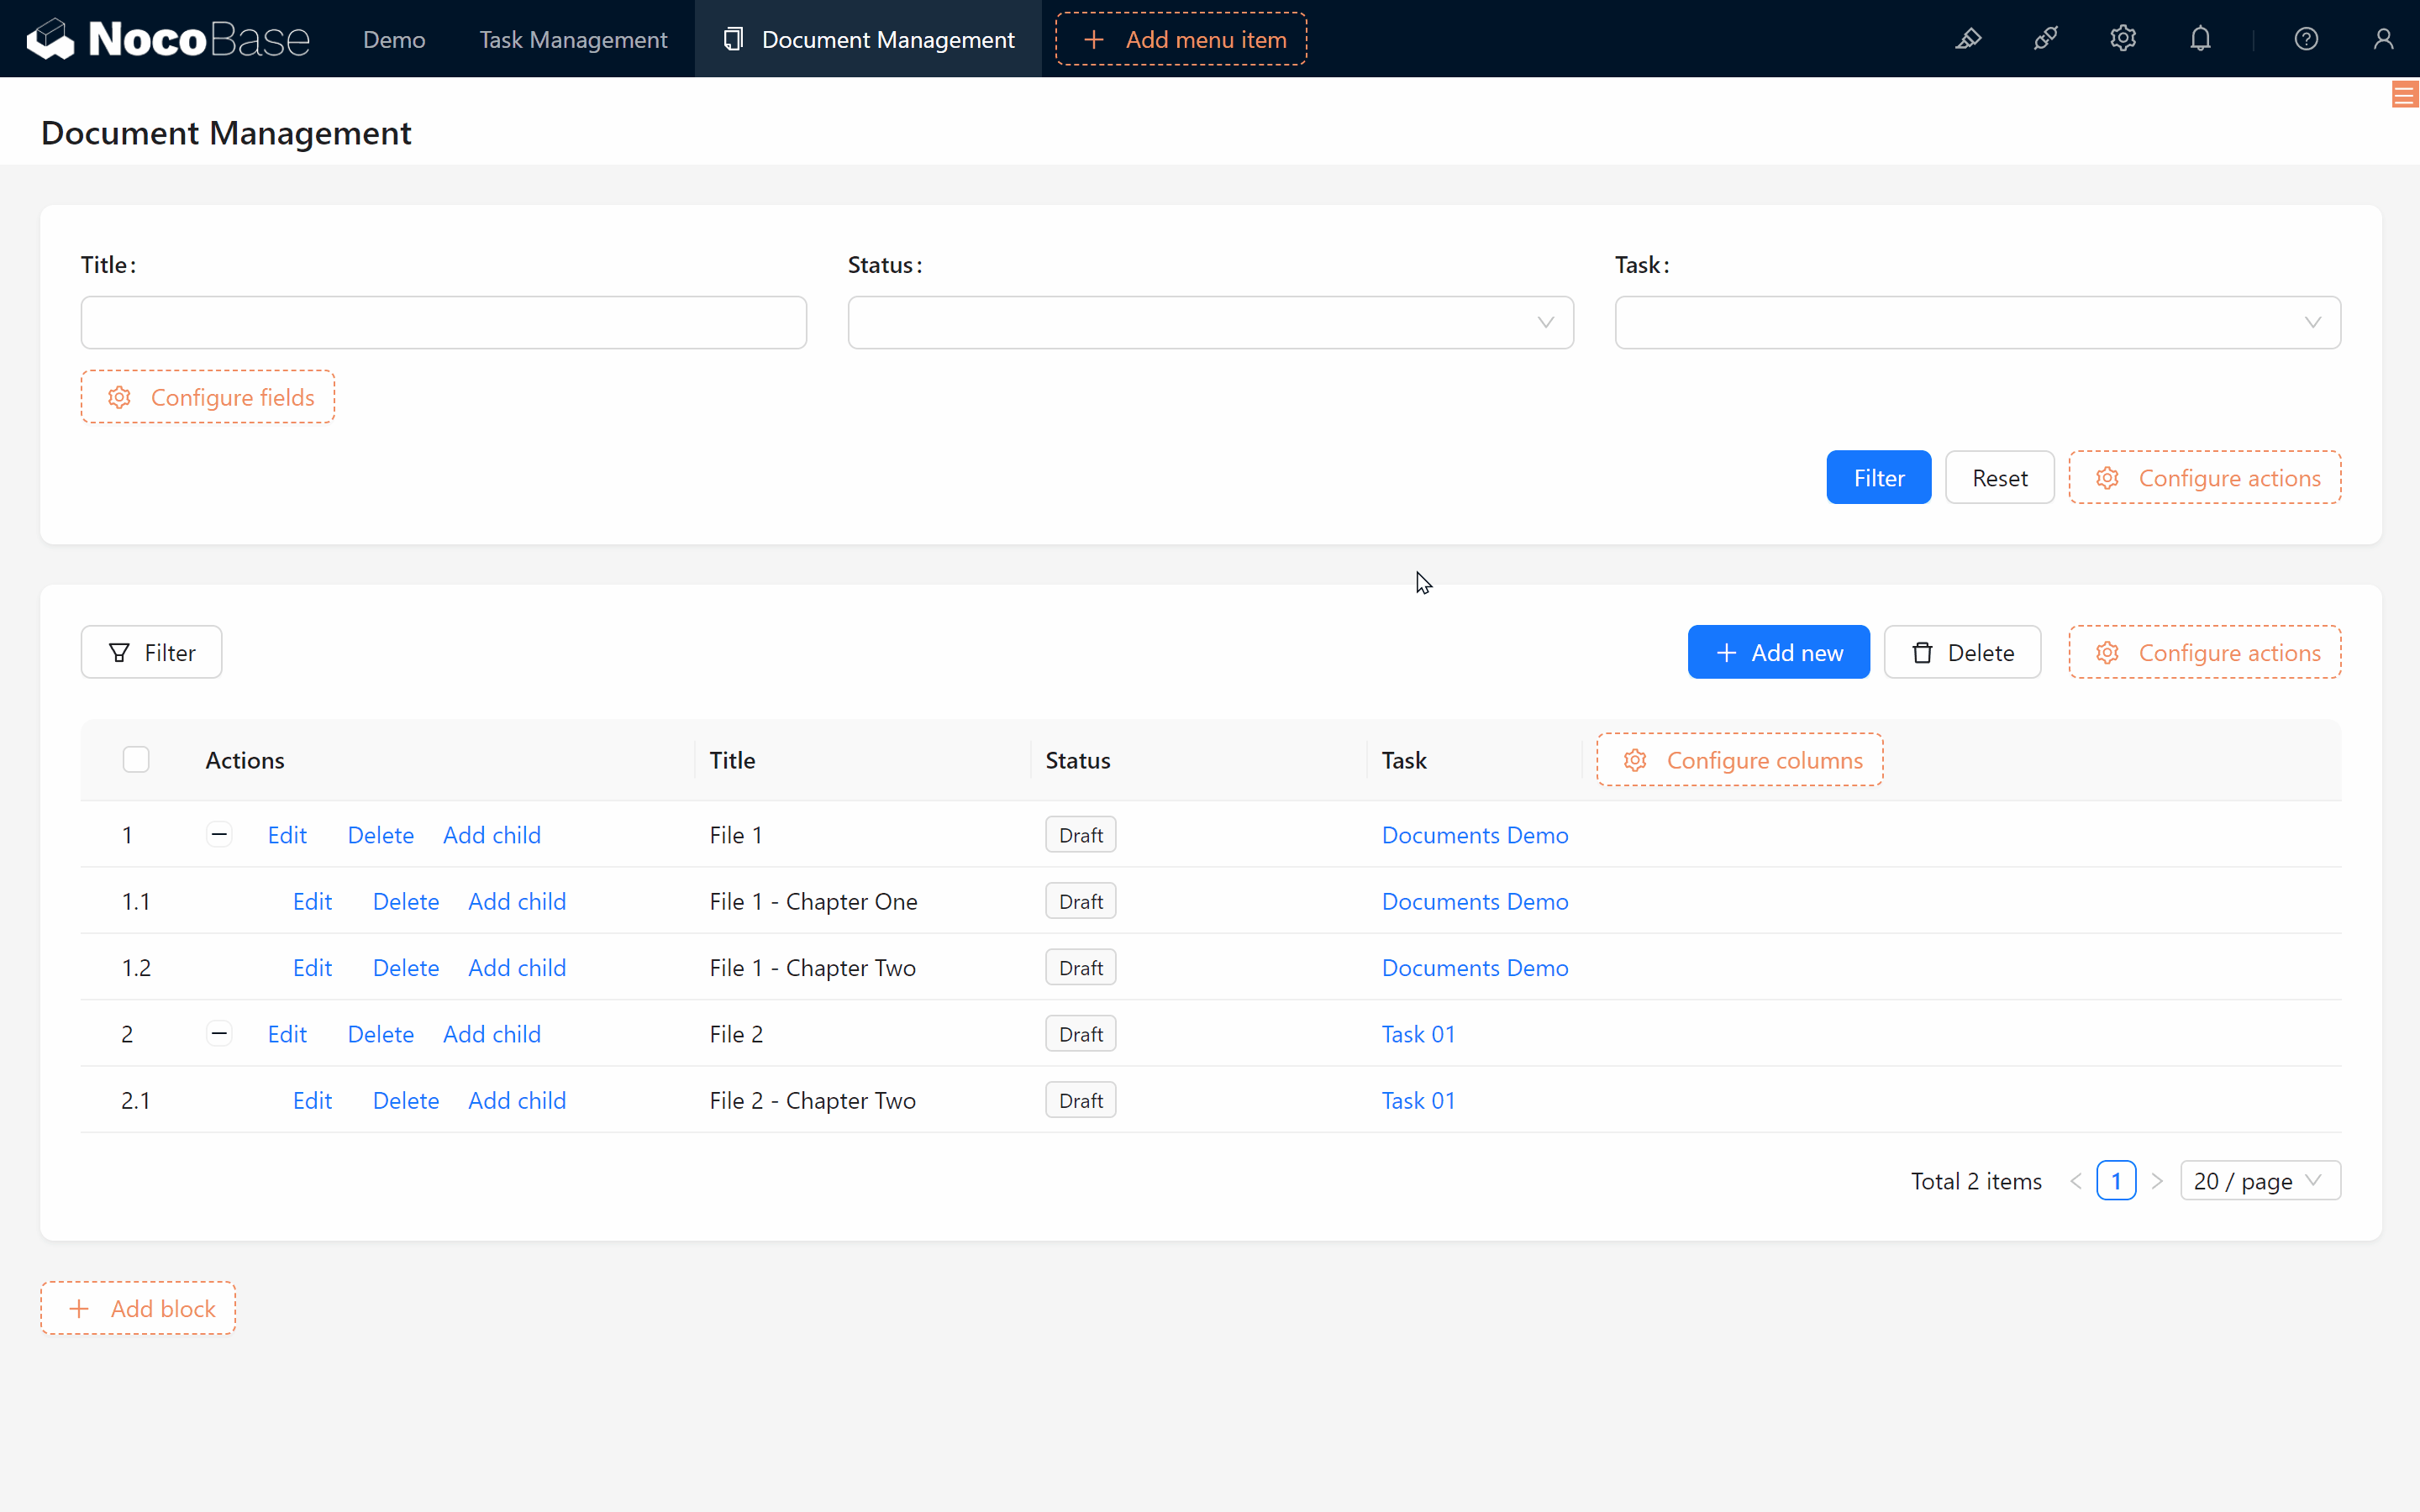
Click the configuration button in the top-right corner of the filter block to link it to the main data block of the document table. This way, whenever you set a condition in the filter block, the table block automatically updates the results based on the condition.
8.6 Setting Permissions for the Knowledge Base
To protect documents and standardize management, assign permissions based on user roles, allowing different users to view, edit, or delete documents according to their permissions.
However, we will be upgrading the document database to add features for news and task announcements, allowing for more flexible permissions.
8.7 Summary and Next Steps
In this chapter, we built the foundation of a knowledge base, incorporating a Document Collection, Tree Collection, and task associations. With added filter blocks and reusable templates, we’ve optimized document management for efficiency.
Next, we’ll build a personal dashboard featuring data analysis charts and key information displays!
Keep exploring and creating endless possibilities! If you encounter any issues along the way, don’t forget to check the NocoBase Documentation or join the NocoBase Community for discussions and support.s