
❤️ Friendly Reminder
This article is quite long, so feel free to jump to the sections that interest you the most using the table of contents. Of course, I believe if you read through the entire piece, you’ll find plenty of valuable insights.

Introduction
The demand for business application development is growing rapidly.
According to Gartner, the global enterprise software market is expected to reach $500 billion by 2025. However, despite the high demand, many companies face significant challenges in developing business applications efficiently.
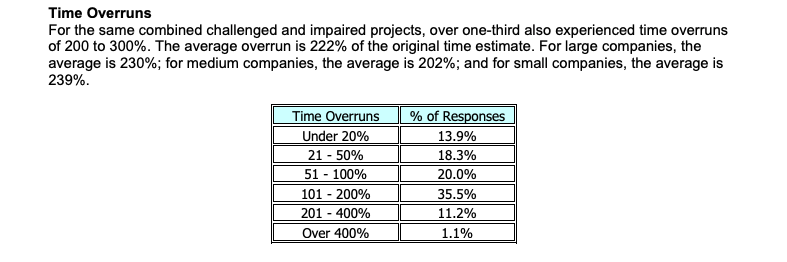
The CHAOS Report from the Standish Group shows that more than 60% of IT projects fail to deliver on time, and nearly 50% exceed their budgets.
These issues often stem from the complexity of traditional development models: long development cycles, reliance on specialized skills, and increasing development costs.
Companies need to respond to business needs more quickly and efficiently. But in reality, many face limitations in terms of technical expertise and resources, making it difficult to rapidly deliver business applications that meet market demands.
This pain point is particularly pronounced for small and medium-sized businesses, as they often lack the resources to build large development teams.
Can No-Code and Low-Code Accelerate Business Application Development?
Against this backdrop, low-code and no-code platforms have emerged as a solution to these challenges.
By offering intuitive development environments, these platforms allow businesses to build and deploy custom business applications quickly and efficiently, without needing complex programming skills. This not only shortens development cycles but also significantly reduces costs, enabling businesses to respond more flexibly to market changes.
But are Low-Code and No-Code the Perfect Solution? Not entirely. Reality tells us that it’s not always the perfect answer.
According to Gartner, while low-code platforms do improve productivity, some users remain skeptical, especially when it comes to handling complex business logic and system integrations.
Some users feel that although low-code/no-code platforms are great for rapid prototyping or simple applications, they may not be able to fully replace traditional development methods for large-scale, complex business systems.
As one low-code platform user shared in a community forum, “No-code platforms allowed us to build applications quickly, but maintenance and scaling became challenging. Flexibility seems lacking, especially when dealing with constantly changing requirements.”

Additionally, customization capabilities of low-code/no-code platforms remain a concern for businesses. According to the 2021 OutSystems report, 53% of developers worry that low-code platforms cannot handle complex business processes, and 43% believe these platforms have limitations when it comes to scalability.
This indicates that while low-code/no-code platforms lower development barriers, their performance in complex scenarios often leaves developers frustrated. Many users point out that although low-code tools are easy to get started with, they face restrictions when it comes to integrating with external systems or handling intricate business logic.
NocoBase’s Approach
Many no-code and low-code platforms excel in quickly building applications, especially for prototyping and developing simple applications, which significantly shortens development time. However, when businesses face more complex demands, system integration challenges, or require a high degree of customization, many existing platforms struggle.
During the design of NocoBase, we deeply understood these challenges. Our goal was not only to help users build applications quickly, but also to ensure that the platform could handle complex business scenarios and ever-growing customization needs.
🙌 Have a try: NocoBase Tutorial – Task Management System
A no-code/low-code platform must offer greater flexibility, scalability, and integration capabilities to truly support businesses in developing everything from simple applications to complex systems.
With this in mind, NocoBase was built on several core principles to ensure the platform meets diverse business needs:
Flexible Data Model-Driven Design
In dealing with complex business processes and data structures, many low-code platforms are limited by rigid frameworks, making it difficult to adapt to changing requirements. NocoBase adopts a data model-driven design, allowing users to build and adjust data models flexibly based on specific business needs.
💡 Read More: How to Create a Good Data Model?
Whether you are constructing a simple customer management system or handling complex data relationships, NocoBase provides the flexibility needed to accommodate a wide range of business complexities.
Microkernel architecture and High Scalability
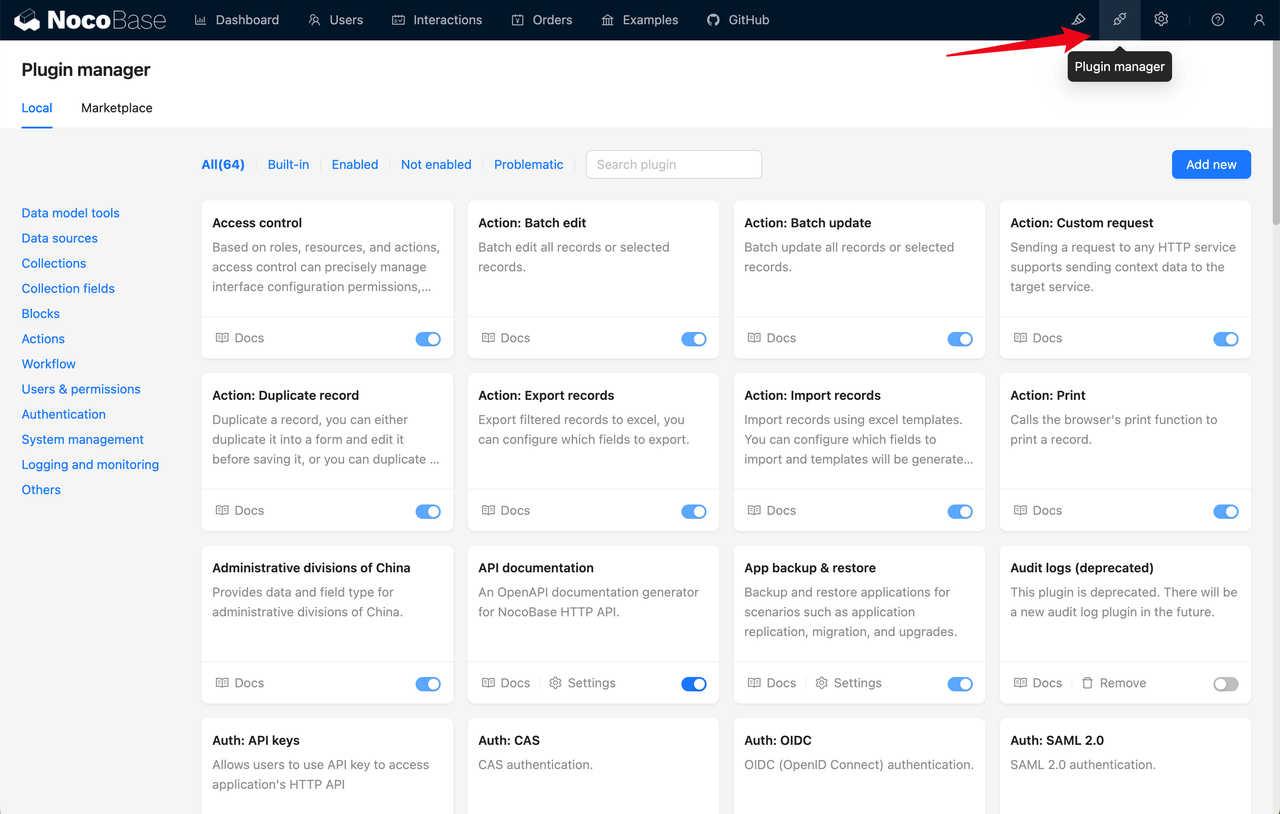
NocoBase adopts a microkernel architecture, where various functionalities are extended in the form of plugins. This allows users to select and add functional modules as needed, avoiding the one-size-fits-all design found in many traditional platforms. This approach enhances scalability, allowing businesses to easily extend application functionality as they grow, whether integrating third-party systems or customizing business processes. NocoBase can implement these extensions quickly through plugins.
💡 Read More: Deep Dive: Low Code/No Code Integration Capabilities
The plugin-based design reduces the coupling between modules, increasing reusability. With the continuous expansion of the plugin library, common scenarios can be easily built by combining plugins. NocoBase’s no-code platform is composed of various plugins.
Workflow Automation

NocoBase simplifies workflow automation with its built-in workflow engine. Users can easily create and manage automated processes without writing complex code, significantly reducing manual tasks and boosting efficiency. Whether it’s automating approval workflows or triggering notifications and data updates, NocoBase allows businesses to quickly configure and execute these processes, saving time and labor costs.
💡 Read More: 5 Best Tools for Building Workflow Automation
Advanced System Integration Capabilities
NocoBase is not just for simple applications; it’s built to handle complex business logic and system integrations. Through open APIs and a flexible plugin system, NocoBase seamlessly integrates with other enterprise systems such as ERP or CRM, ensuring smooth data flow across systems. This addresses one of the key concerns businesses have when choosing a low-code platform: how to quickly develop applications without sacrificing flexibility or scalability.
Open-Source and Community Support
In addition to technical flexibility and robust features, NocoBase is committed to being an open-source platform. Open-source offers transparency and control, giving businesses and developers a high degree of autonomy. With open-source, users have full control over their code and data, avoiding vendor lock-in. NocoBase’s open-source architecture also supports extensive customization and further development, ensuring that every business can tailor the platform to meet its unique needs.
Additionally, NocoBase is backed by a vibrant open-source community, where users and developers can receive support, share experiences, and contribute to the platform’s ongoing growth, further enhancing its sustainability and reliability.
Developing Business Applications Quickly with NocoBase
Now, let me show you how to use NocoBase to quickly develop flexible and scalable business applications.
Defining Business Requirements
Before starting the development of any business application, defining the business requirements is a crucial step.
A clear definition of requirements not only helps avoid rework and adjustments later, but also ensures the development team stays aligned and that the application effectively addresses actual business problems.
💡 Read More: Build CRM in Hours: Top No-Code/Low-Code Tools You Need to Know
Let’s take building a Customer Relationship Management (CRM) system as an example:
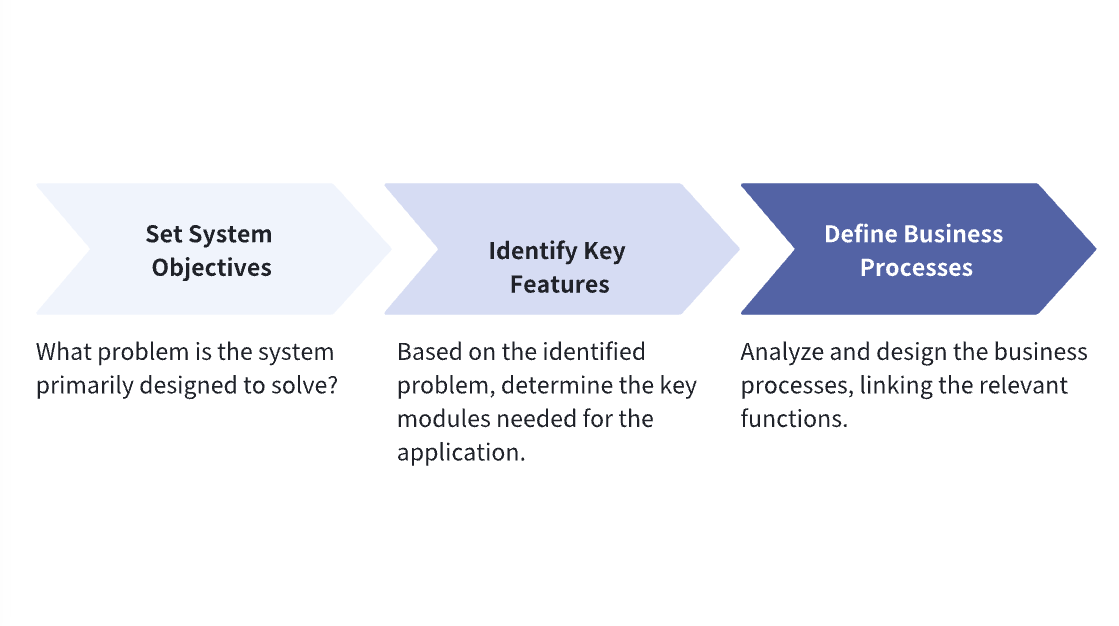
Step 1: Define the Objectives
Before developing a CRM system, it’s essential to define the system’s core objectives. You need to think about what specific problems the system is meant to solve. For instance, the primary goal of a CRM might be to help businesses better manage customer information, track sales leads, enhance customer engagement, and optimize sales processes. These goals can be further refined into specific objectives, such as:
- Improving customer data management efficiency
- Enhancing the sales team’s ability to follow up on potential leads
- Providing data analysis tools to help decision-makers gain insights into customer behavior
- Facilitating cross-department collaboration, ensuring marketing, sales, and customer service teams share the same data
Clearly defining these objectives will guide the subsequent steps of feature design and development, ensuring they are focused on actual business needs.
Step 2: List Core Features
To achieve the main objectives of the CRM, the next step is to determine the key features required. A standard CRM system usually includes the following core features:
- Customer Management: Store and manage essential customer information such as contact details, company info, and purchase history.
- Sales Lead Tracking: Help the sales team track the progress of potential customers (leads), from initial contact to closure or loss.
- Task Management: Enable team members to set and track tasks related to customers, such as scheduling meetings or sending emails.
- Activity Log: Record all interactions with each customer, such as phone calls, meetings, and email communications, ensuring team members have a complete history of the customer.
- Reports & Analytics: Provide data analysis tools to generate reports on customer behavior, sales performance, etc., helping managers make informed decisions.
- Customer Service Module: Allow customers to submit service tickets, which are then followed up by the support team to enhance customer satisfaction.
Additional features may be added based on the specific needs of the business, such as:
- Automated Marketing Tools: Automatically send marketing emails or remind the sales team to follow up with customers.
- Integration with Other Systems: For instance, integration with financial systems to automatically generate invoices, or with email systems to send and receive emails directly from the CRM.
Step 3: Analyze Business Processes
A successful CRM system needs to be tightly integrated with the actual business processes. For example, in sales, you can break down the customer lifecycle into several stages and design appropriate processes for each stage:
- Lead Acquisition: The business acquires potential customer information through marketing campaigns or social media, and this information is automatically entered into the CRM.
- Sales Follow-Up: The sales team assigns follow-up tasks based on the lead’s progress, such as scheduling a call or setting up a product demo.
- Deal Closure and Contract Management: Once a customer agrees to purchase, the system automatically generates a contract and notifies the finance team to process the next steps.
- Customer Service & Maintenance: After a deal is closed, the customer service team handles customer service inquiries, and all related tickets and interactions are stored in the CRM.
Process Optimization: By automating parts of the CRM’s workflow, you can reduce manual effort. For example, once a lead enters the system, the CRM can automatically assign it to a sales team member and send reminders, or trigger automated marketing workflows (such as sending personalized emails) based on customer behavior. This automation significantly improves operational efficiency.
The above example illustrates how to analyze business requirements for building a CRM system. You can apply these three core steps—defining objectives, listing features, and analyzing processes—when when developing other business applications to help refine your requirements and guide the development process.
Designing the Data Model
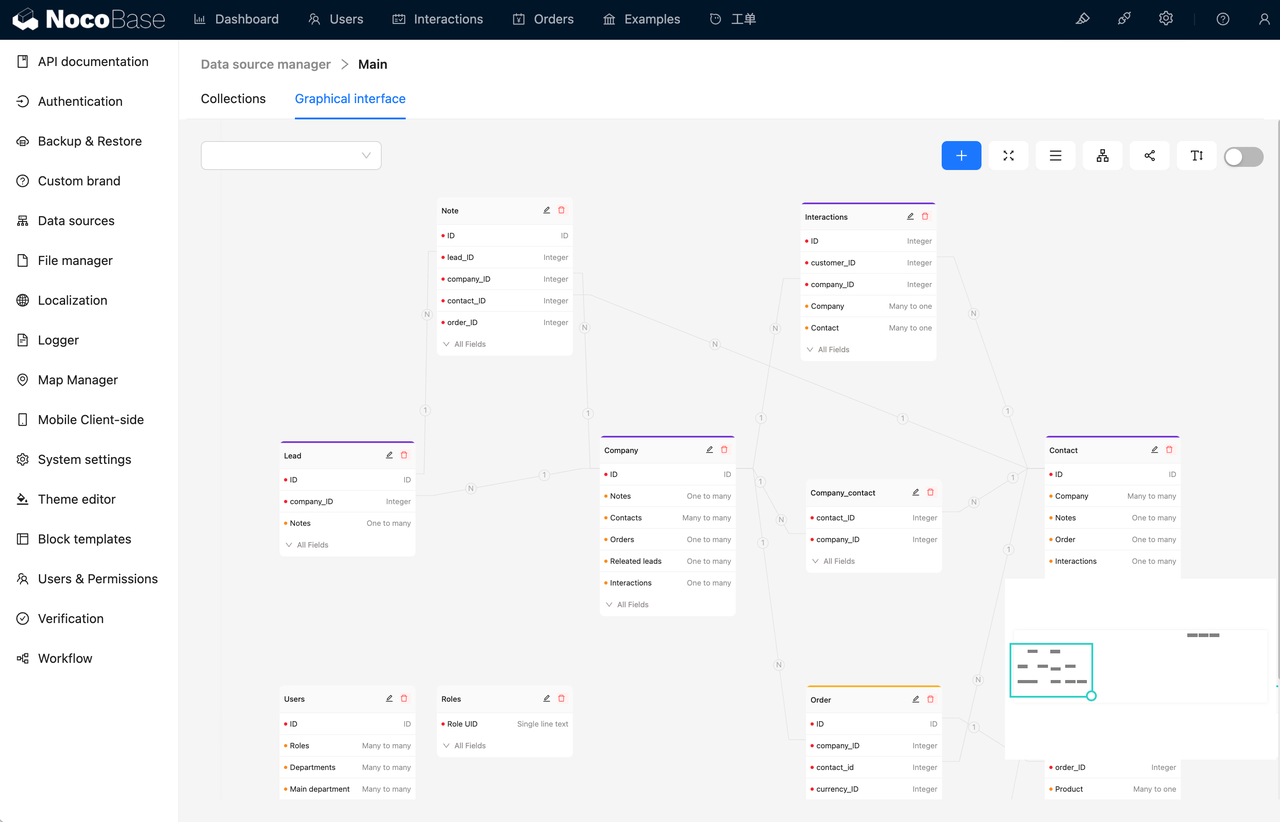
After defining your business requirements, the next critical step is designing the data model. In NocoBase, the data model forms the core foundation of the application, determining how the system will store, organize, and manage data. By constructing a well-structured data model, the application can achieve efficient data processing and flexible functionality expansion.
Building the Data Model
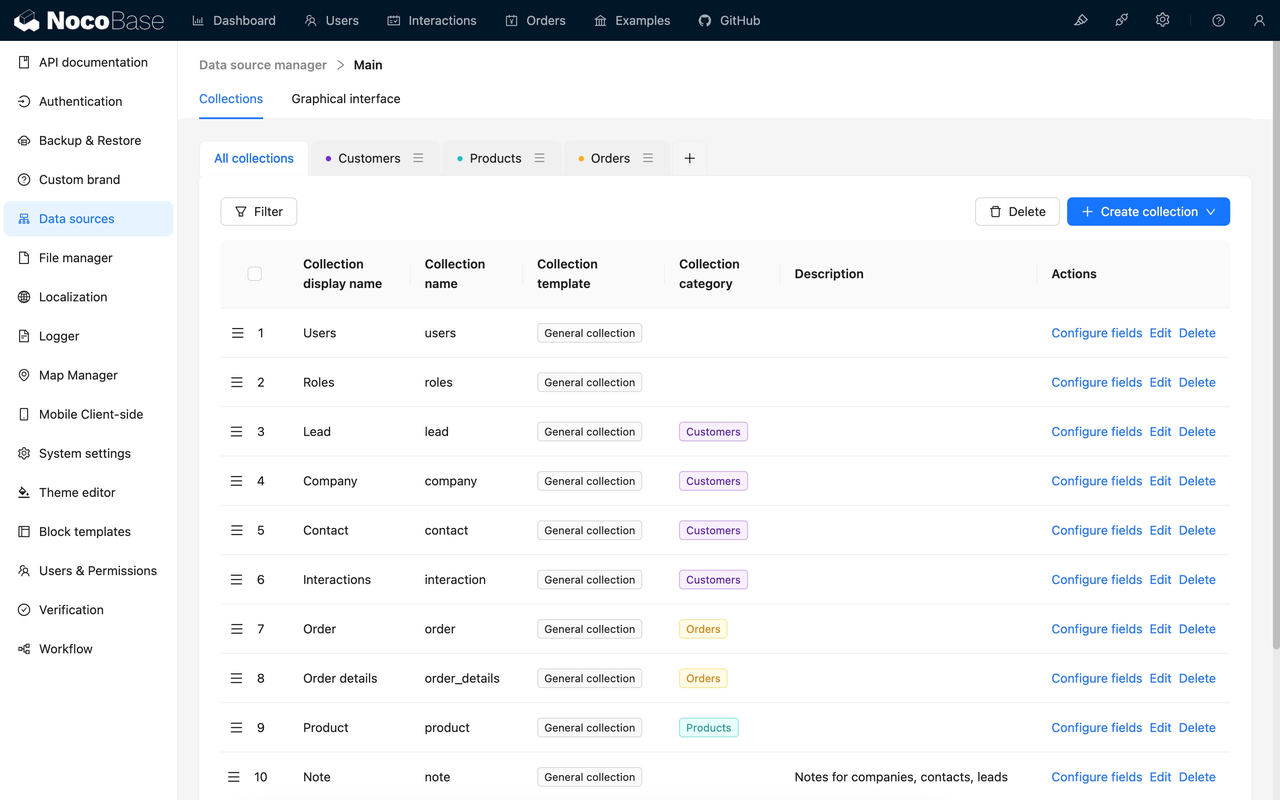
In NocoBase, the process of building a data model is intuitive. Users can define various entities and their relationships based on business needs. Entities are the basic components of data, such as Customer, Order, Product, etc. When building your model, it’s essential to design a data structure that not only meets current needs but also remains flexible enough for future expansion.
Example:
- In a CRM system, typical entities include Customer, Sales Opportunity, Contract, and Support Request.
- You can use NocoBase’s visual interface to drag and drop these entities and define their attributes.

Defining Fields and Data Relationships
When adding fields to each entity, ensure that these fields cover all necessary information. For instance, the Customer entity might have fields such as Customer Name, Contact Info, and Company Information. Each field should be set according to the actual data type, such as text, numbers, dates, or boolean values.
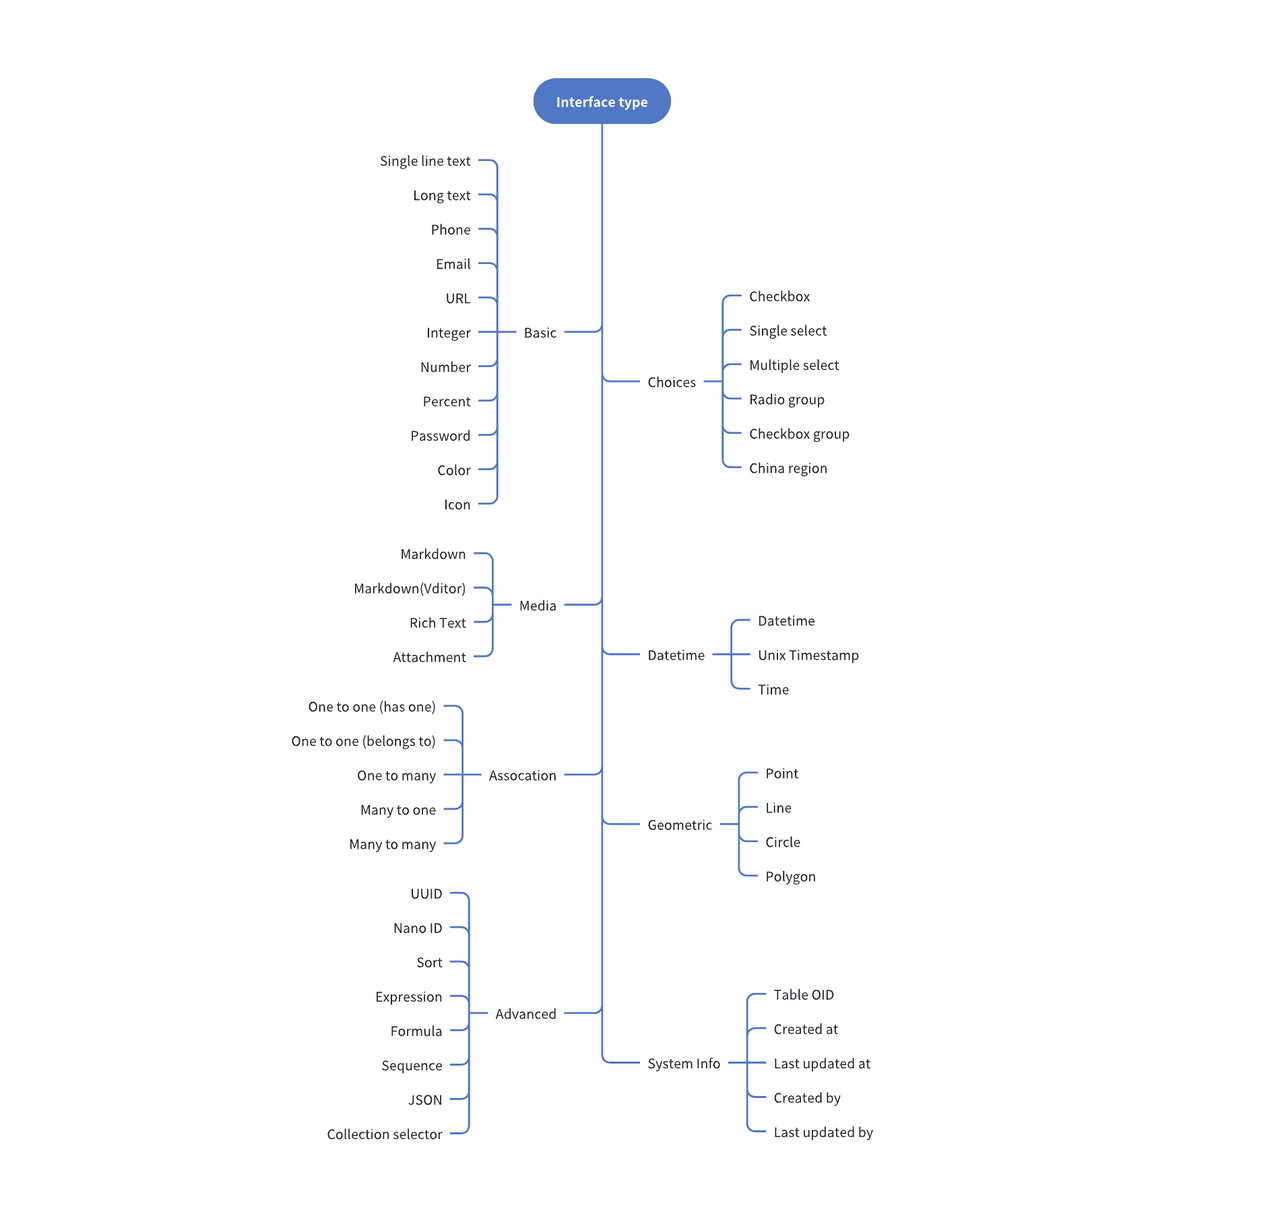
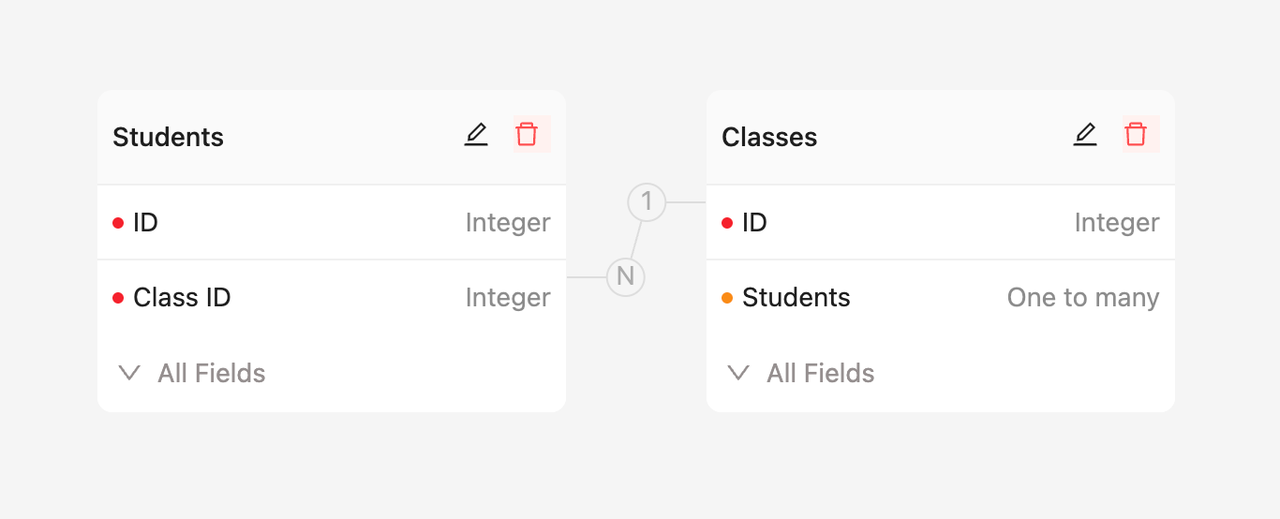
In data model design, the relationships between entities are equally important. NocoBase allows you to define these relationships through its Relationship Fields. Examples include:
- One-to-Many: In a CRM, one customer may have multiple orders. The screenshot example shows the relationship between Class and Student, where one class can have many students, but each student belongs to only one class. In this case, there is a one-to-many relationship between classes and students.
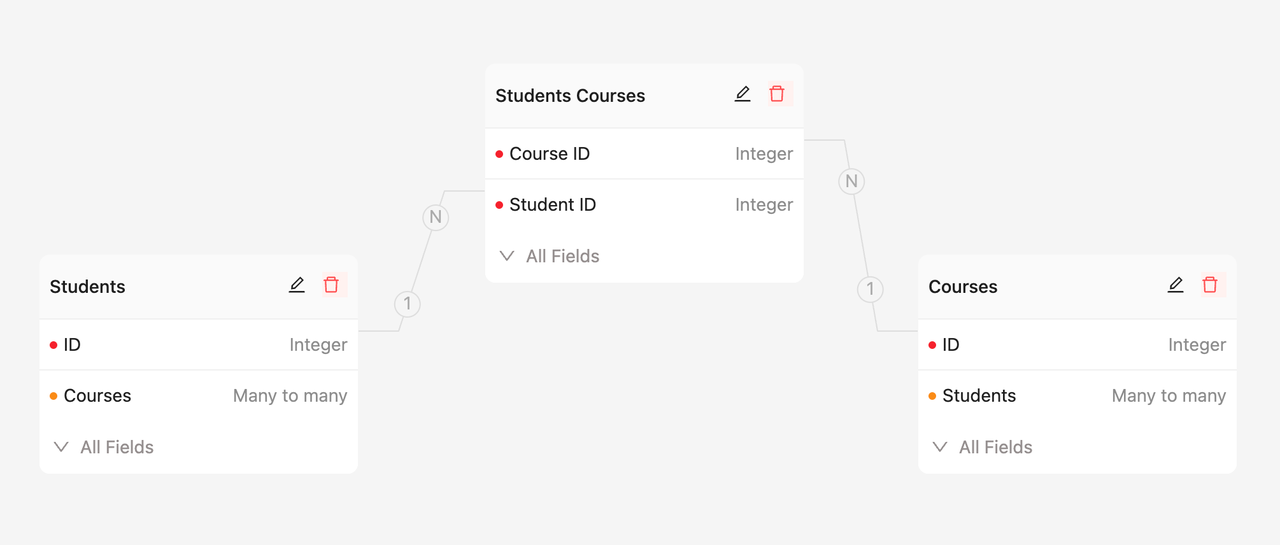
- Many-to-Many: Similarly, one product might appear in multiple orders, and one order might contain multiple products. The screenshot example shows the relationship between Students and Courses in a course enrollment system. A student can enroll in multiple courses, and a course can have multiple students enrolled, constituting a many-to-many relationship.
By defining these relationships correctly, you ensure that data can flow smoothly between different entities, supporting complex business scenarios.
Optimizing the Data Model
After designing the initial model, it’s recommended to optimize the data structure to ensure system performance and scalability. For example, consider using indexes to improve query efficiency or adding redundancy to reduce repeated data storage. In NocoBase, these optimizations can be easily achieved through simple configurations and plugins, ensuring your data model has enough flexibility to adapt to changing future needs.
For more detailed information on optimizing data models, check out our blog post: How to Create an Good Data Model?
Configuring the Interface
Once the data model is set up, the next step is displaying the data on the frontend interface. Thanks to NocoBase’s separation of data structure and user interface, the frontend design remains highly flexible. The same table or record can be used to create multiple blocks and actions in various forms.
Let me walk you through how to configure the interface in the next section.
Designing the User Interface
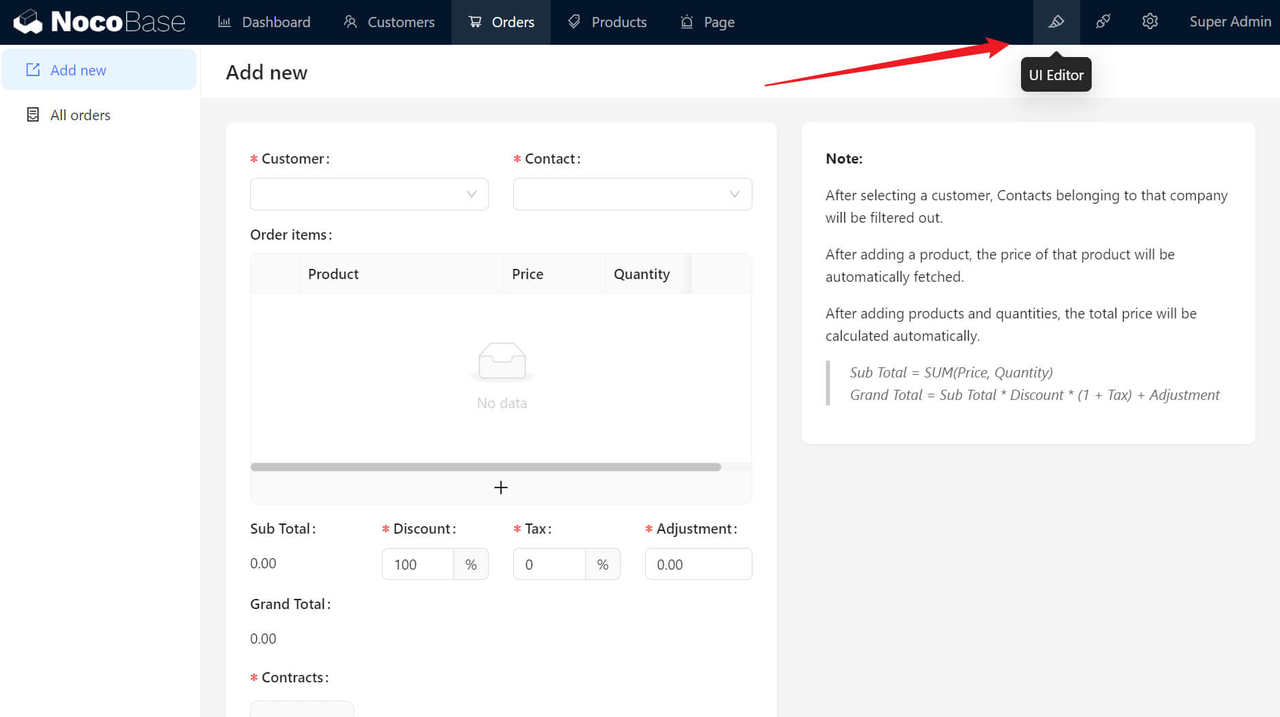
NocoBase provides a WYSIWYG interface design tool. By adding blocks (similar to Notion), you can quickly build the front-end interface for your applications, such as forms, data views, and dashboards. Notably, NocoBase’s blocks are also provided through plugins, meaning you can develop new block plugins to meet specific display needs based on your requirements.
Form Design: You can design custom forms, allowing users to input and edit information, such as customer information forms or order entry forms. Simply click and select fields to configure the layout and field types of the form. The forms also support public access, a feature supported by the latest free plugin.
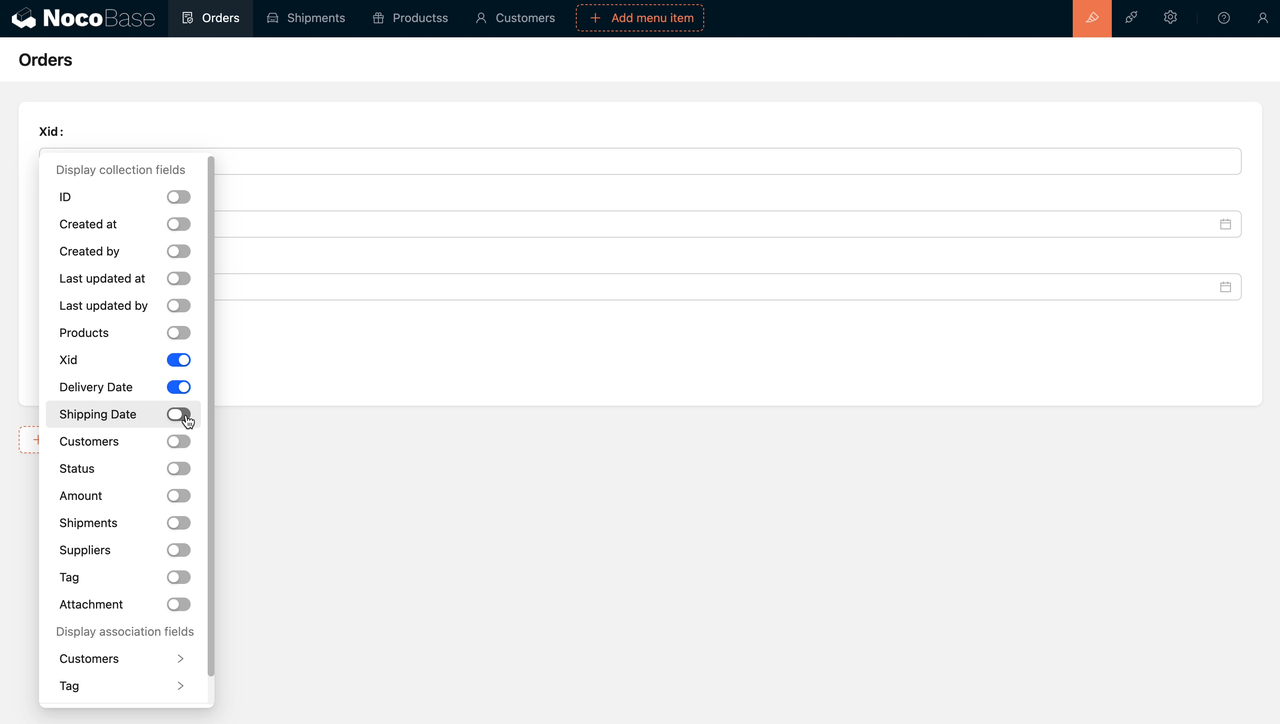
Data Display: With NocoBase, users can quickly create data views, presenting data retrieved from the database in the form of tables, lists, or cards for easy browsing and management. For example, a customer list view can display each customer’s basic information and provide action buttons for further processing.

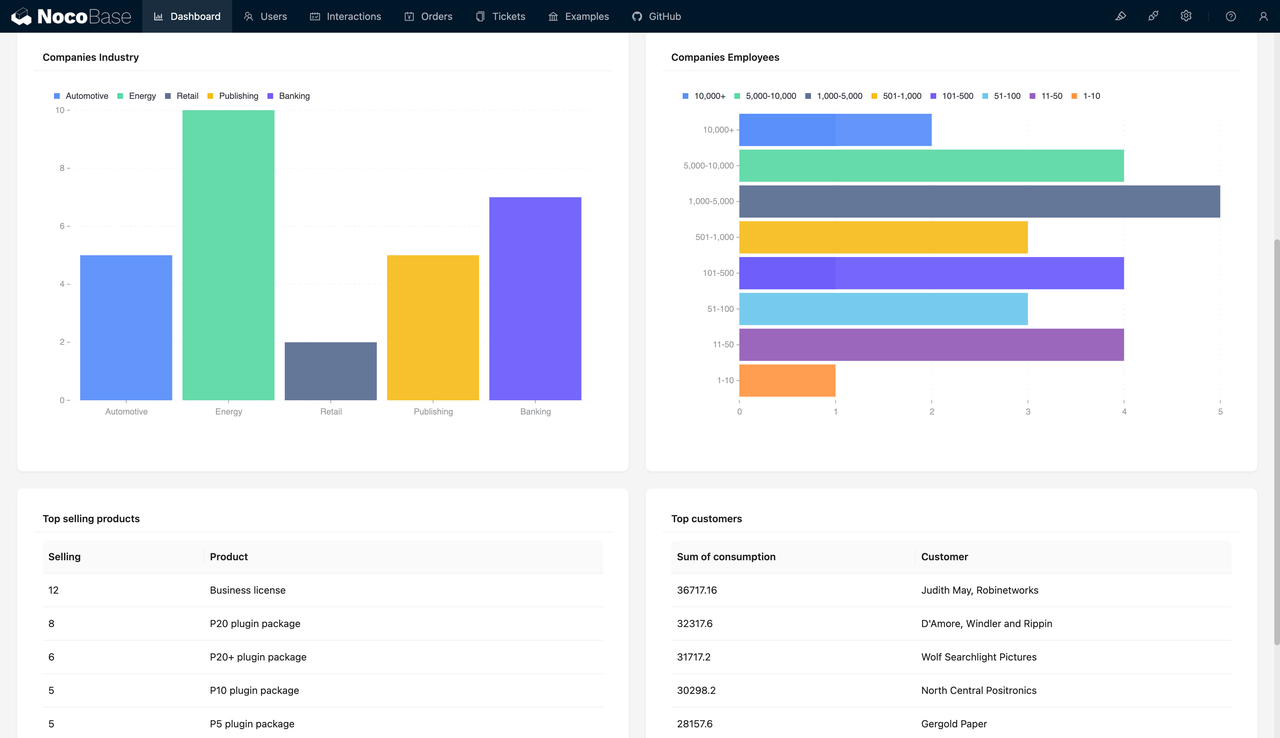
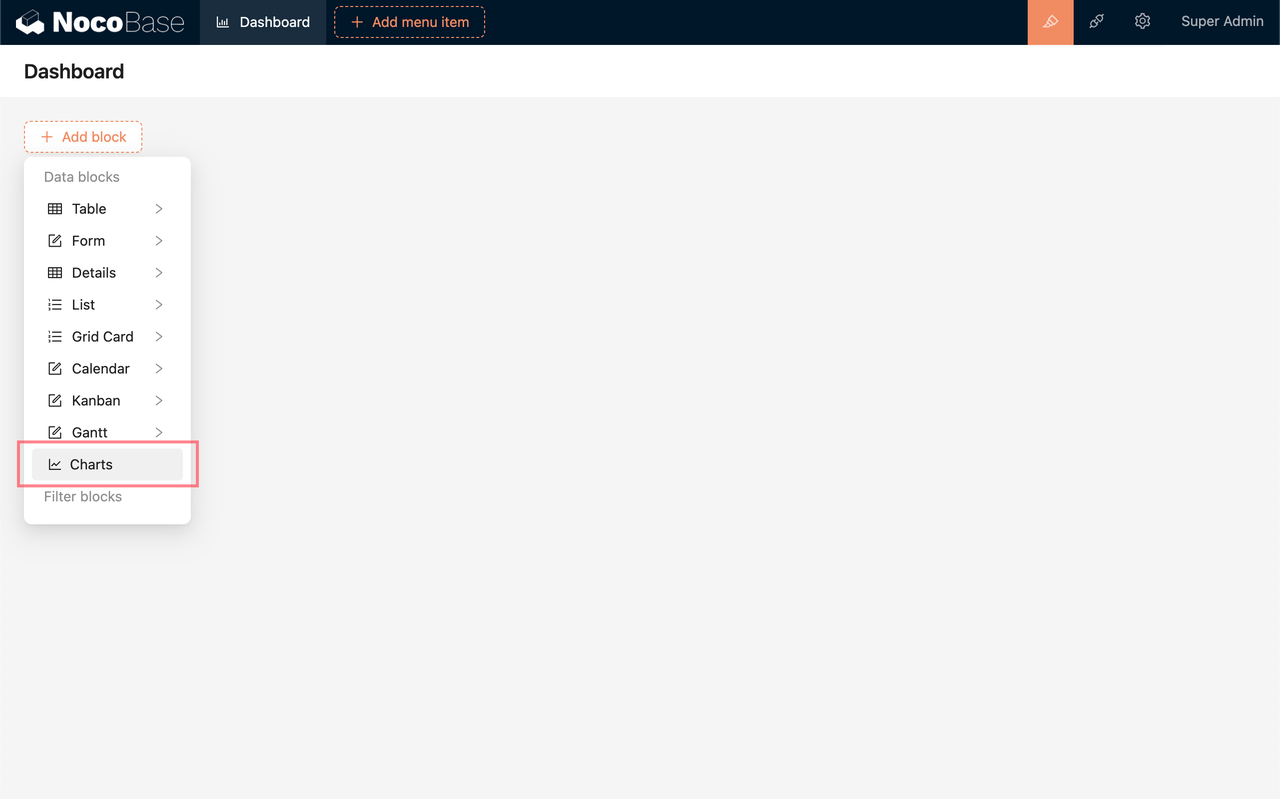
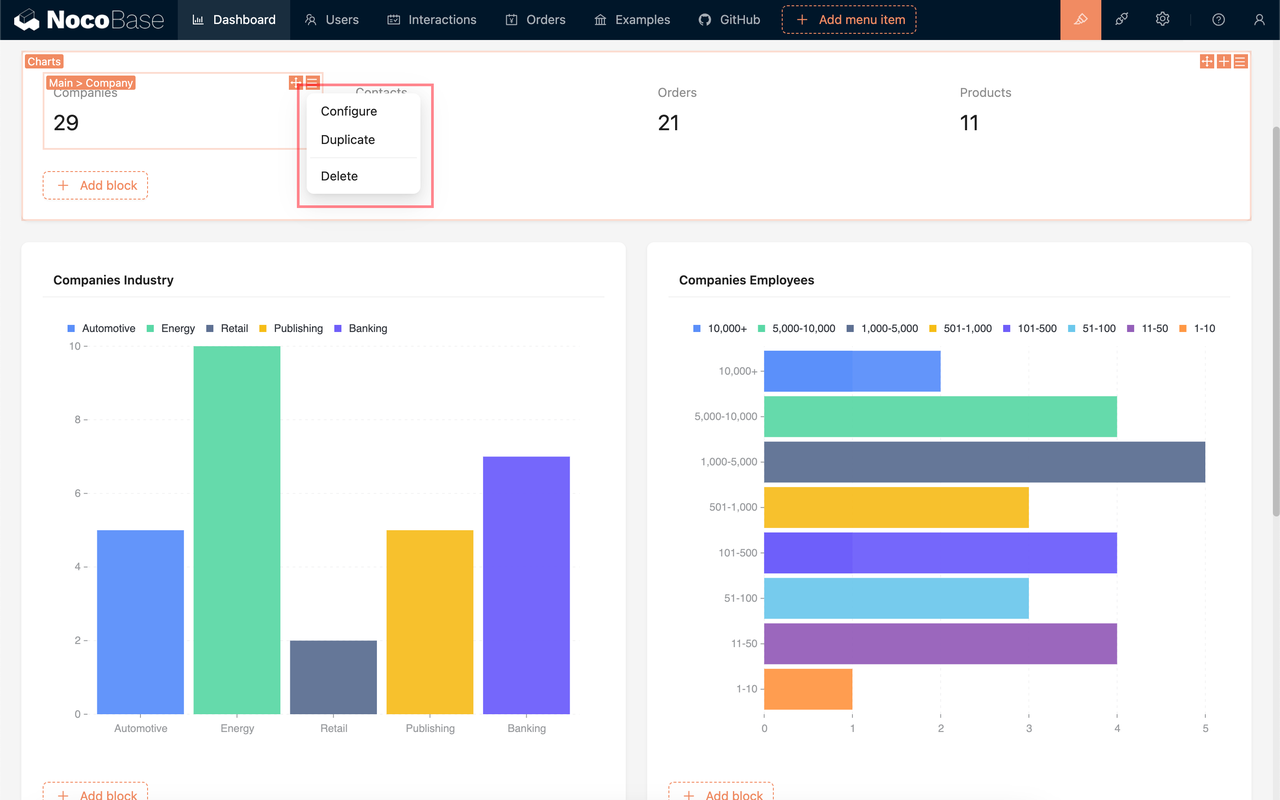
Dashboard: NocoBase supports integrating various data and visualization elements into dashboards, helping users view key data metrics in real-time. For instance, you can display key business insights like customer count, order status, and sales data using charts, progress bars, and statistic modules.
Configuring User Interactions
After designing the interface, the next step is to configure how users interact with the application. This includes defining how users interact with forms, buttons, navigation bars, and other elements, ensuring a smooth and intuitive user experience.
Beyond these basic interactions, NocoBase supports more advanced interactions, such as setting data visibility for different users, linking blocks for filtering and synchronization, and configuring complex field operations.
Some typical scenarios include:
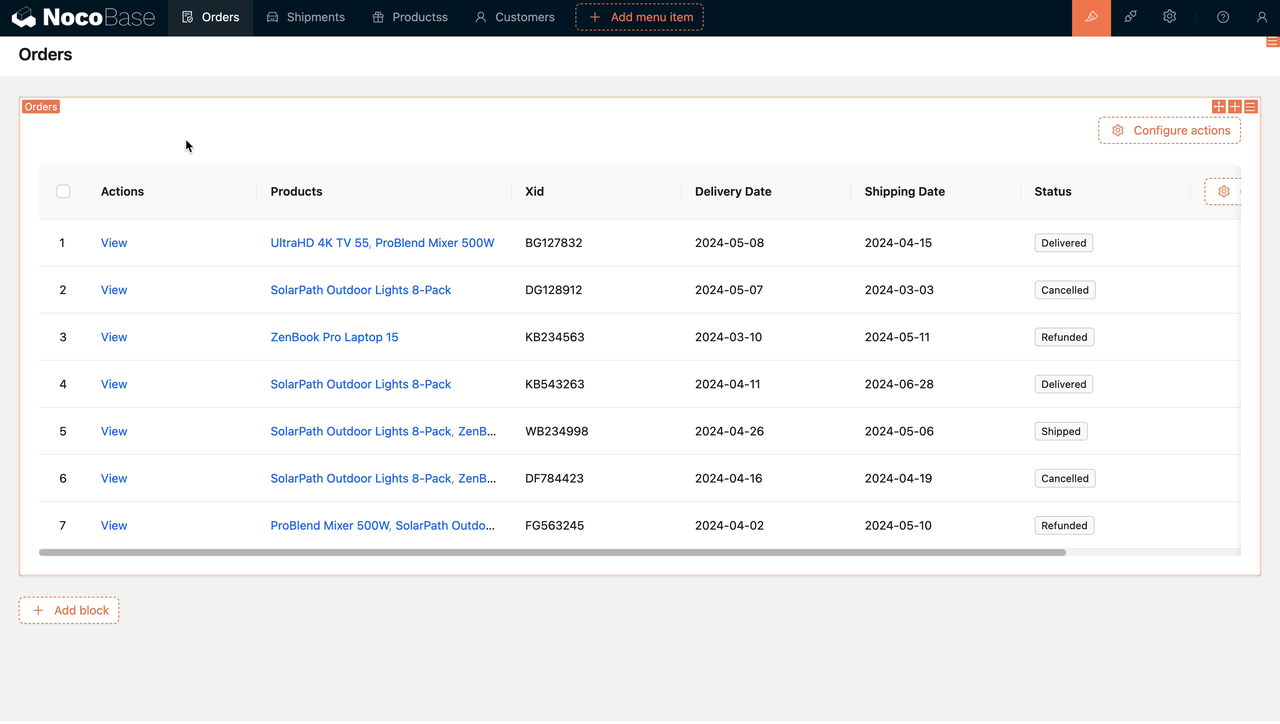
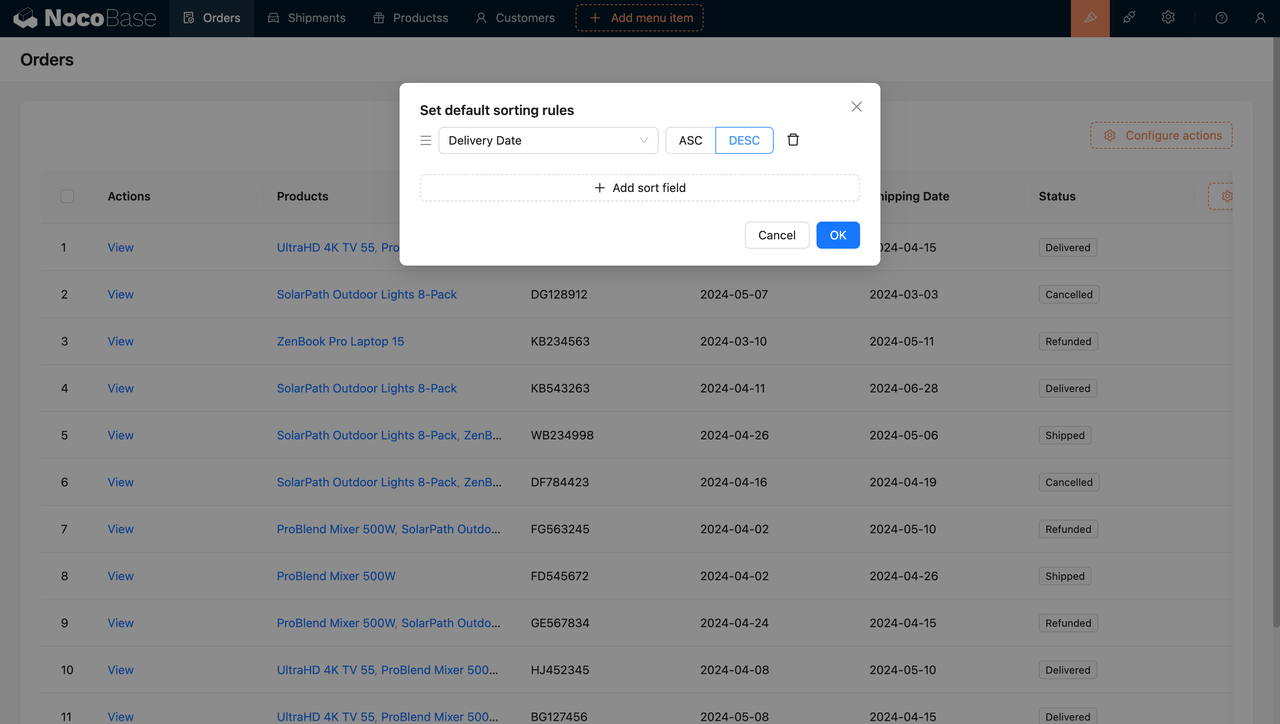
Setting Table Sorting Rules: For example, in a CRM, you can display documents sorted by shipping date in descending order.
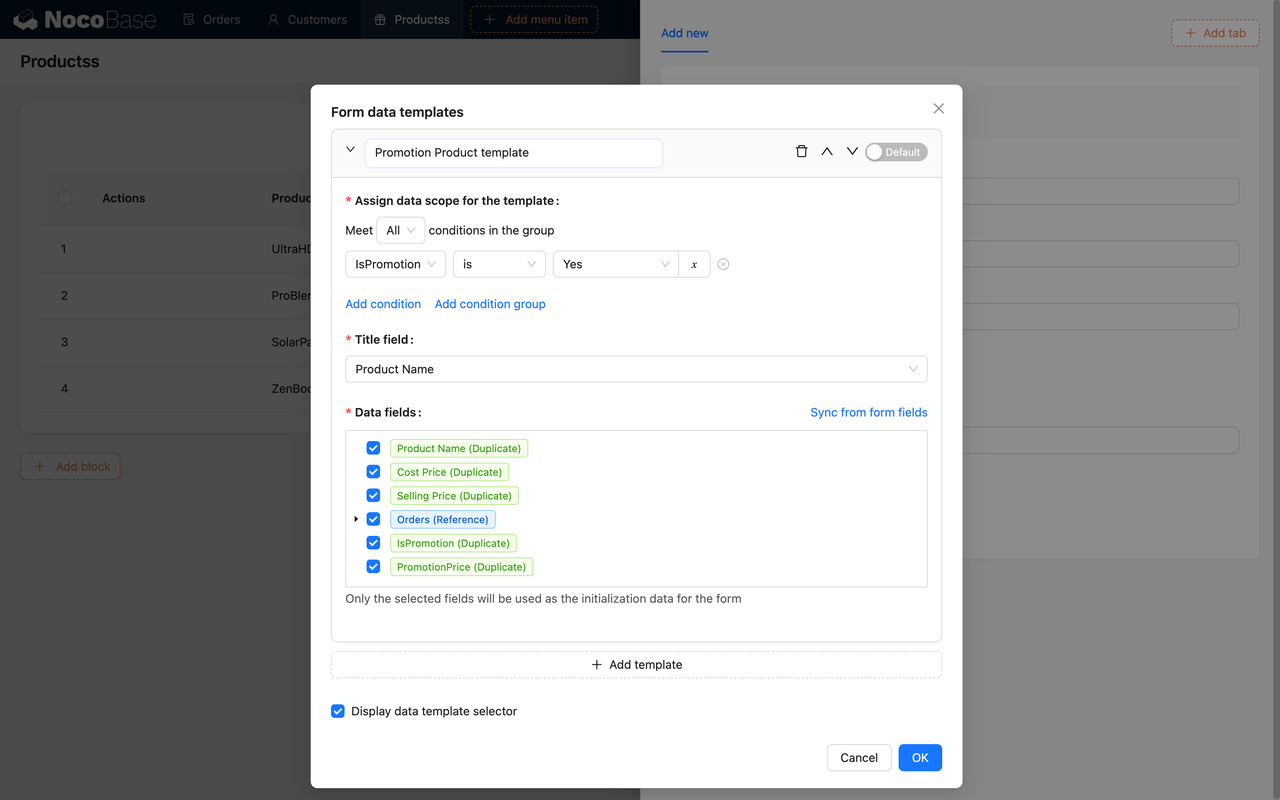
Form Data Templates: The purpose of form data templates is to simplify data entry and improve efficiency. By filtering a set of data as a template, the selected template data can be used to pre-fill form fields. For instance, on an e-commerce platform, where new products are frequently added and share similar attributes with existing products, you can select an existing product as a template. This template’s attribute information can then be applied to new products, significantly improving the efficiency of new product entry.
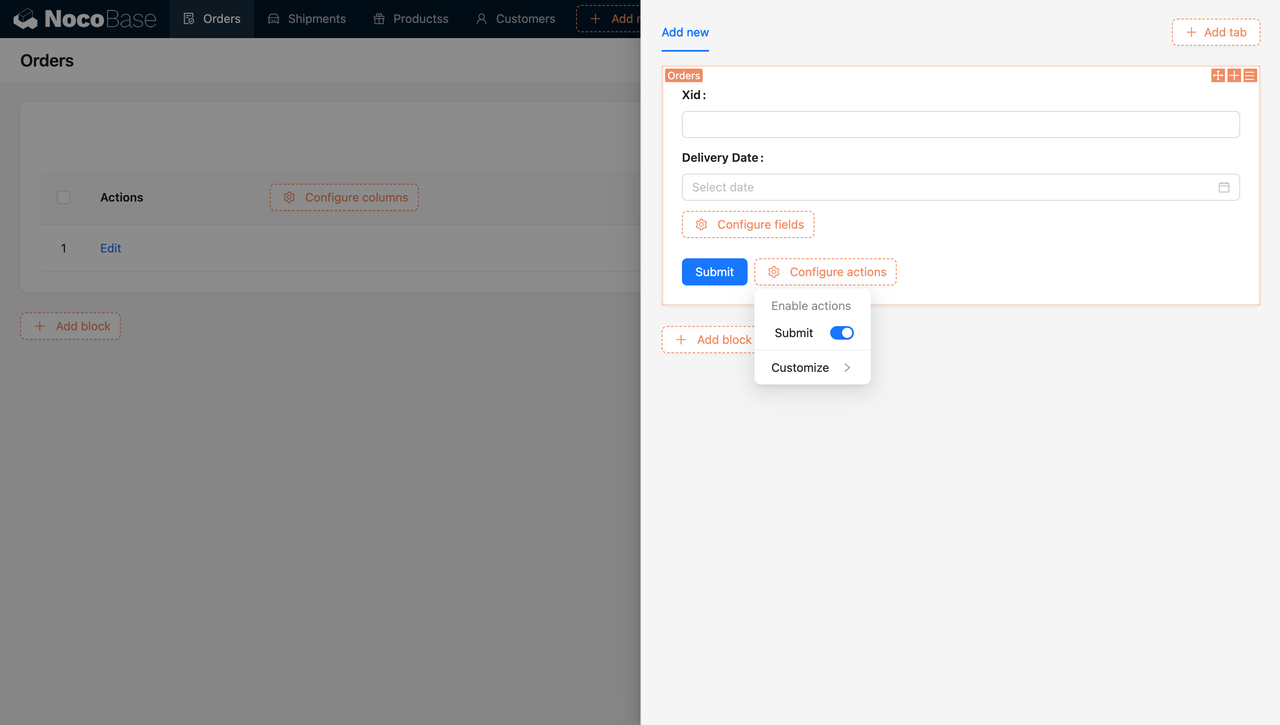
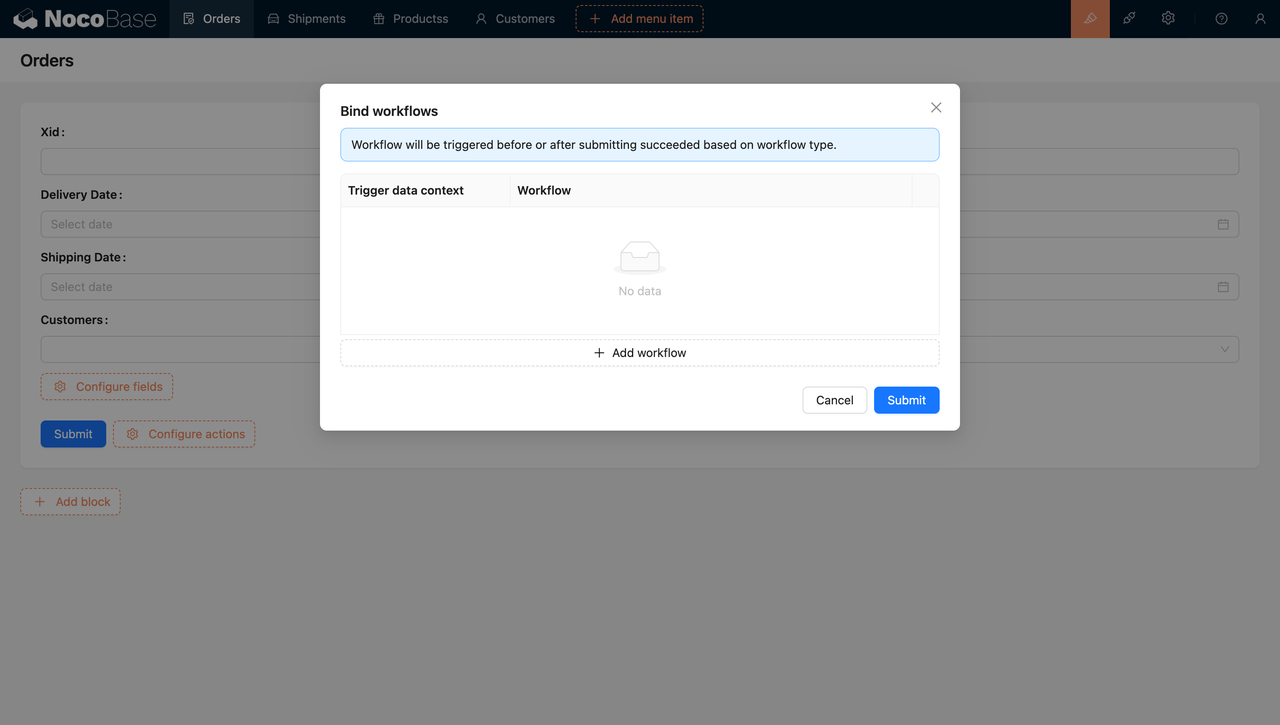
Button Clicks: Define the actions for buttons, such as saving form data and triggering workflows when the user clicks the “Submit” button (e.g., generating orders or sending notifications). You can also configure different buttons to perform different actions, like “Save and Continue” or “Cancel.”
Dynamic Interactions: NocoBase allows dynamic changes to interface elements based on user actions. For example, when a user selects a specific option, additional input fields can be shown or hidden, or calculations can be performed based on user input and displayed in real-time. A screenshot could show configuring a dynamic interaction where the “Copy” button is hidden for canceled orders.
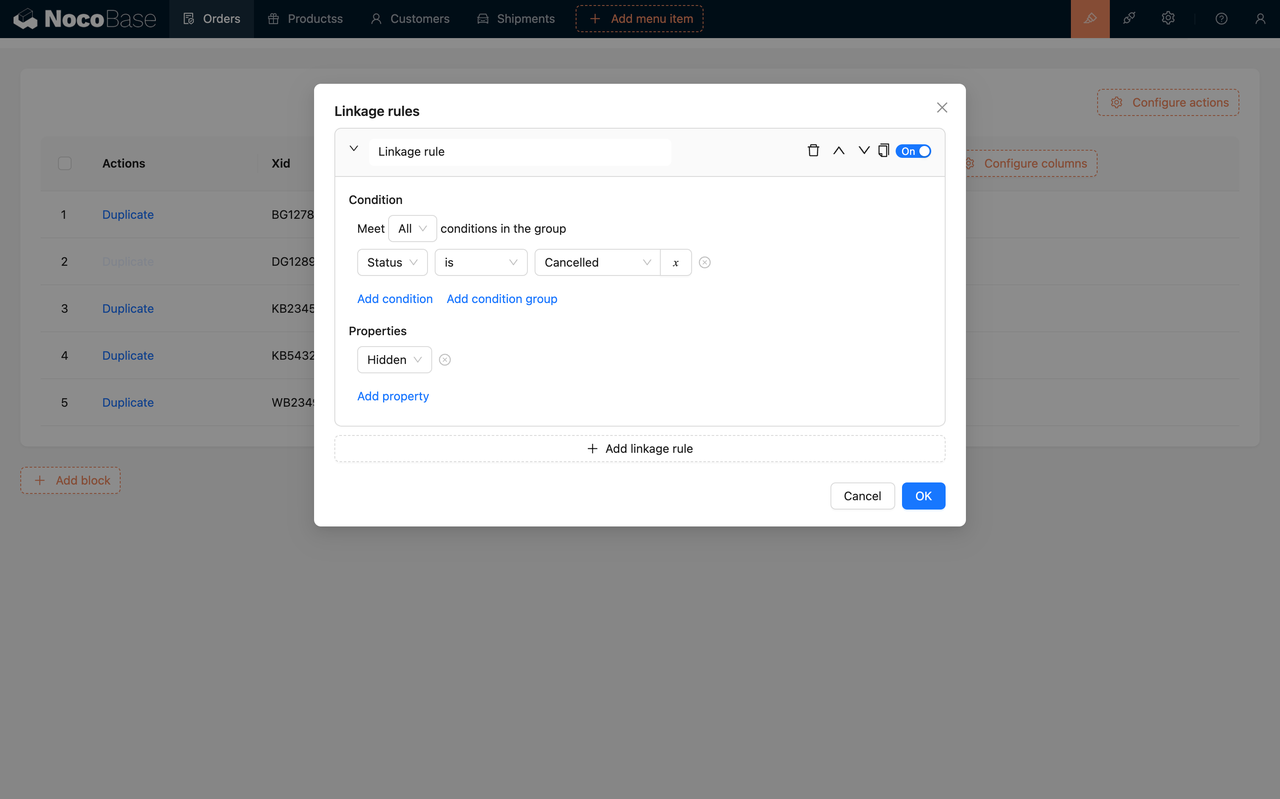
With these simple configurations, NocoBase allows you to implement complex business application scenarios. These settings ensure the application’s workflow meets user expectations, providing a seamless user experience and making the application more efficient and practical.
Creating Automated Workflows
After configuring the data model and user interface, the next step is to add automation features to the application, improving efficiency and reducing manual operations. NocoBase’s workflow tool provides users with powerful capabilities to define and manage automated tasks within business processes.
Defining Workflows
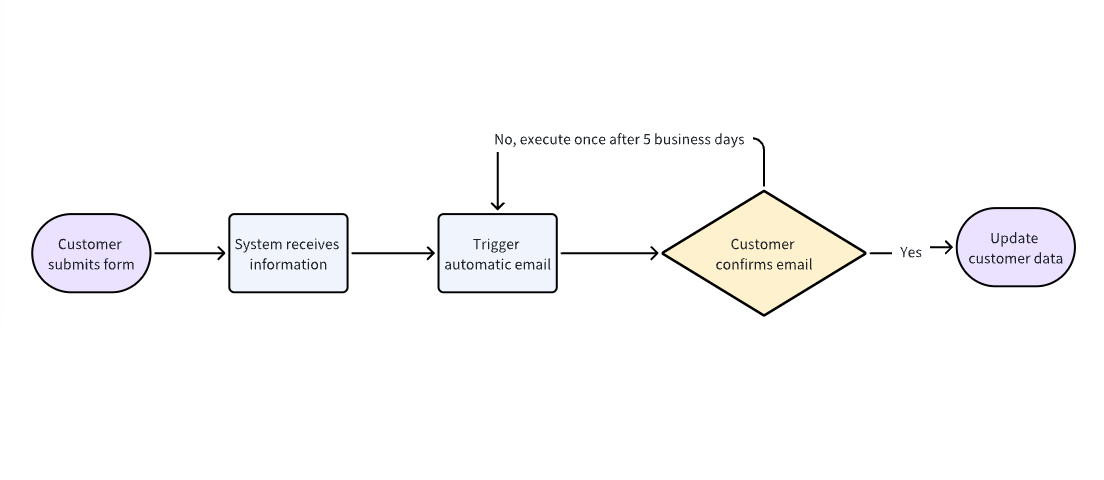
First, you need to identify which processes in your business can be automated. Below are common automated workflows in a CRM scenario. For more complex workflows, it’s recommended to sketch out the steps in a flowchart before configuration for easier reference.
- Automatically Send Confirmation Emails: For instance, when a customer submits information through an online form, the system can automatically send a confirmation email to the customer, informing them that their information has been received and will be processed.
- Order Status Notifications: In an order management system, when the order status is updated from “Pending” to “Shipped,” the system can automatically send notifications to relevant departments or customers to ensure timely communication.
- Scheduled Report Generation: Automatically generate and send scheduled reports, such as weekly sales statistics or monthly customer analytics, reducing the manual workload.
Once you’ve defined your automation scenarios, you can begin configuration.
Configuring Workflows
In NocoBase, workflows consist of several key concepts:
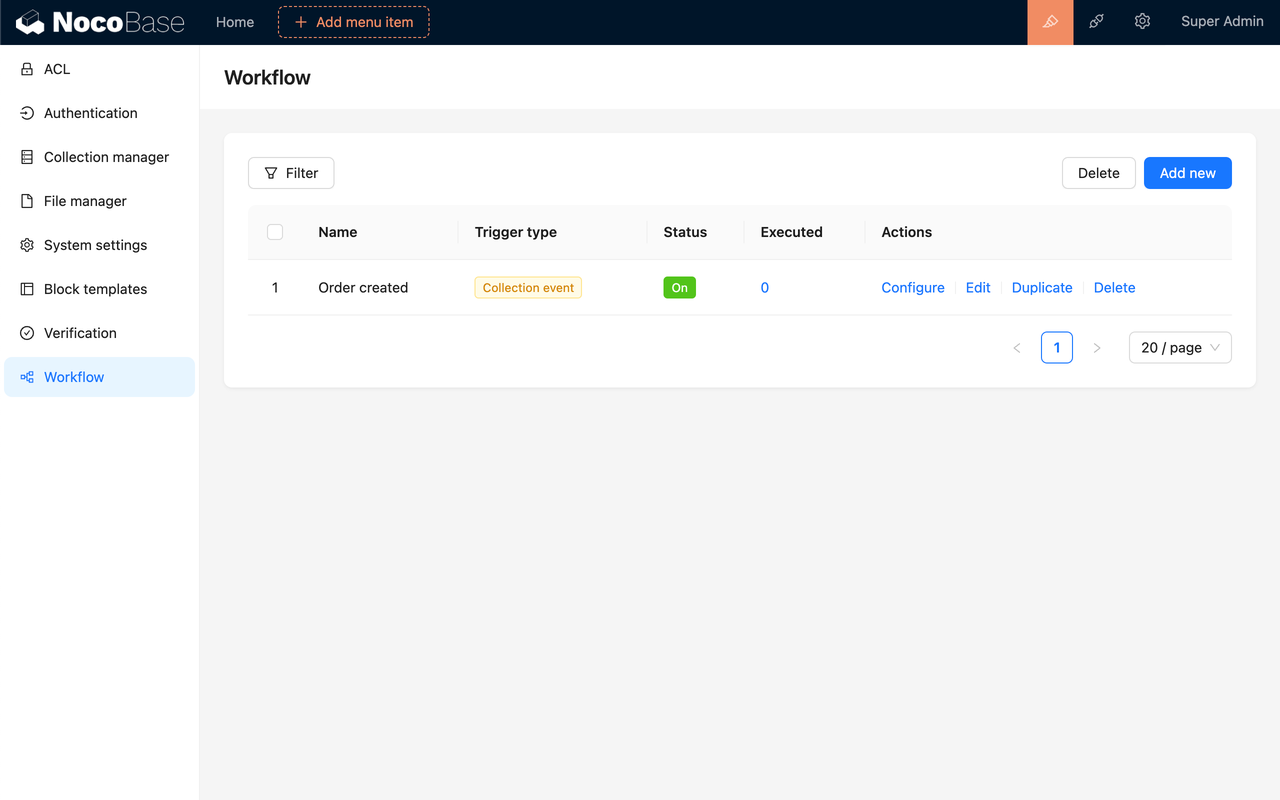
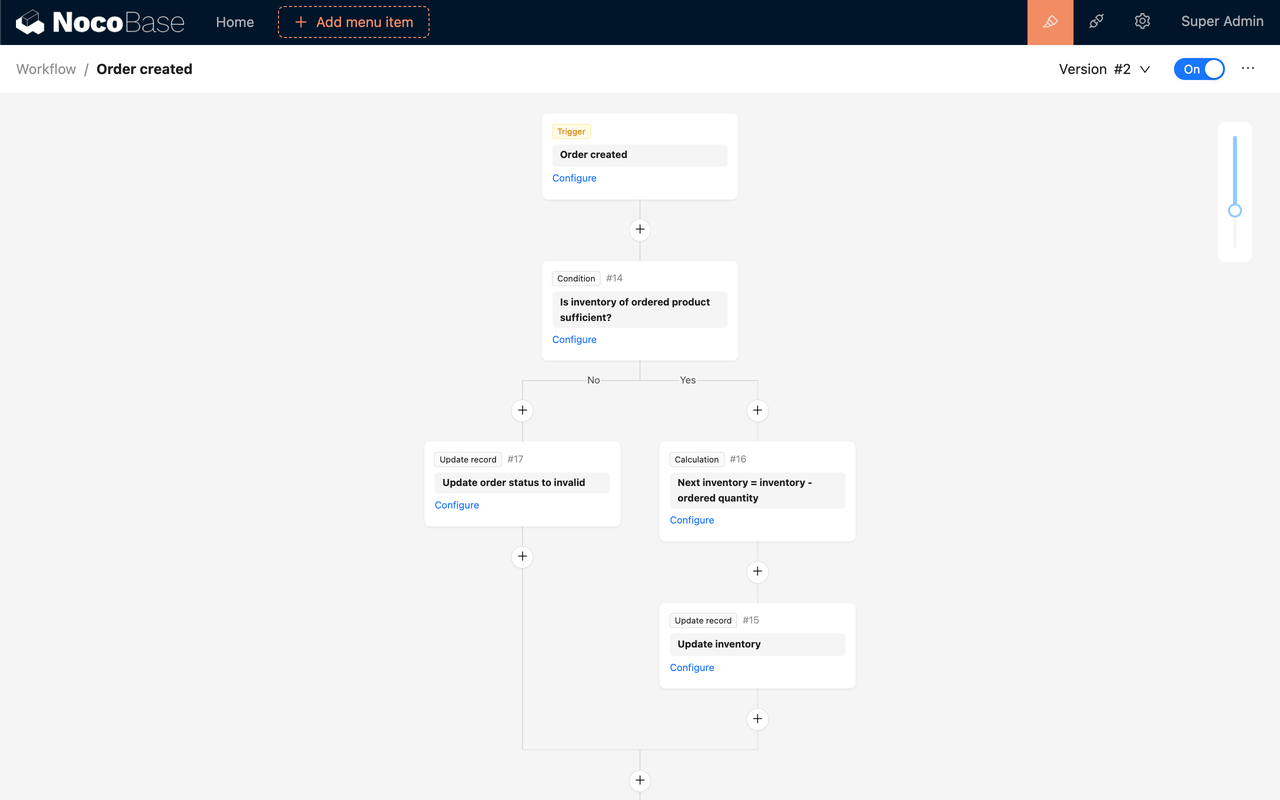
Workflow: It defines the basic information of the workflow, including its name, trigger type, and On/Off status. Within a workflow, you can configure multiple nodes. It serves as the container for the process.
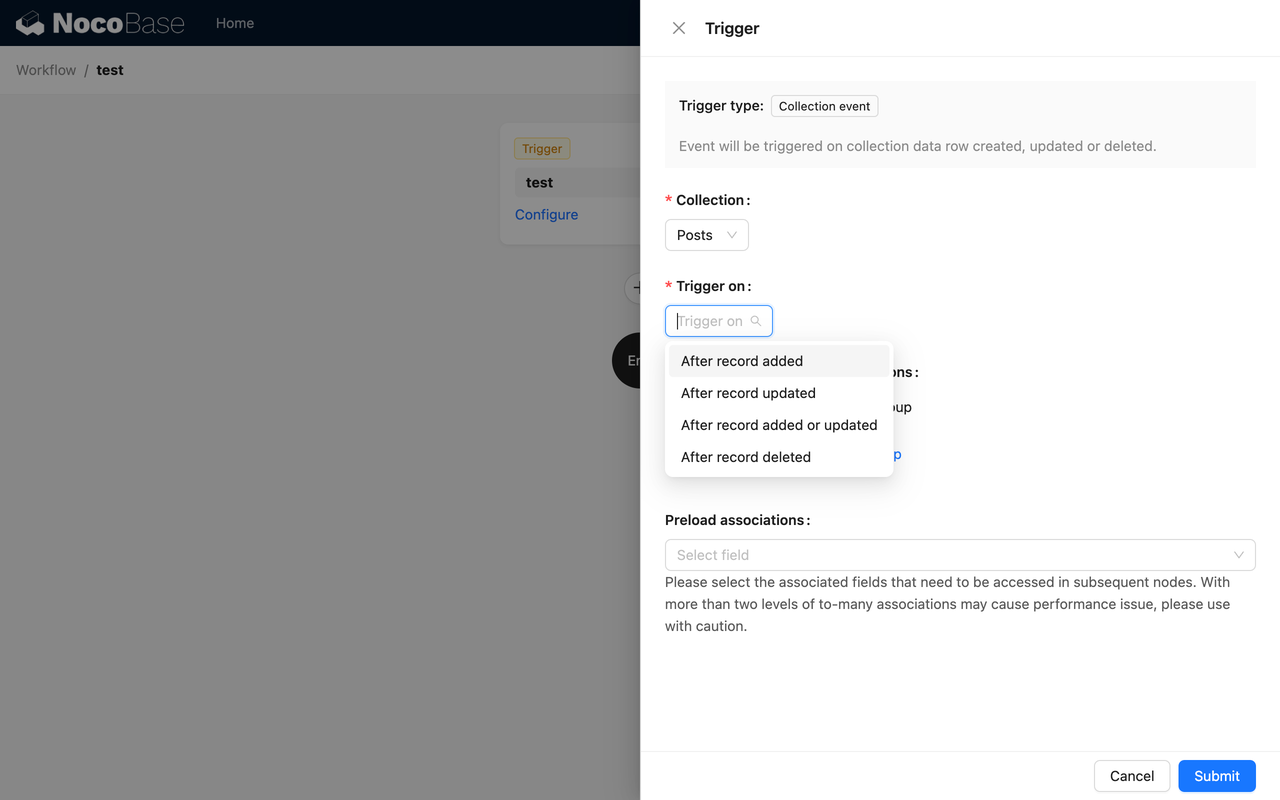
Trigger: Each workflow contains a trigger, which can be configured to specific conditions that triggers the workflow. It serves as the entry point of the workflow.
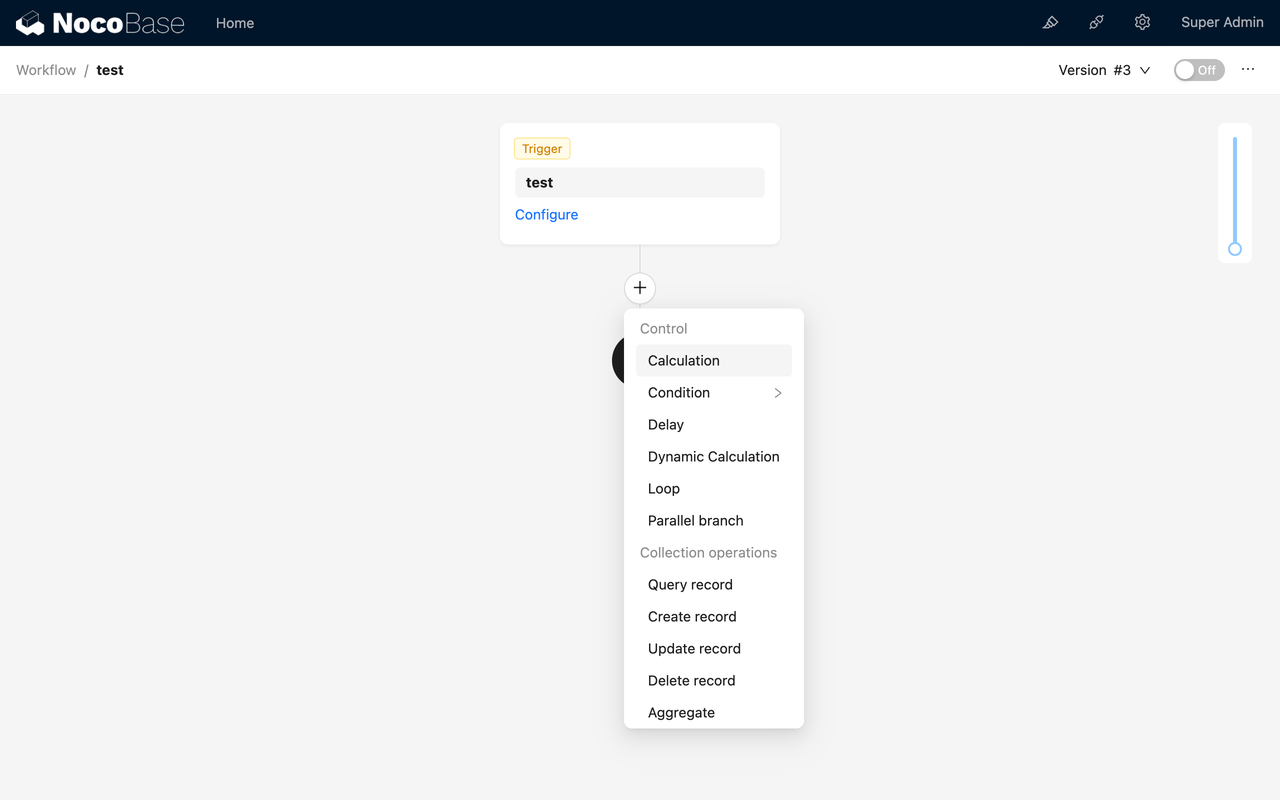
Node: A node is an instruction unit within the workflow that performs specific actions. Multiple nodes within a workflow are interconnected in an upstream and downstream relationship, forming a complete process flow.
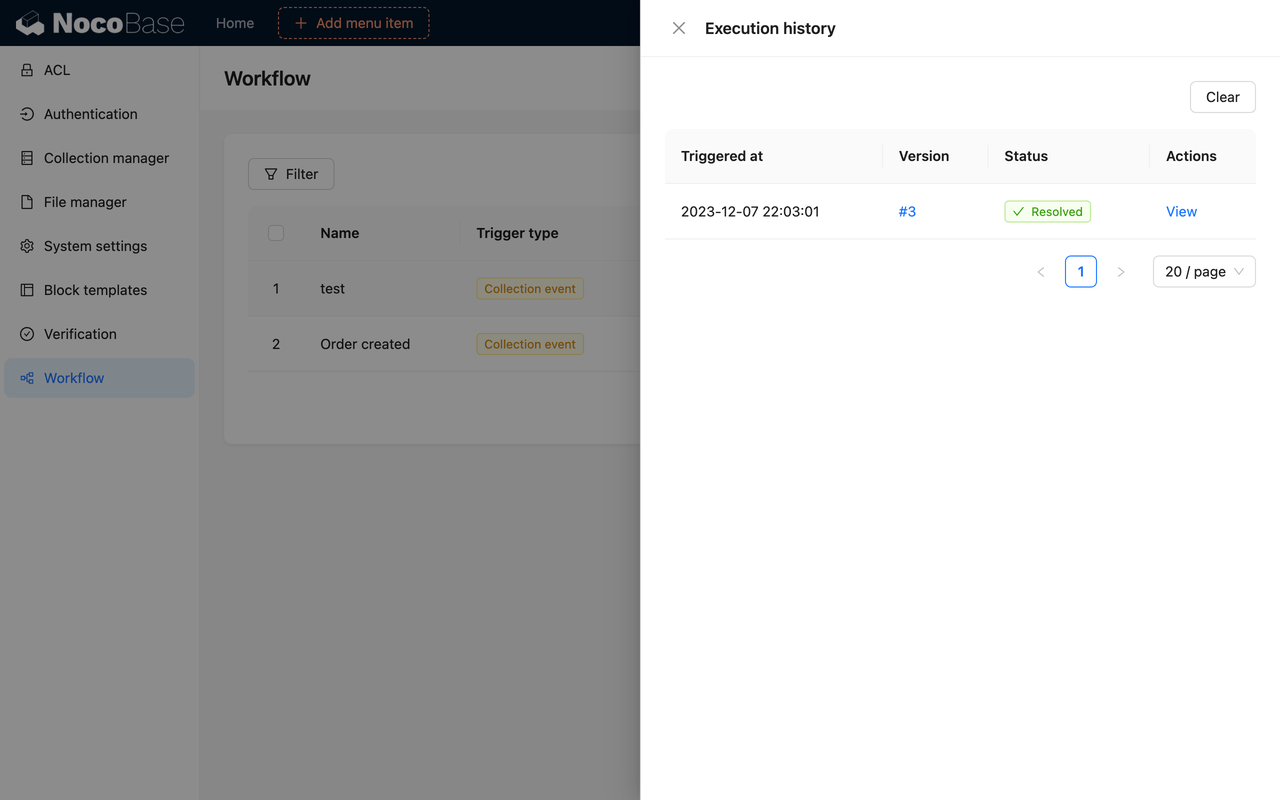
Execution: The execution represents the specific objects that are executed after the workflow is triggered. It is also known as execution record or execution history, and it includes information such as the execution status and trigger context data. For each node, there is a corresponding execution result which includes the node’s execution status and data.
For more details on configuring workflows, you can refer to NocoBase’s workflow documentation.
After setting up workflows, these automated processes will run as expected, reducing manual intervention and improving the accuracy and efficiency of operations.
Configuring Permissions and Roles
Security and access control are crucial when building business applications. NocoBase provides flexible permissions and role management features, ensuring that different types of users can only access and operate data and features relevant to their responsibilities. With proper permissions configuration, businesses can better protect sensitive information and ensure secure system usage.
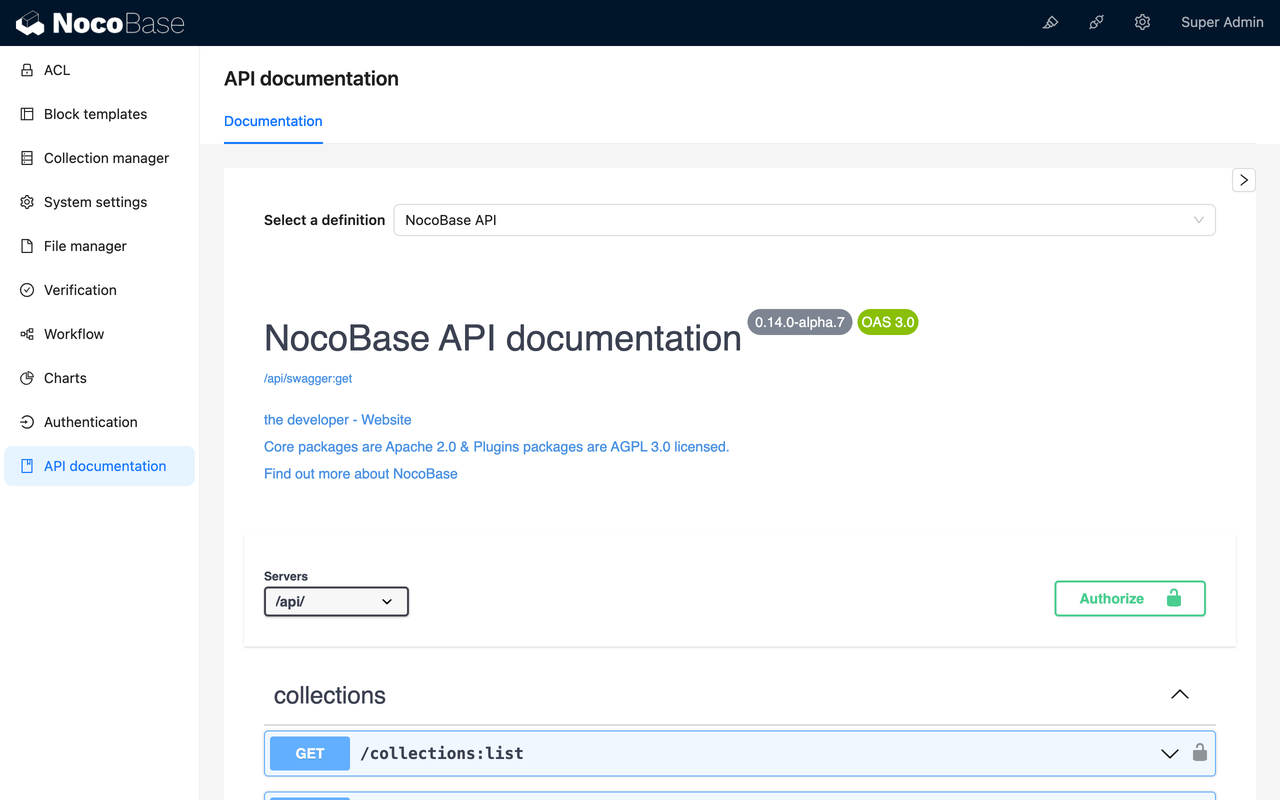
NocoBase offers user authentication as a plugin.
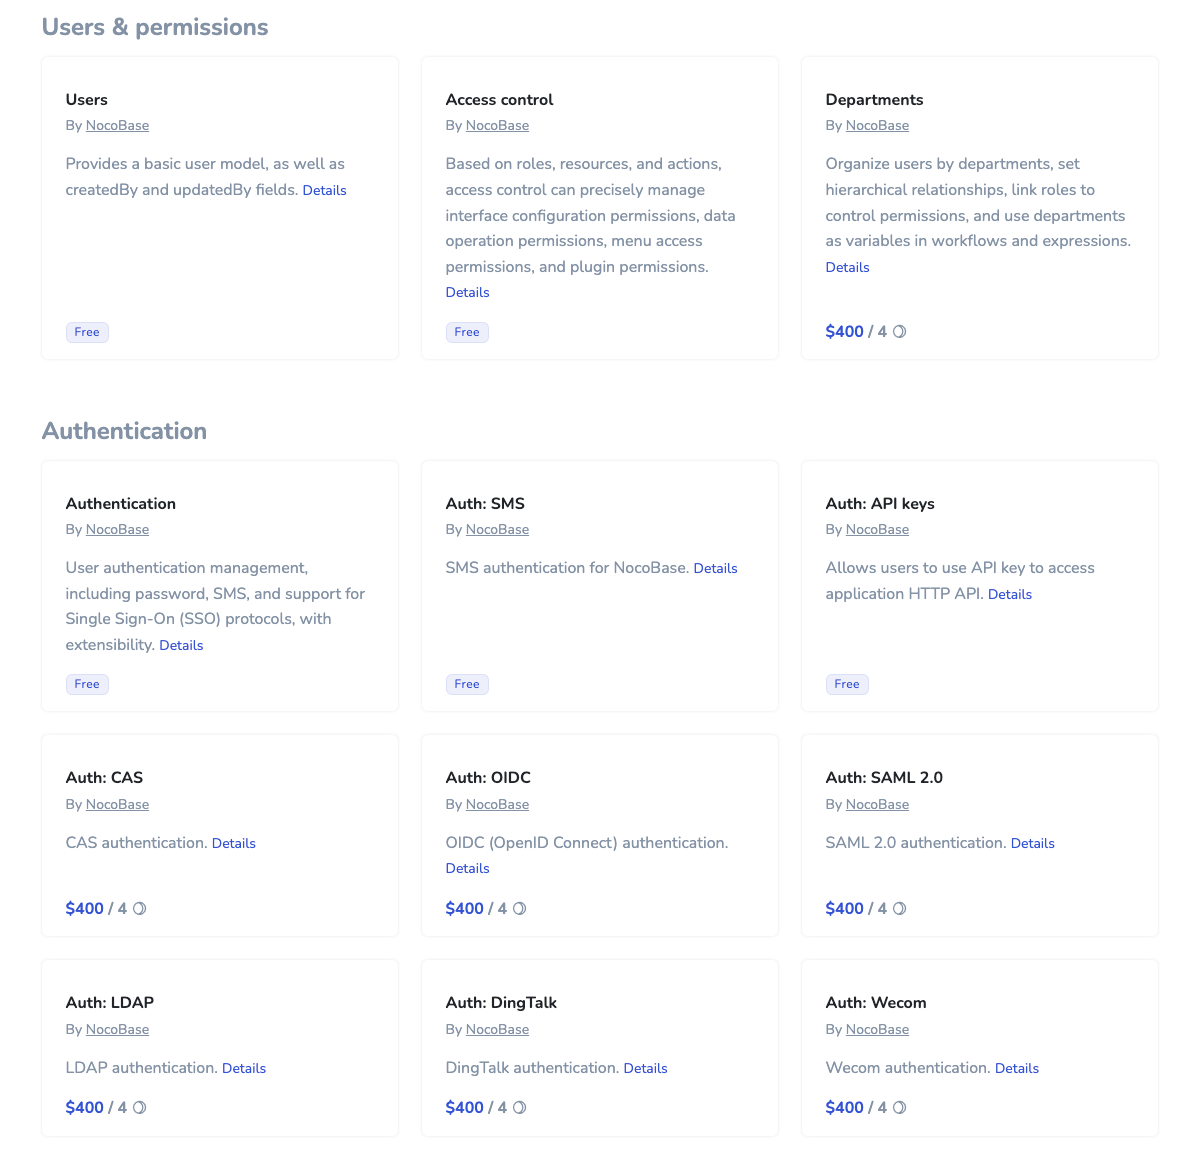
By configuring the relevant authentication methods, users can log into the system using platforms like Google Workspace, Microsoft Azure, or third-party tools like Auth0, Logto, and Keycloak.
In NocoBase, role management allows you to assign appropriate permissions based on the responsibilities of different users, ensuring that each user can only access and operate within their authorized scope.

Common user roles include:
- Administrator: Has the highest level of permissions, able to manage all data, configurations, users, and workflows. Administrators can add or remove users, modify system settings, and view all sensitive data.
- User: Can access modules and data relevant to their role. For example, salespeople can view and manage their customers and order statuses but cannot access financial data or system settings.
- Guest: Guests or external users may only access public data and cannot modify the system. They might be able to view public reports or partial data records.
With role-based permissions, NocoBase provides businesses with granular control, ensuring that each user operates within their defined responsibilities.
Testing, Optimizing, and Deploying
After completing the above steps, the next phase is ensuring the application runs smoothly. You’ll need to test whether all modules are functioning correctly, especially the automation processes and data relationships. Once the testing is complete, you can release the application to a small group of users for feedback and fine-tune the application based on user experience.
Once all tests are passed and users are satisfied, the application is ready for deployment. With NocoBase’s recommended three different deployment methods, you can easily publish the application to the production environment, ensuring users can access and use it without issues.
Post-deployment, continuous maintenance and iteration are equally important. By using logs and monitoring tools, you can maintain NocoBase efficiently, helping you detect and resolve problems in a timely manner, optimize system performance, and ensure the reliability and availability of the system.
Additionally, you can update and extend the application based on changing business needs (e.g., developing plugins), ensuring that the application can continue to meet the demands of a growing business.
Conclusion
As businesses’ demand for application development increases, the challenge lies in how to meet complex business needs while maintaining flexibility and efficiency. Traditional development methods are often time-consuming and expensive, whereas NocoBase offers a more efficient solution. It’s capable of handling complex business scenarios, enabling automation, and providing high scalability.
By using NocoBase, businesses can quickly develop applications that meet their needs, from defining requirements, designing data models, and configuring the interface to creating automated workflows and managing security. After testing and optimization, the application can be smoothly deployed and iterated as the business grows. Whether for small, medium, or large enterprises, NocoBase provides strong support for efficient business application development.
We invite you to try NocoBase to accelerate your business application development and help your company quickly respond to market changes and maintain a competitive edge.
😊 Finally, if this article has inspired you in business application development, please share it with your friends. Thanks!
Related reading
- NocoBase vs. Appsmith: Which Open Source Low-Code Platform is Right for You?
- Open Source CRUD Development Tools: NocoBase vs Refine
- Deep Dive: Low Code/No Code Integration Capabilities
- NocoBase vs NocoDB: An In-Depth Comparison of Open Source No-Code Tools
- Top 6 Core App Dashboard Building Tools
- Top 7 Open Source Alternatives to Airtable with the Most GitHub Stars