Hello, everyone! Welcome to Chapter 5! This chapter is packed with exciting content as we expand functionality in the task management page, enabling various viewing options. I bet you’ve been looking forward to this, right? No worries — I’ll guide you step-by-step, and as always, we’ll breeze through it together!
5.1 Tab Containers for Organizing Blocks
We’ve already set up a task management page, but to make the system even more intuitive, we want tasks to be viewable in different modes, such as Table, Kanban, Calendar, and even Gantt Chart. Using NocoBase’s tab feature, we can toggle between these different block layouts on the same page. Let’s walk through the steps.
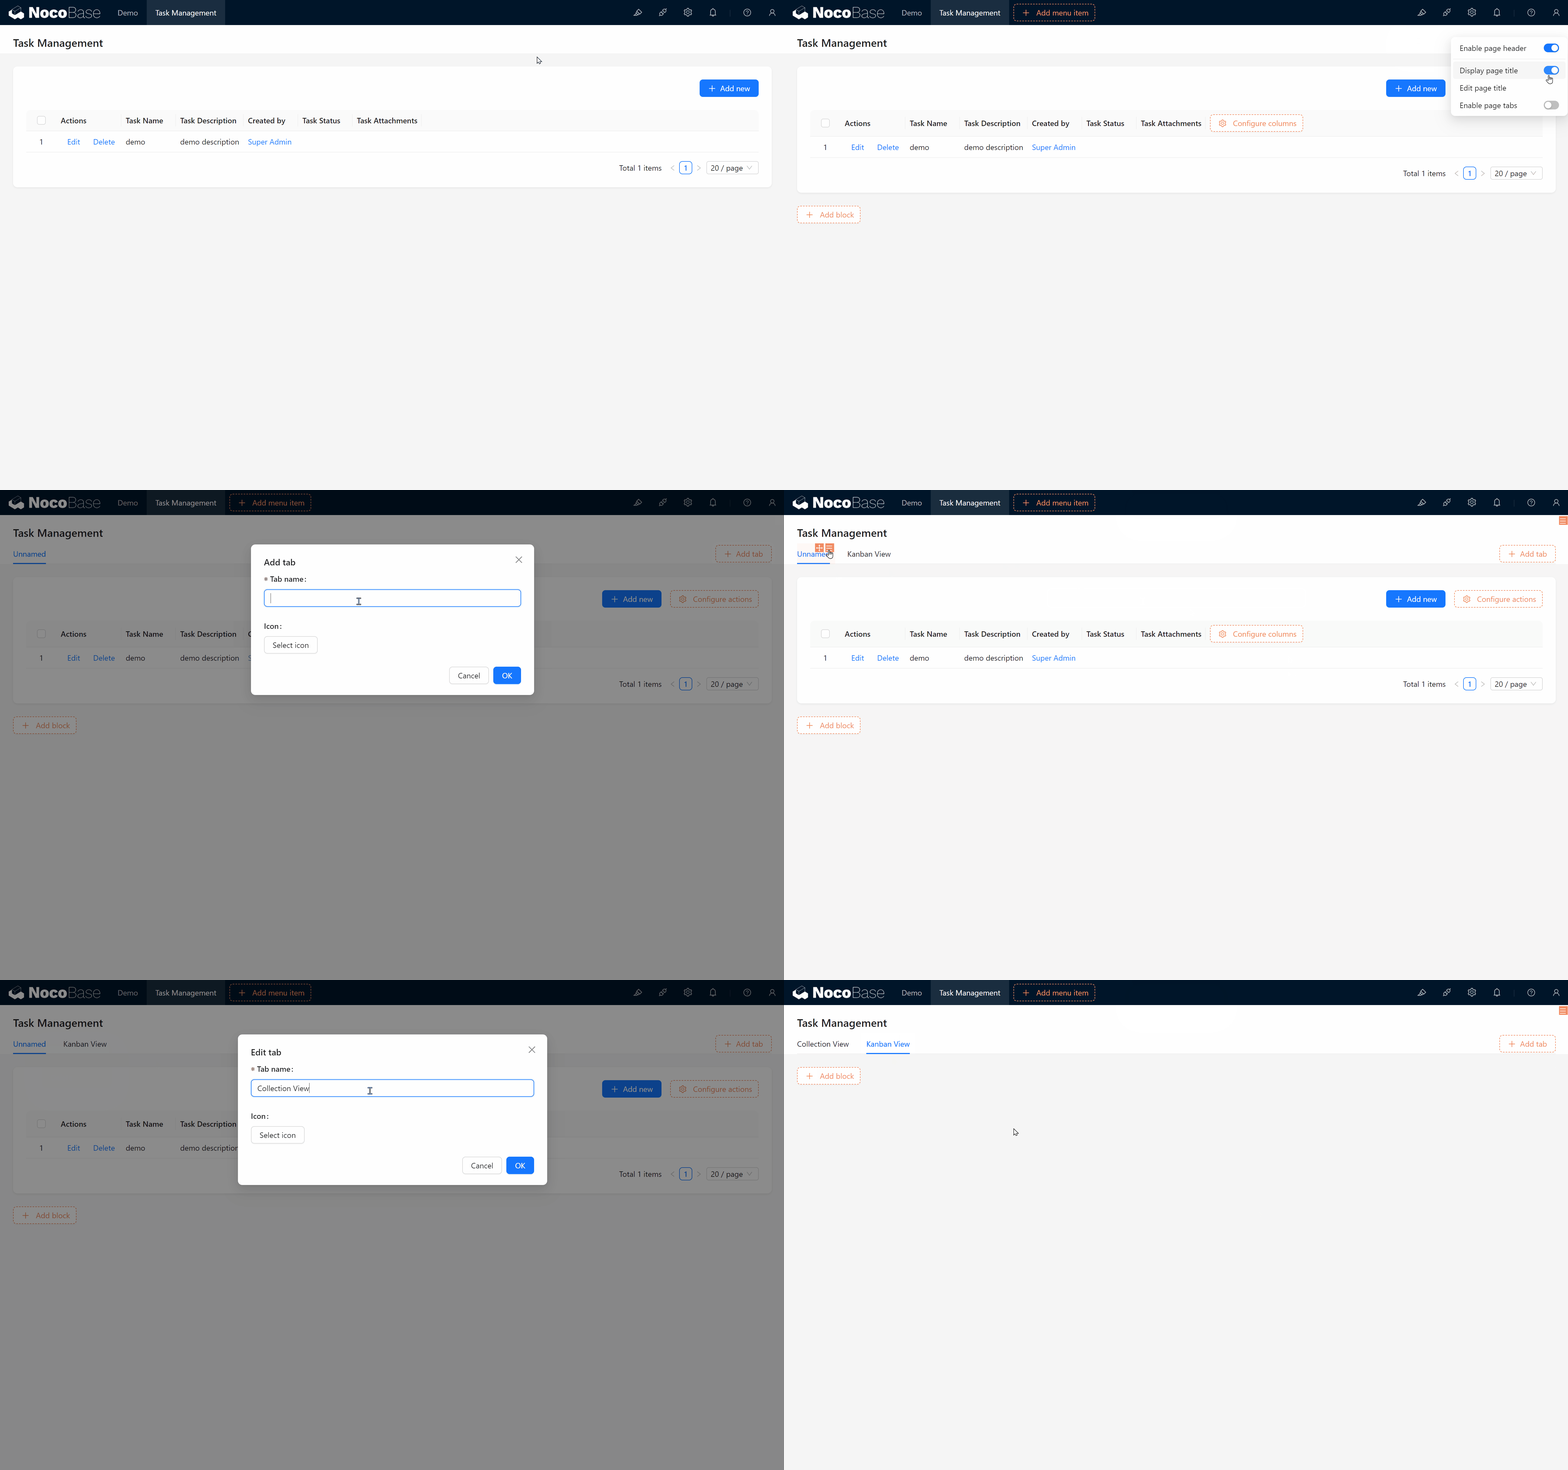
- Creating a Tab Let’s start by setting up a tab.
-
Adding a Sub-tab
- Open your existing task management page, and within the page, create a sub-tab. You can name the first tab “Table View”, where we will display the task list block that was previously set up.
-
Adding Another New Tab
- Next, add a second tab, naming it “Kanban View”. Here, we’ll create a Kanban block to manage tasks.
Ready? Let’s dive into creating each block type!
Block Introduction: Blocks are data and content carriers that present information in the most suitable format on a website. Blocks can be added to a Page, Modal, or Drawer, and multiple blocks can be freely arranged via drag-and-drop. Using blocks in NocoBase makes page and feature building fast and flexible, while templates allow easy replication and referencing, greatly reducing setup time.
5.2 Kanban Block: Task Status at a Glance
Kanban is an essential feature in task management systems, allowing intuitive task management through drag-and-drop. For instance, you can group tasks by status to get an instant overview of each task’s current stage.
5.2.1 Creating a Kanban Block
-
Start Building a Kanban Block
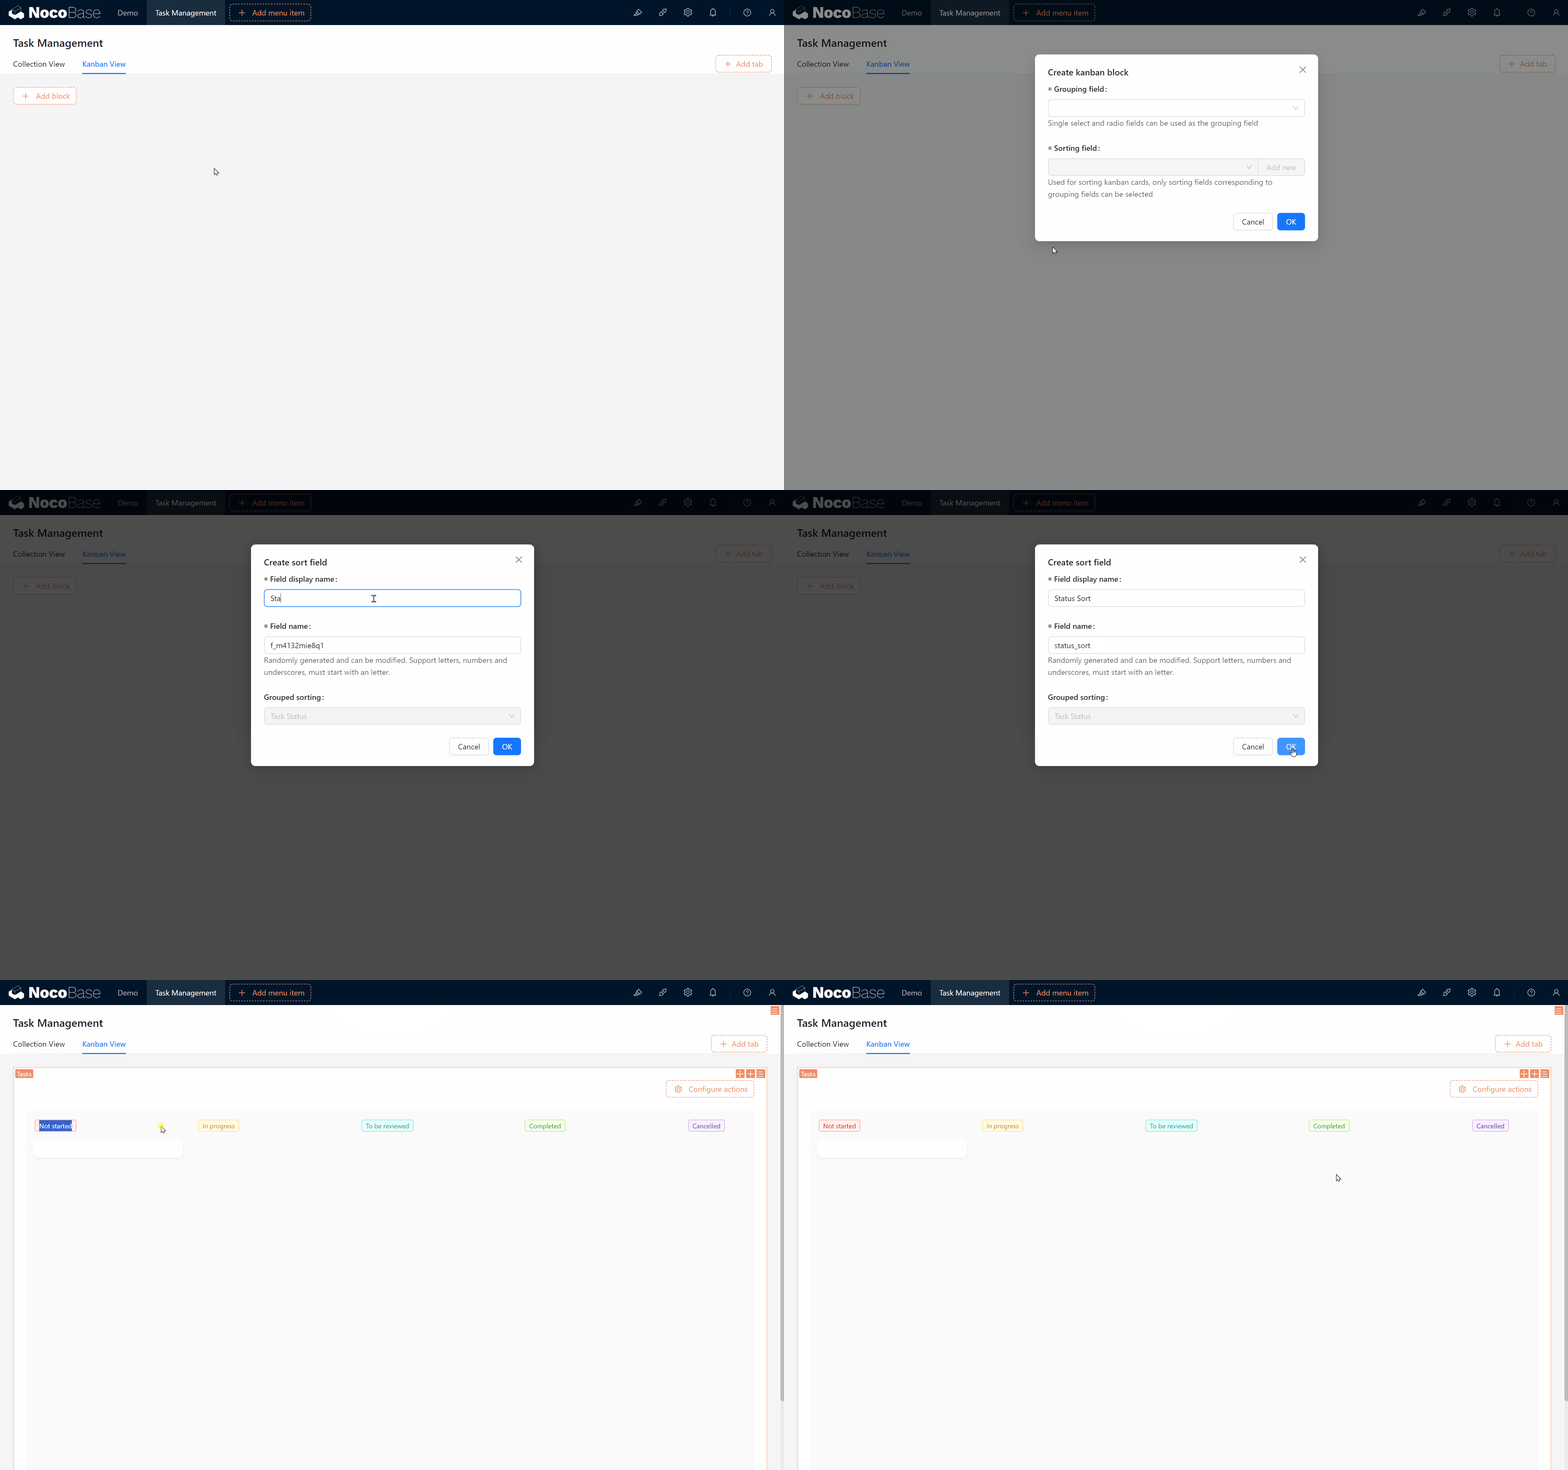
- Within the Kanban View tab, click “Create Block,” select the task collection, and an option will appear asking which field you want to use for task grouping.
-
Choosing a Grouping Field
- We’ll select the Status field to group tasks by their status. (Grouping fields should be of type “Dropdown (single select)” or “Radio group.”)
-
Adding a Sorting Field
- Within the Kanban view, cards can be organized by a sorting field. To set this up, create a new sorting field named Status Sort (status_sort).
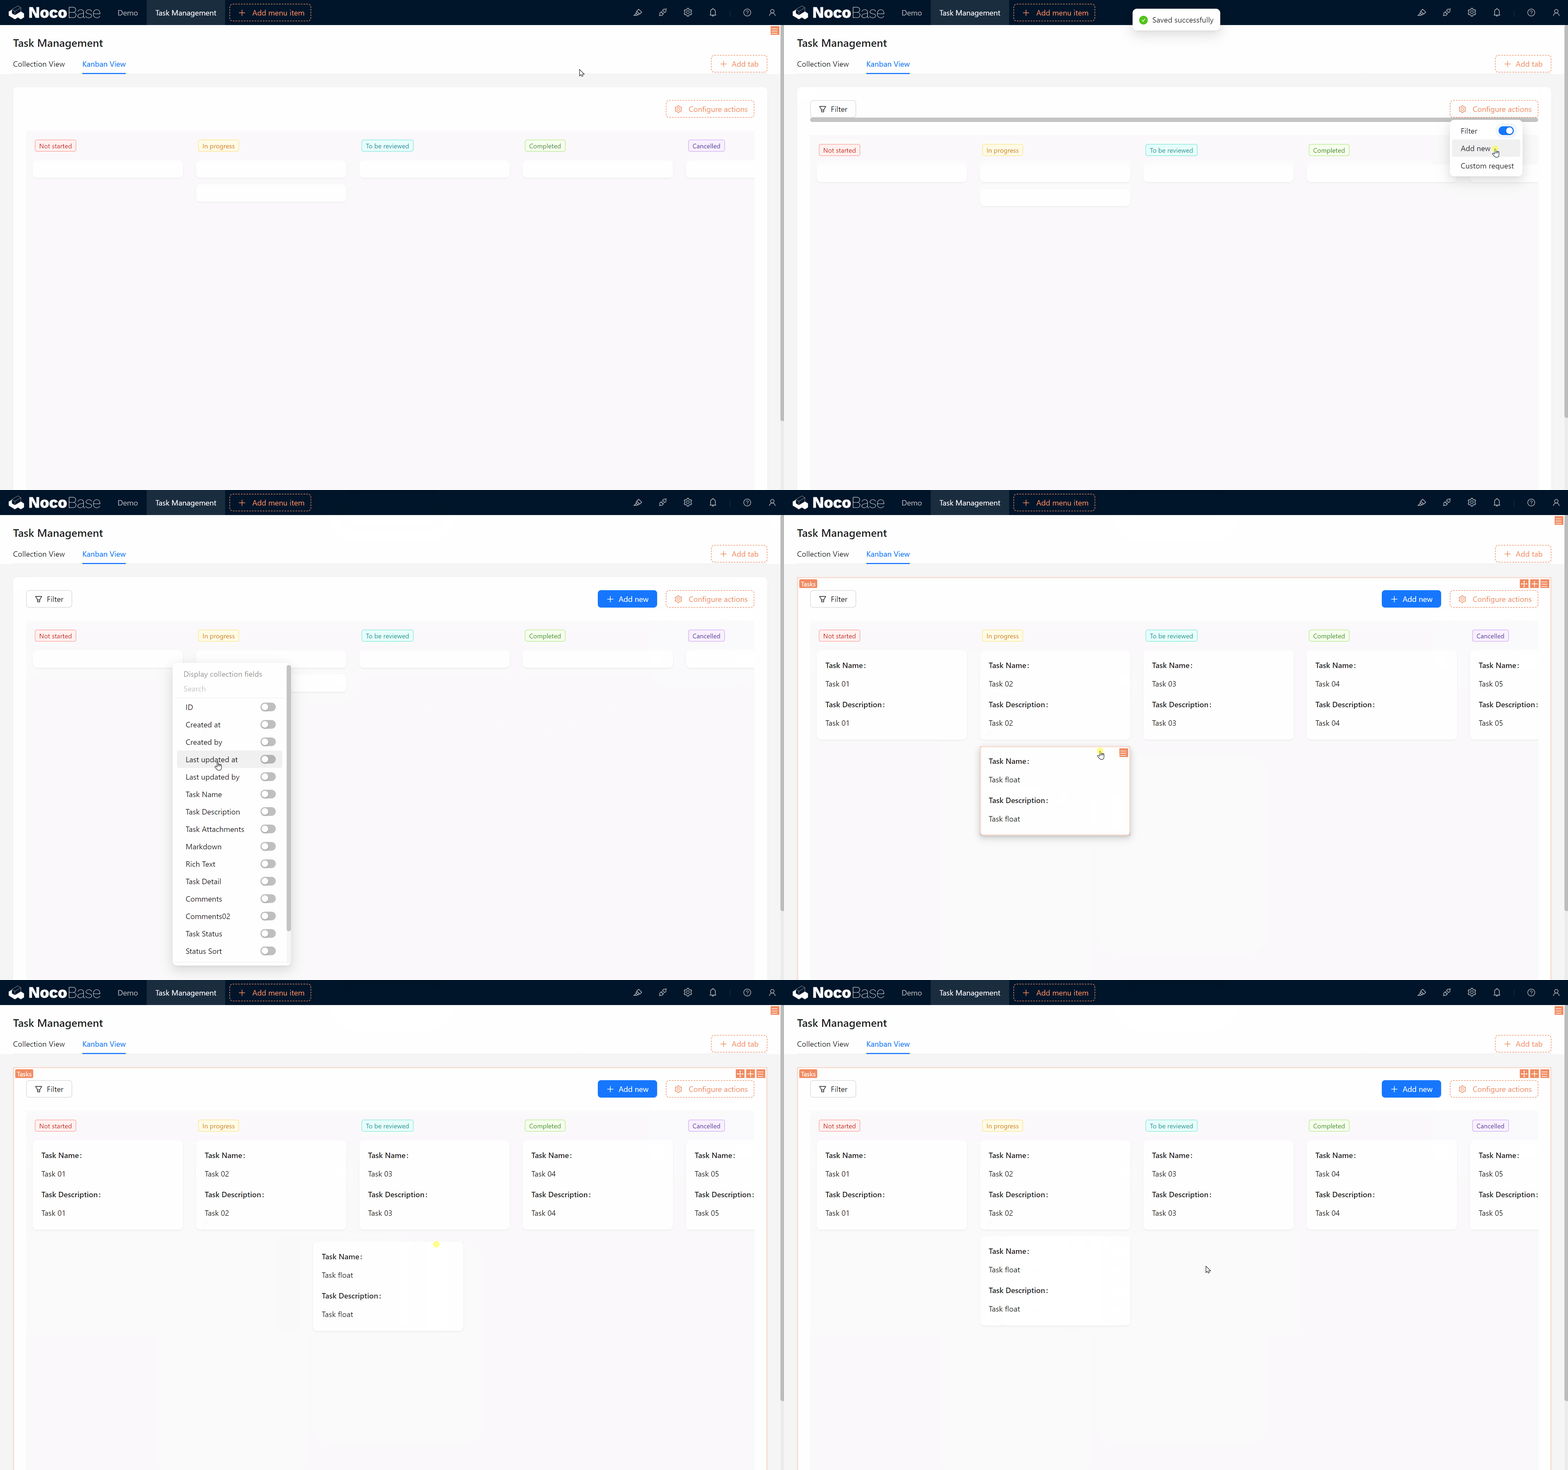
- This field allows cards to be arranged vertically within each status group. Later, when we drag and drop cards, the sorting values will be updated automatically and can be reviewed in the form.
5.2.2 Selecting Fields and Configuring Operations
- Lastly, be sure to select fields in the Kanban block, like task name and task status, to ensure that each card contains complete, relevant information.
5.3 Using Templates: Copying and Referencing
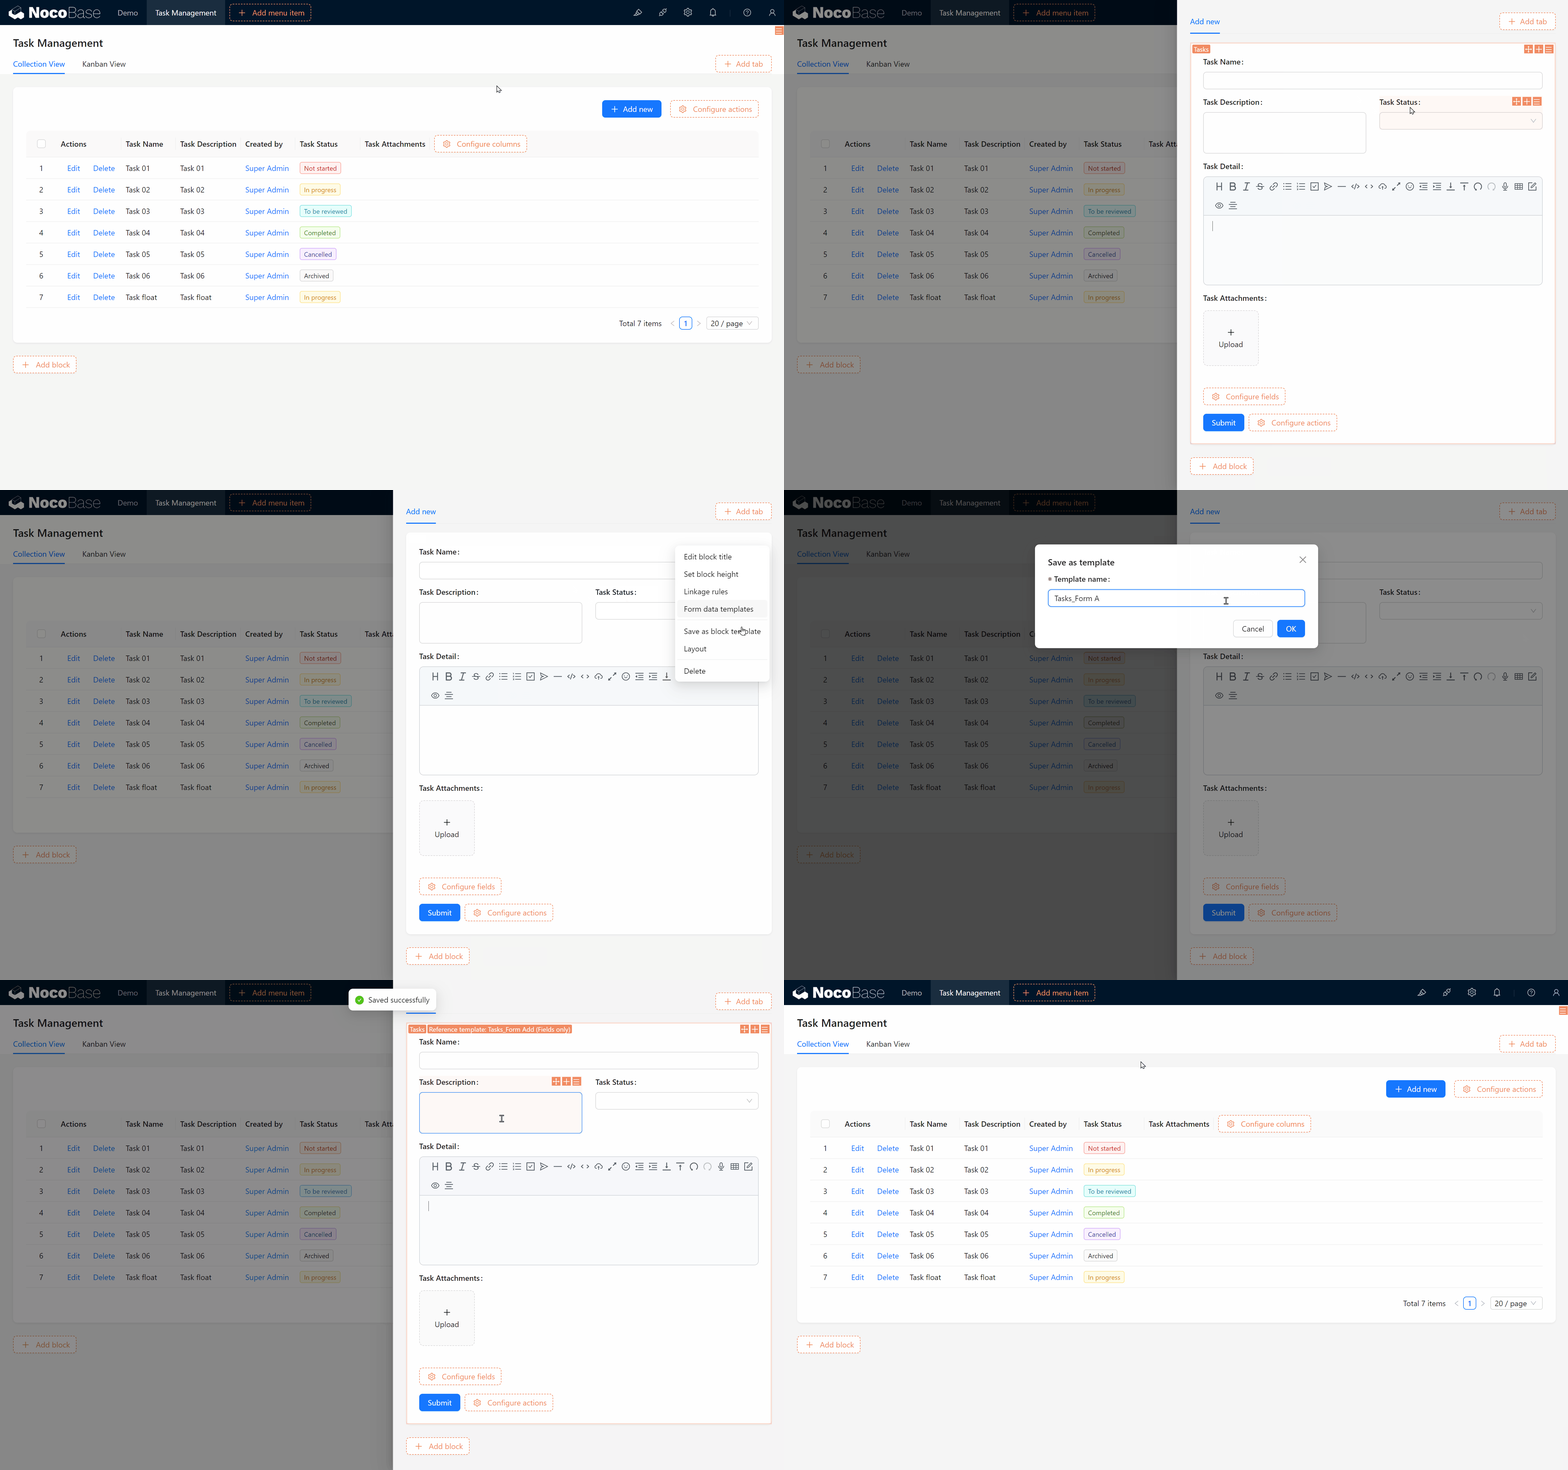
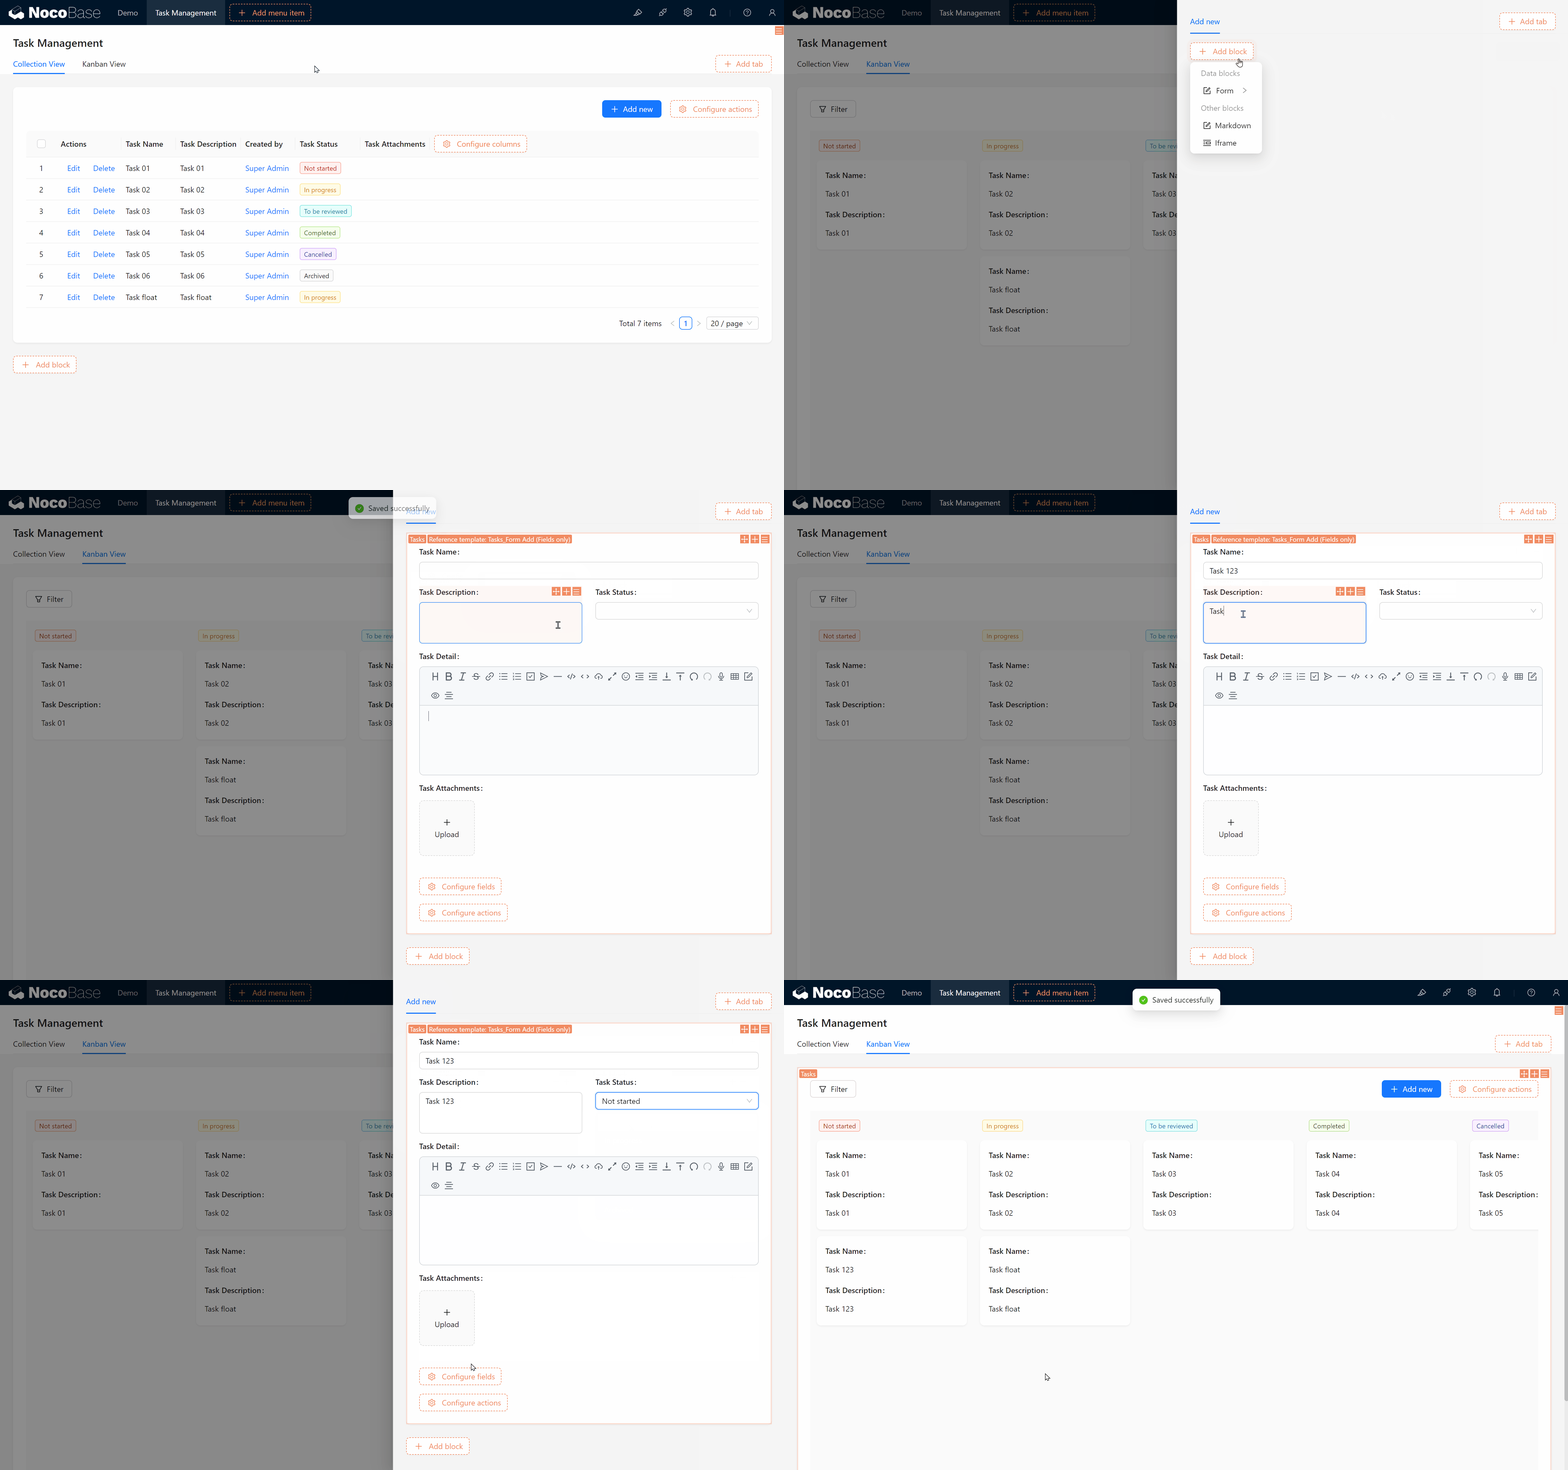
After creating the Kanban block, we’ll need to set up an Add Form. Here, NocoBase provides a very useful feature — you can Copy or Reference a form template created previously, sparing you from reconfiguring a new one each time.
5.3.1 Saving a Form as a Template
- In your existing Add Form, hover over the form settings and select “Save as Template.” You might name this template “Task Form_Add.”
5.3.2 Copying or Referencing a Template
When creating a form in the Kanban view, you’ll see two options: “Copy Template” and “Reference Template.” You might wonder, what’s the difference?
- Copy Template: This creates a duplicate of the form, allowing you to make independent changes without affecting the original form.
- Reference Template: This “borrows” the original form, so any changes made to it will automatically update all other forms that reference it.
5.4 Calendar Block: Clear Task Scheduling
Next, let’s create a Calendar Block to help manage task schedules more effectively.
5.4.1 Creating a Calendar View
5.4.1.1 Adding Date Fields
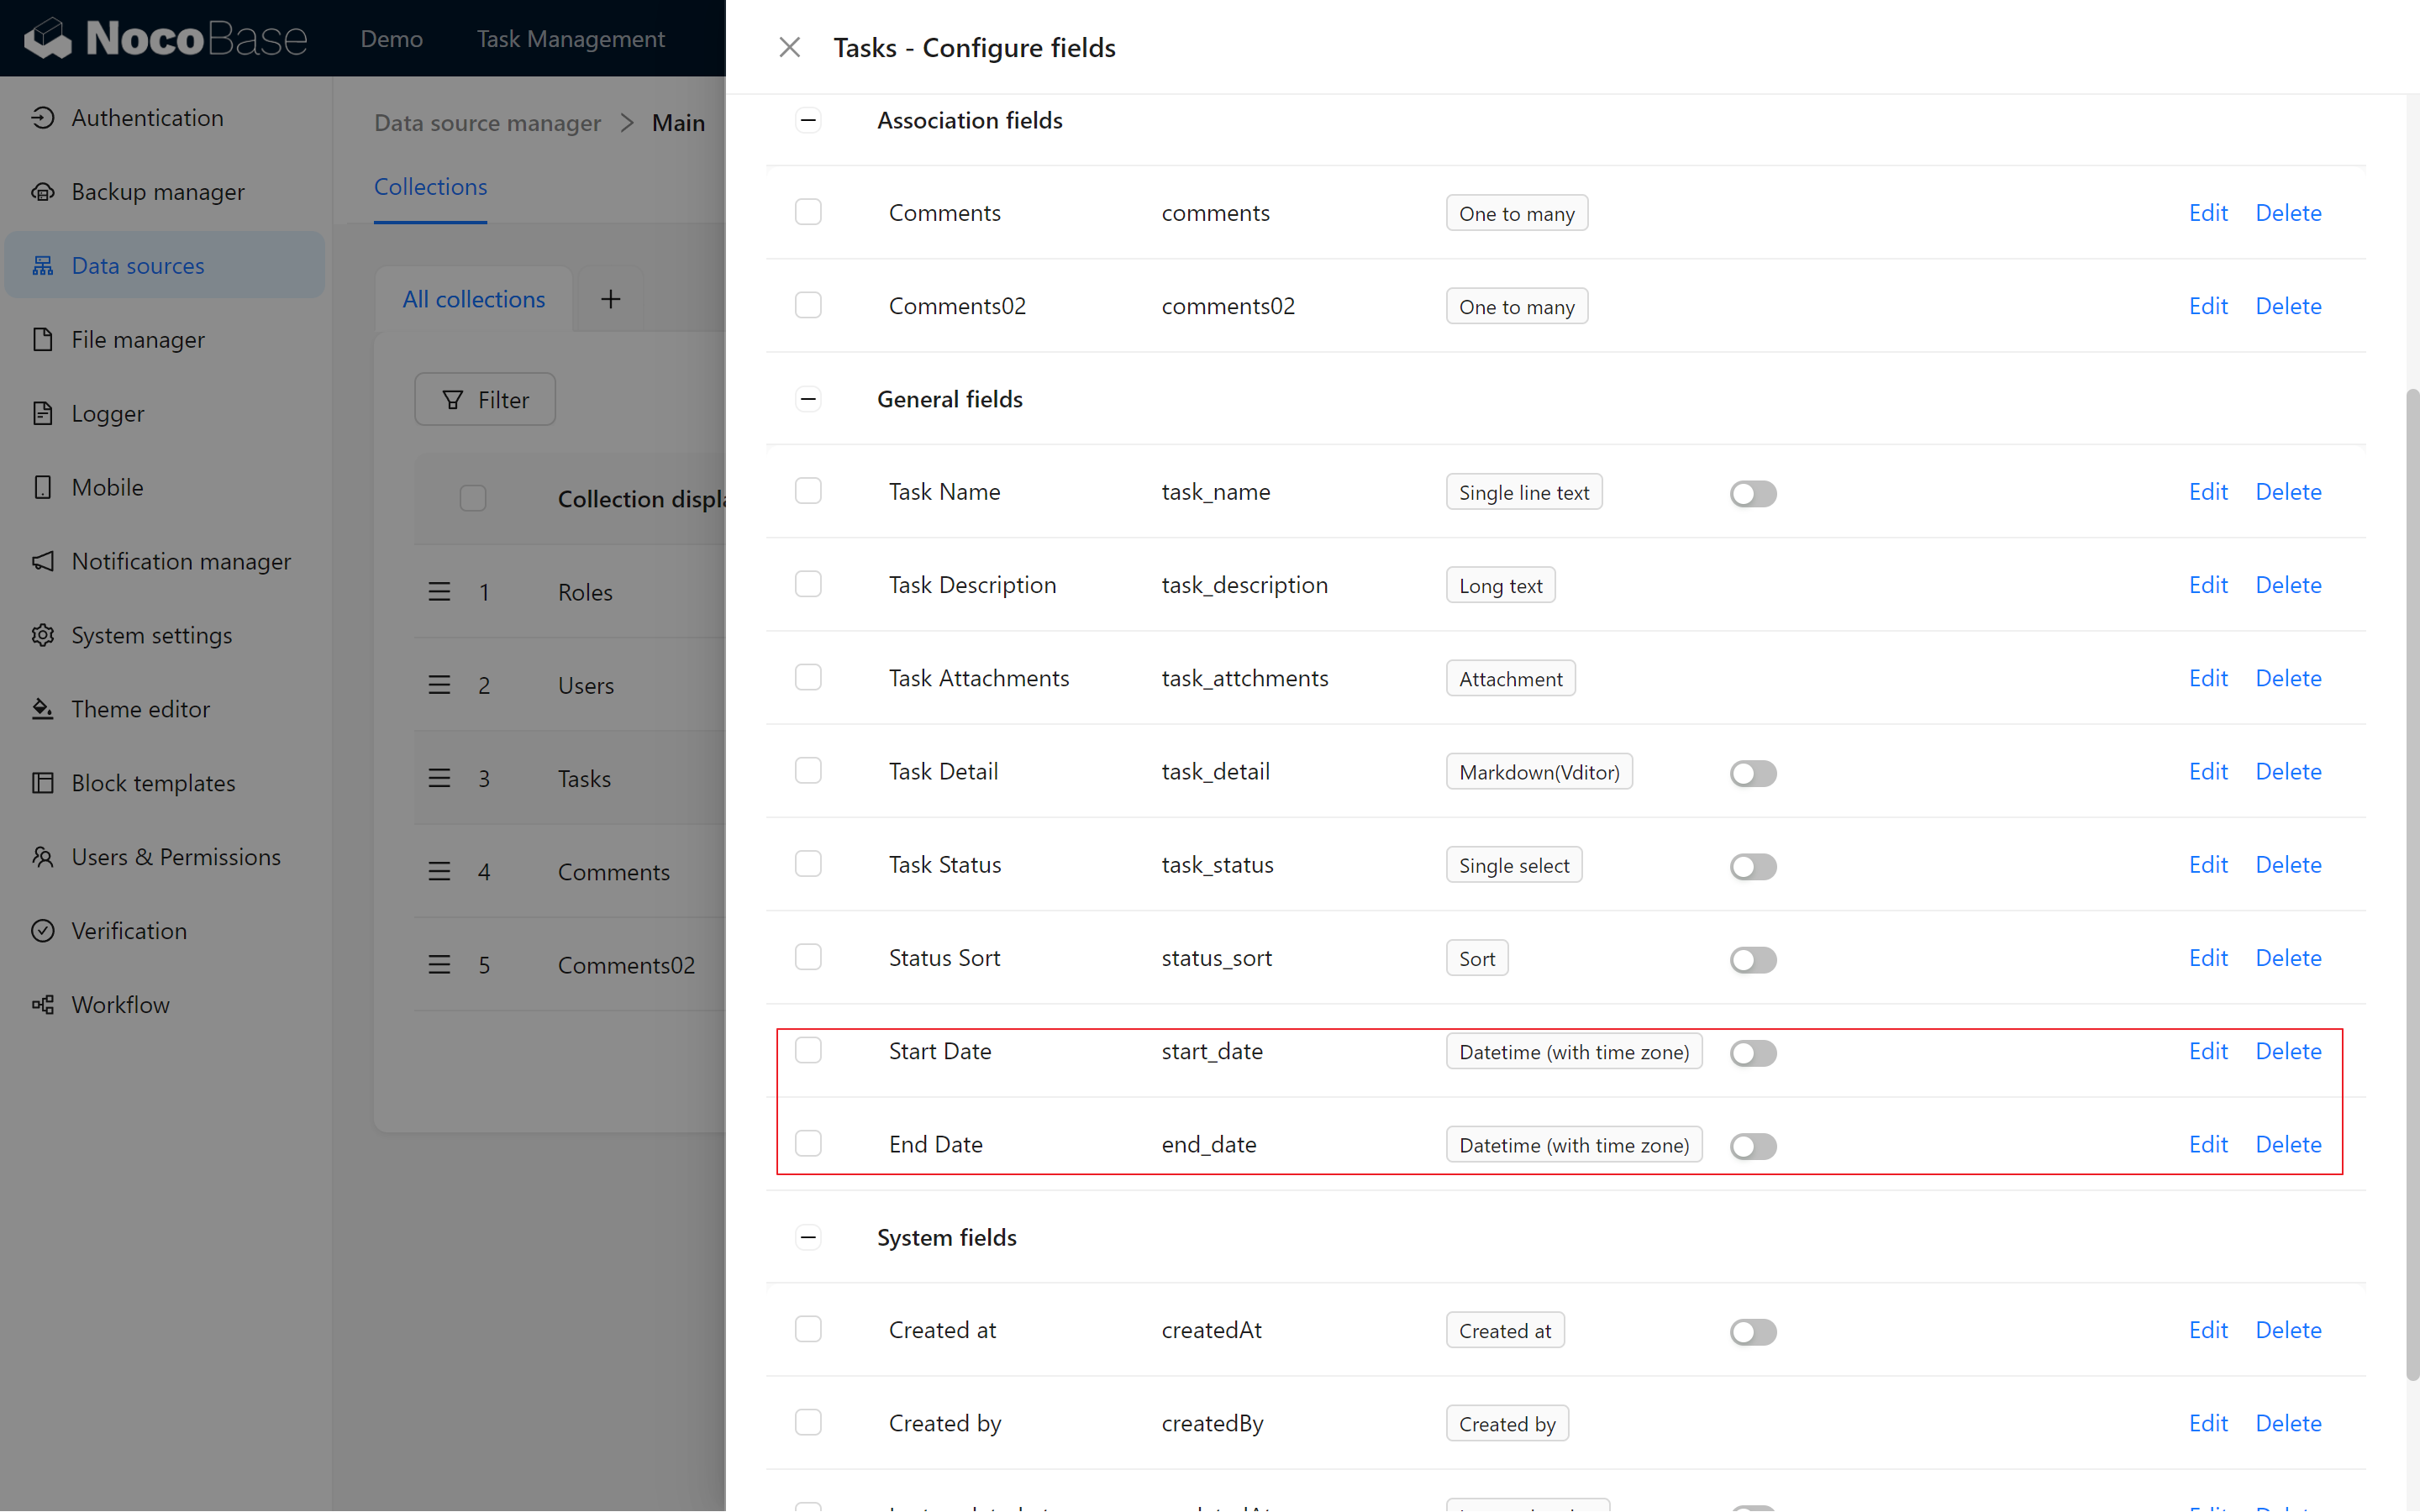
To use the calendar view, the task collection needs Start Date and End Date fields:
- Start Date (start_date): Marks the start date of the task.
- End Date (end_date): Marks the task’s end date.
5.4.2 Creating the Calendar Block
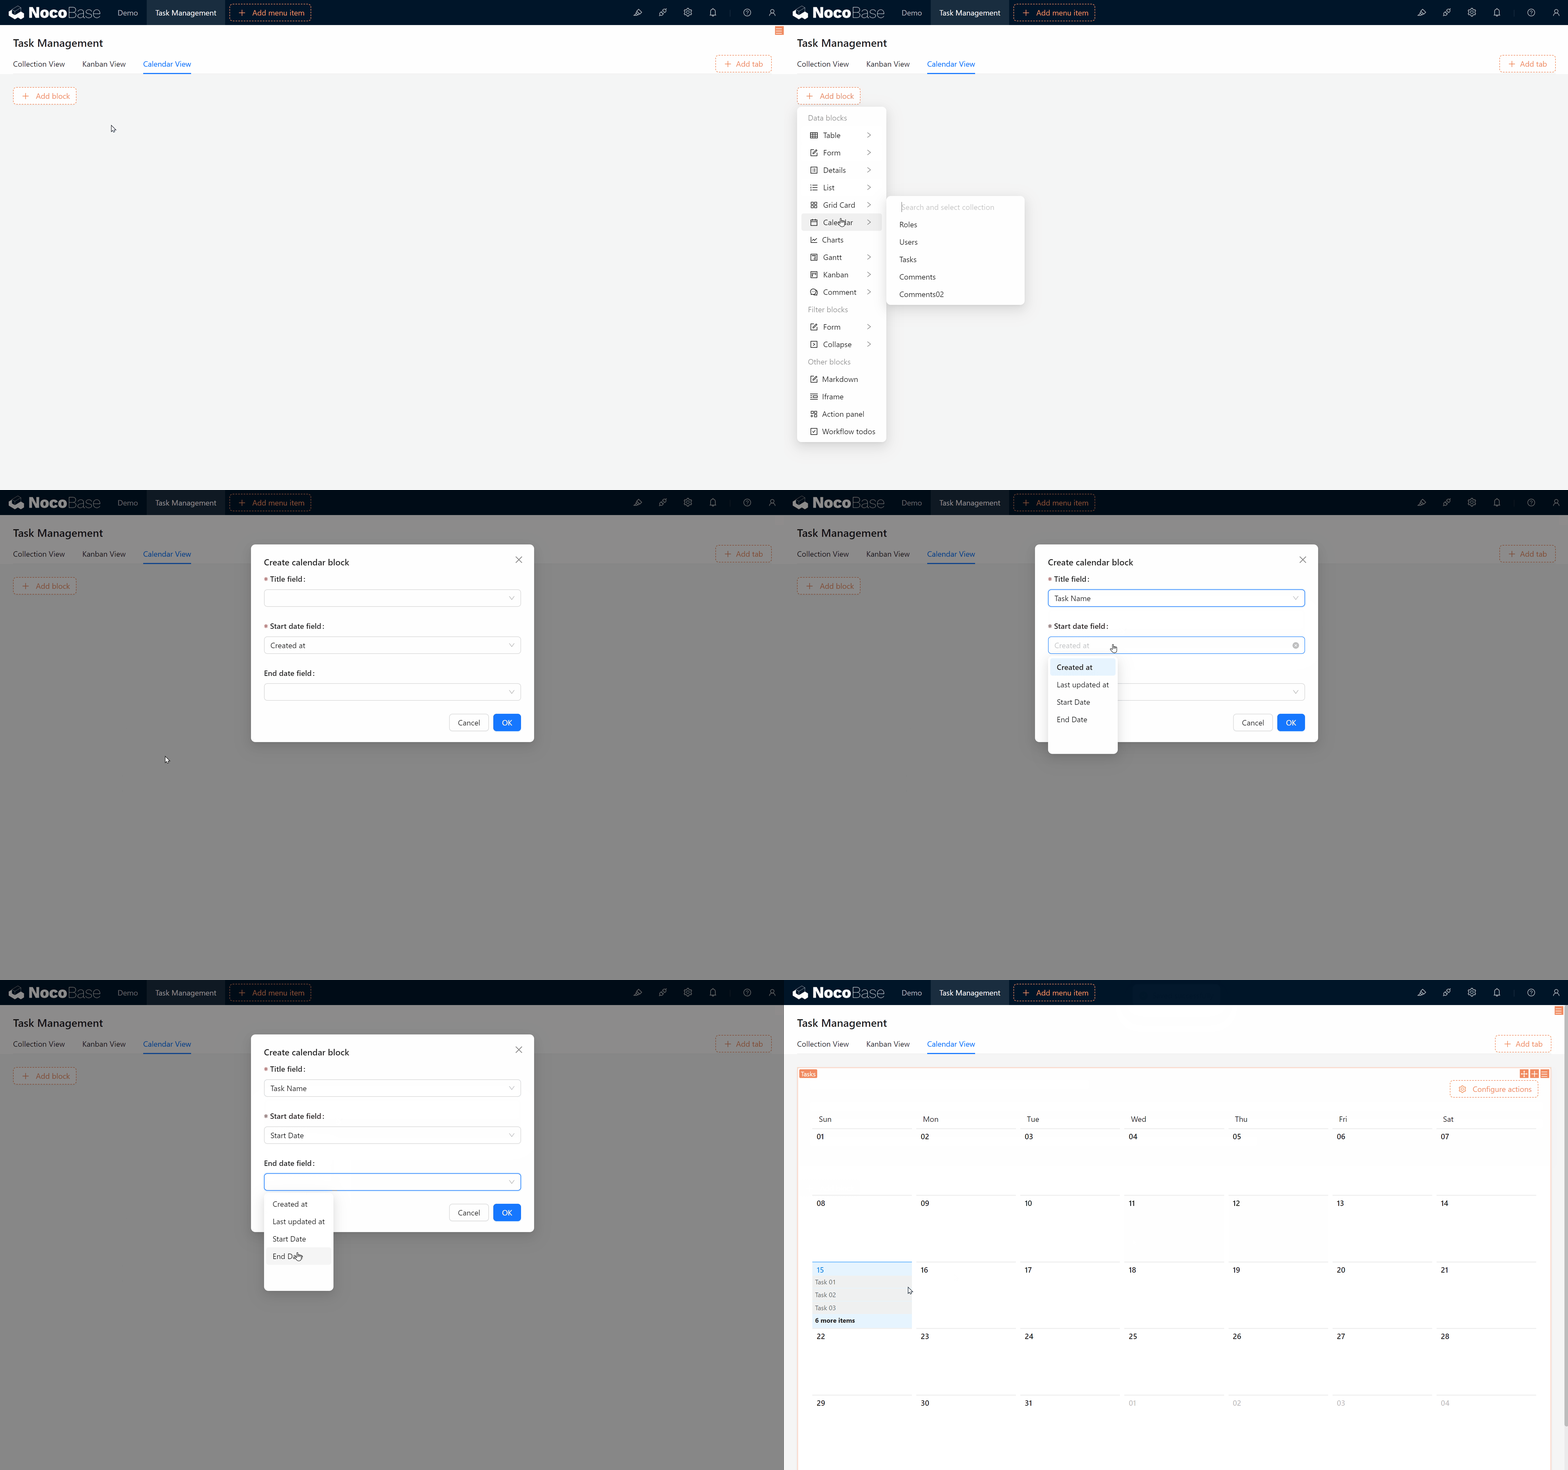
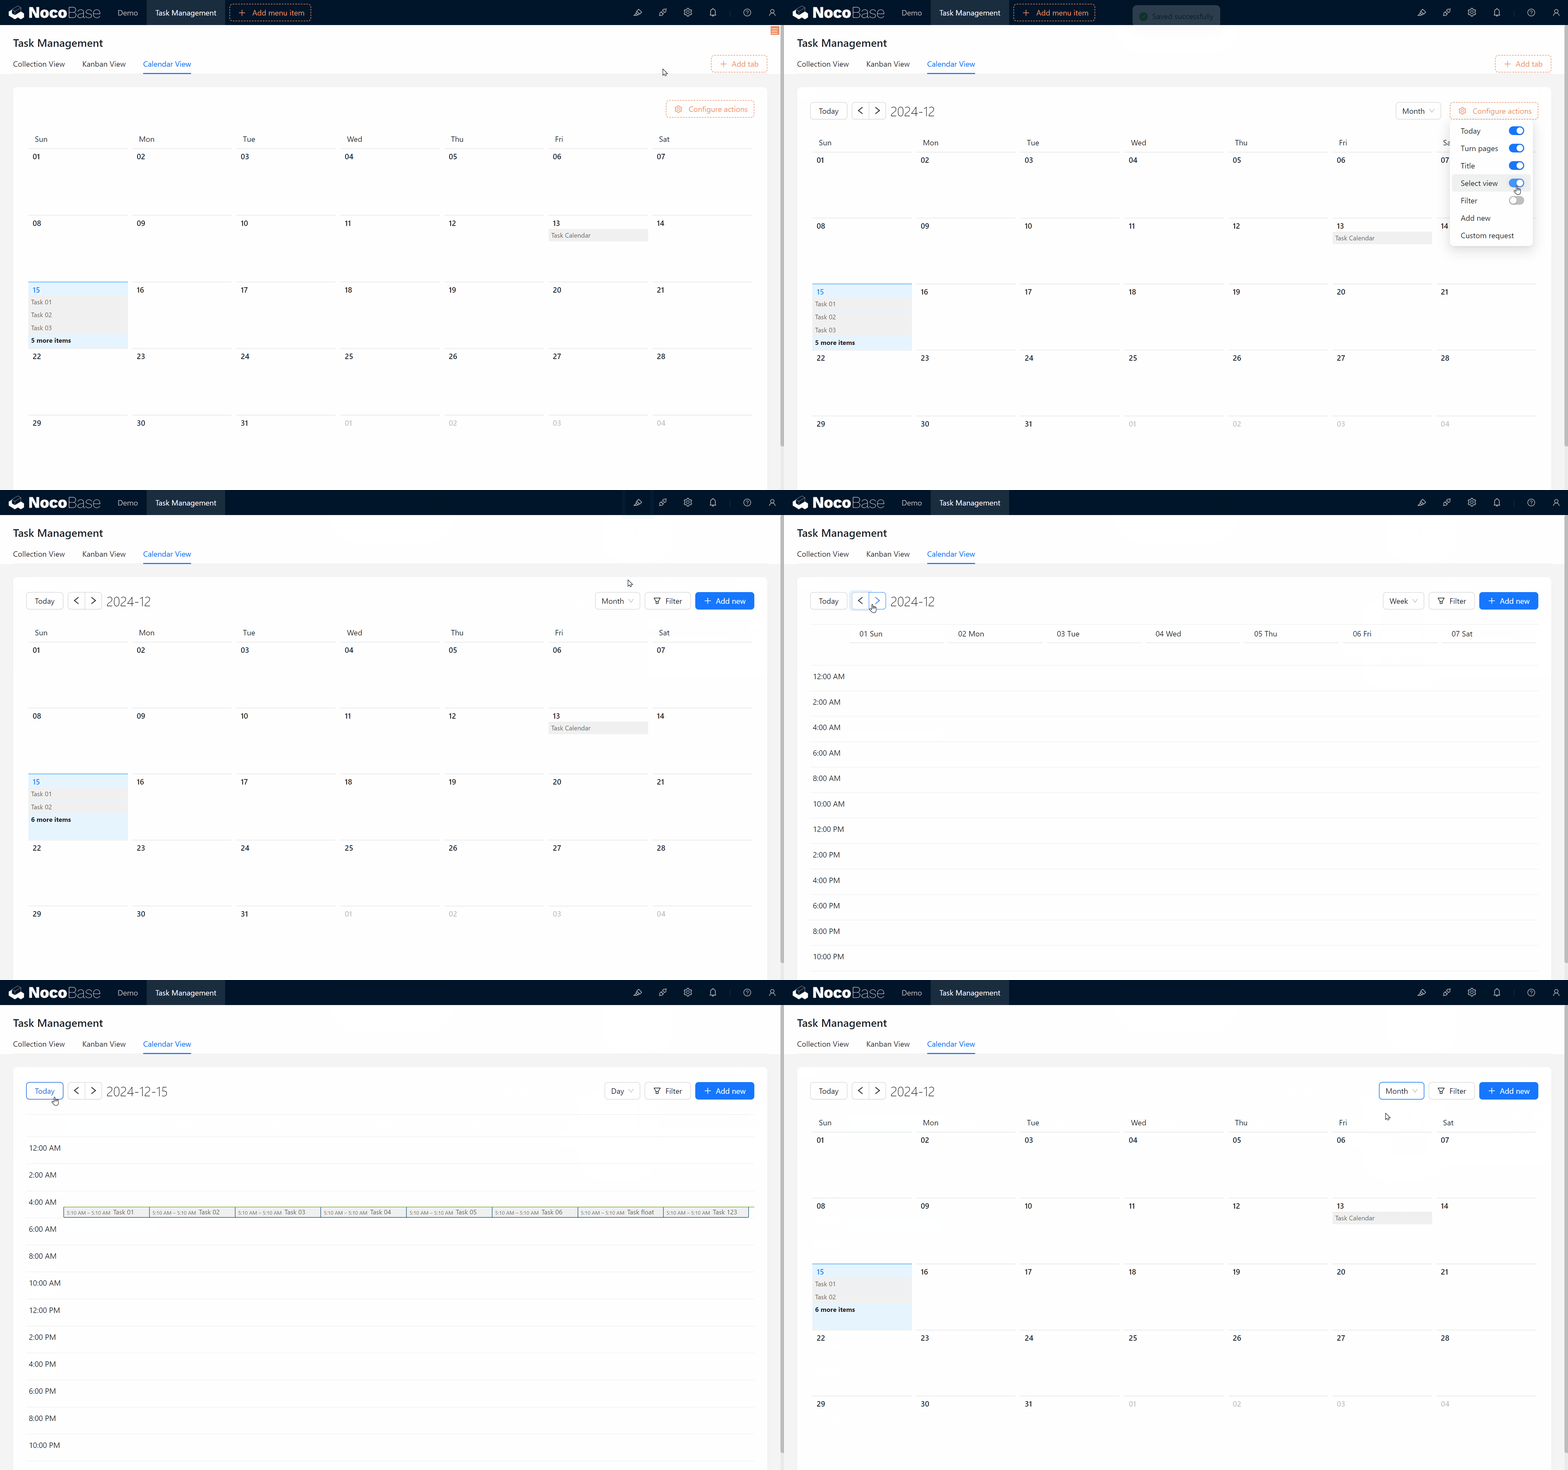
In the Calendar View, create a calendar block, select the task collection, and set it up using the Start Date and End Date fields. This configuration will display tasks as spans on the calendar, offering a clear view of task timelines.
5.4.3 Exploring Calendar Interactions
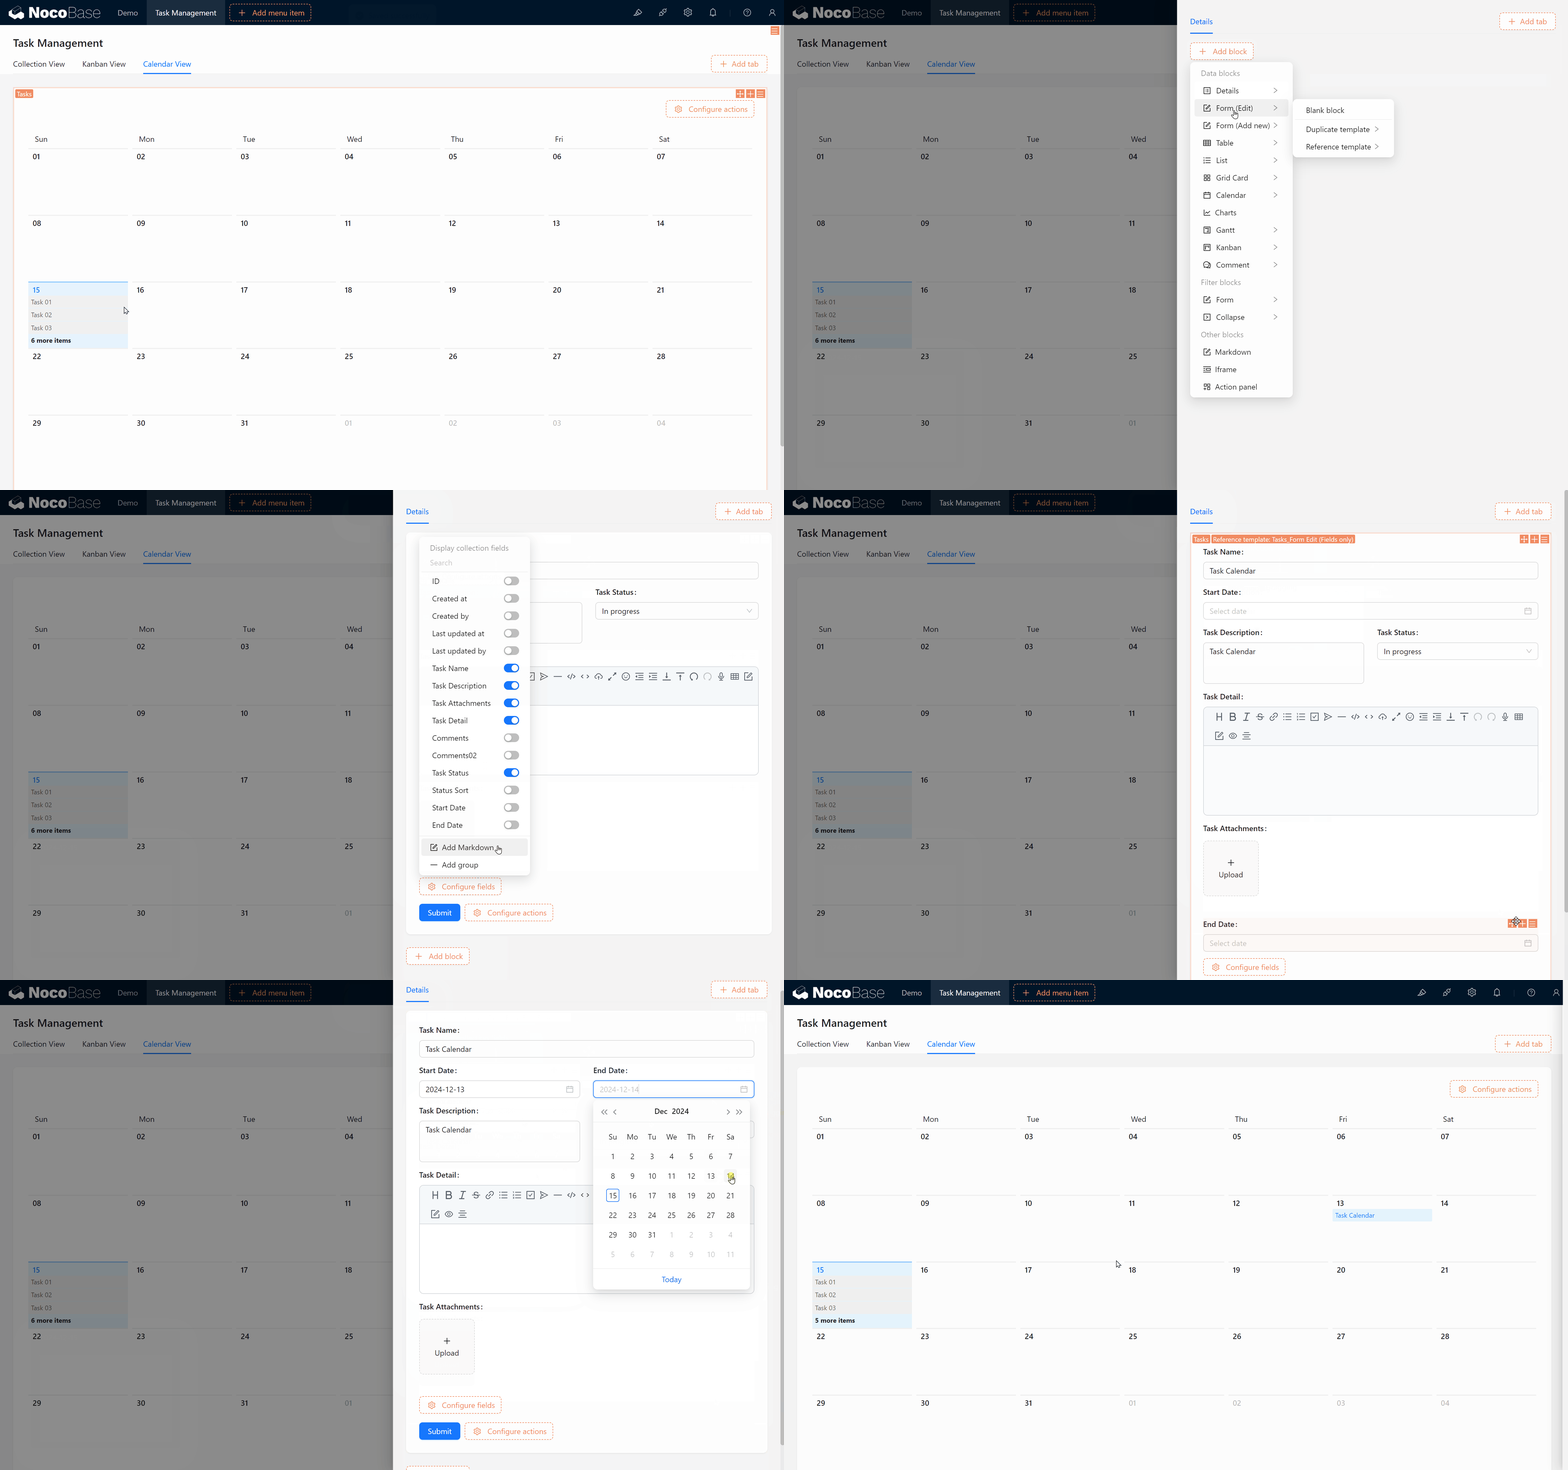
On the calendar, you can easily choose date, click to edit task details, and remember to copy or reference templates as needed.
5.5 Gantt Block: The Ultimate Tool for Task Management
The last block we’ll explore is the Gantt Block, a tool widely used in project management to track task progress and dependencies.
5.5.1 Creating a “Gantt View” Tab
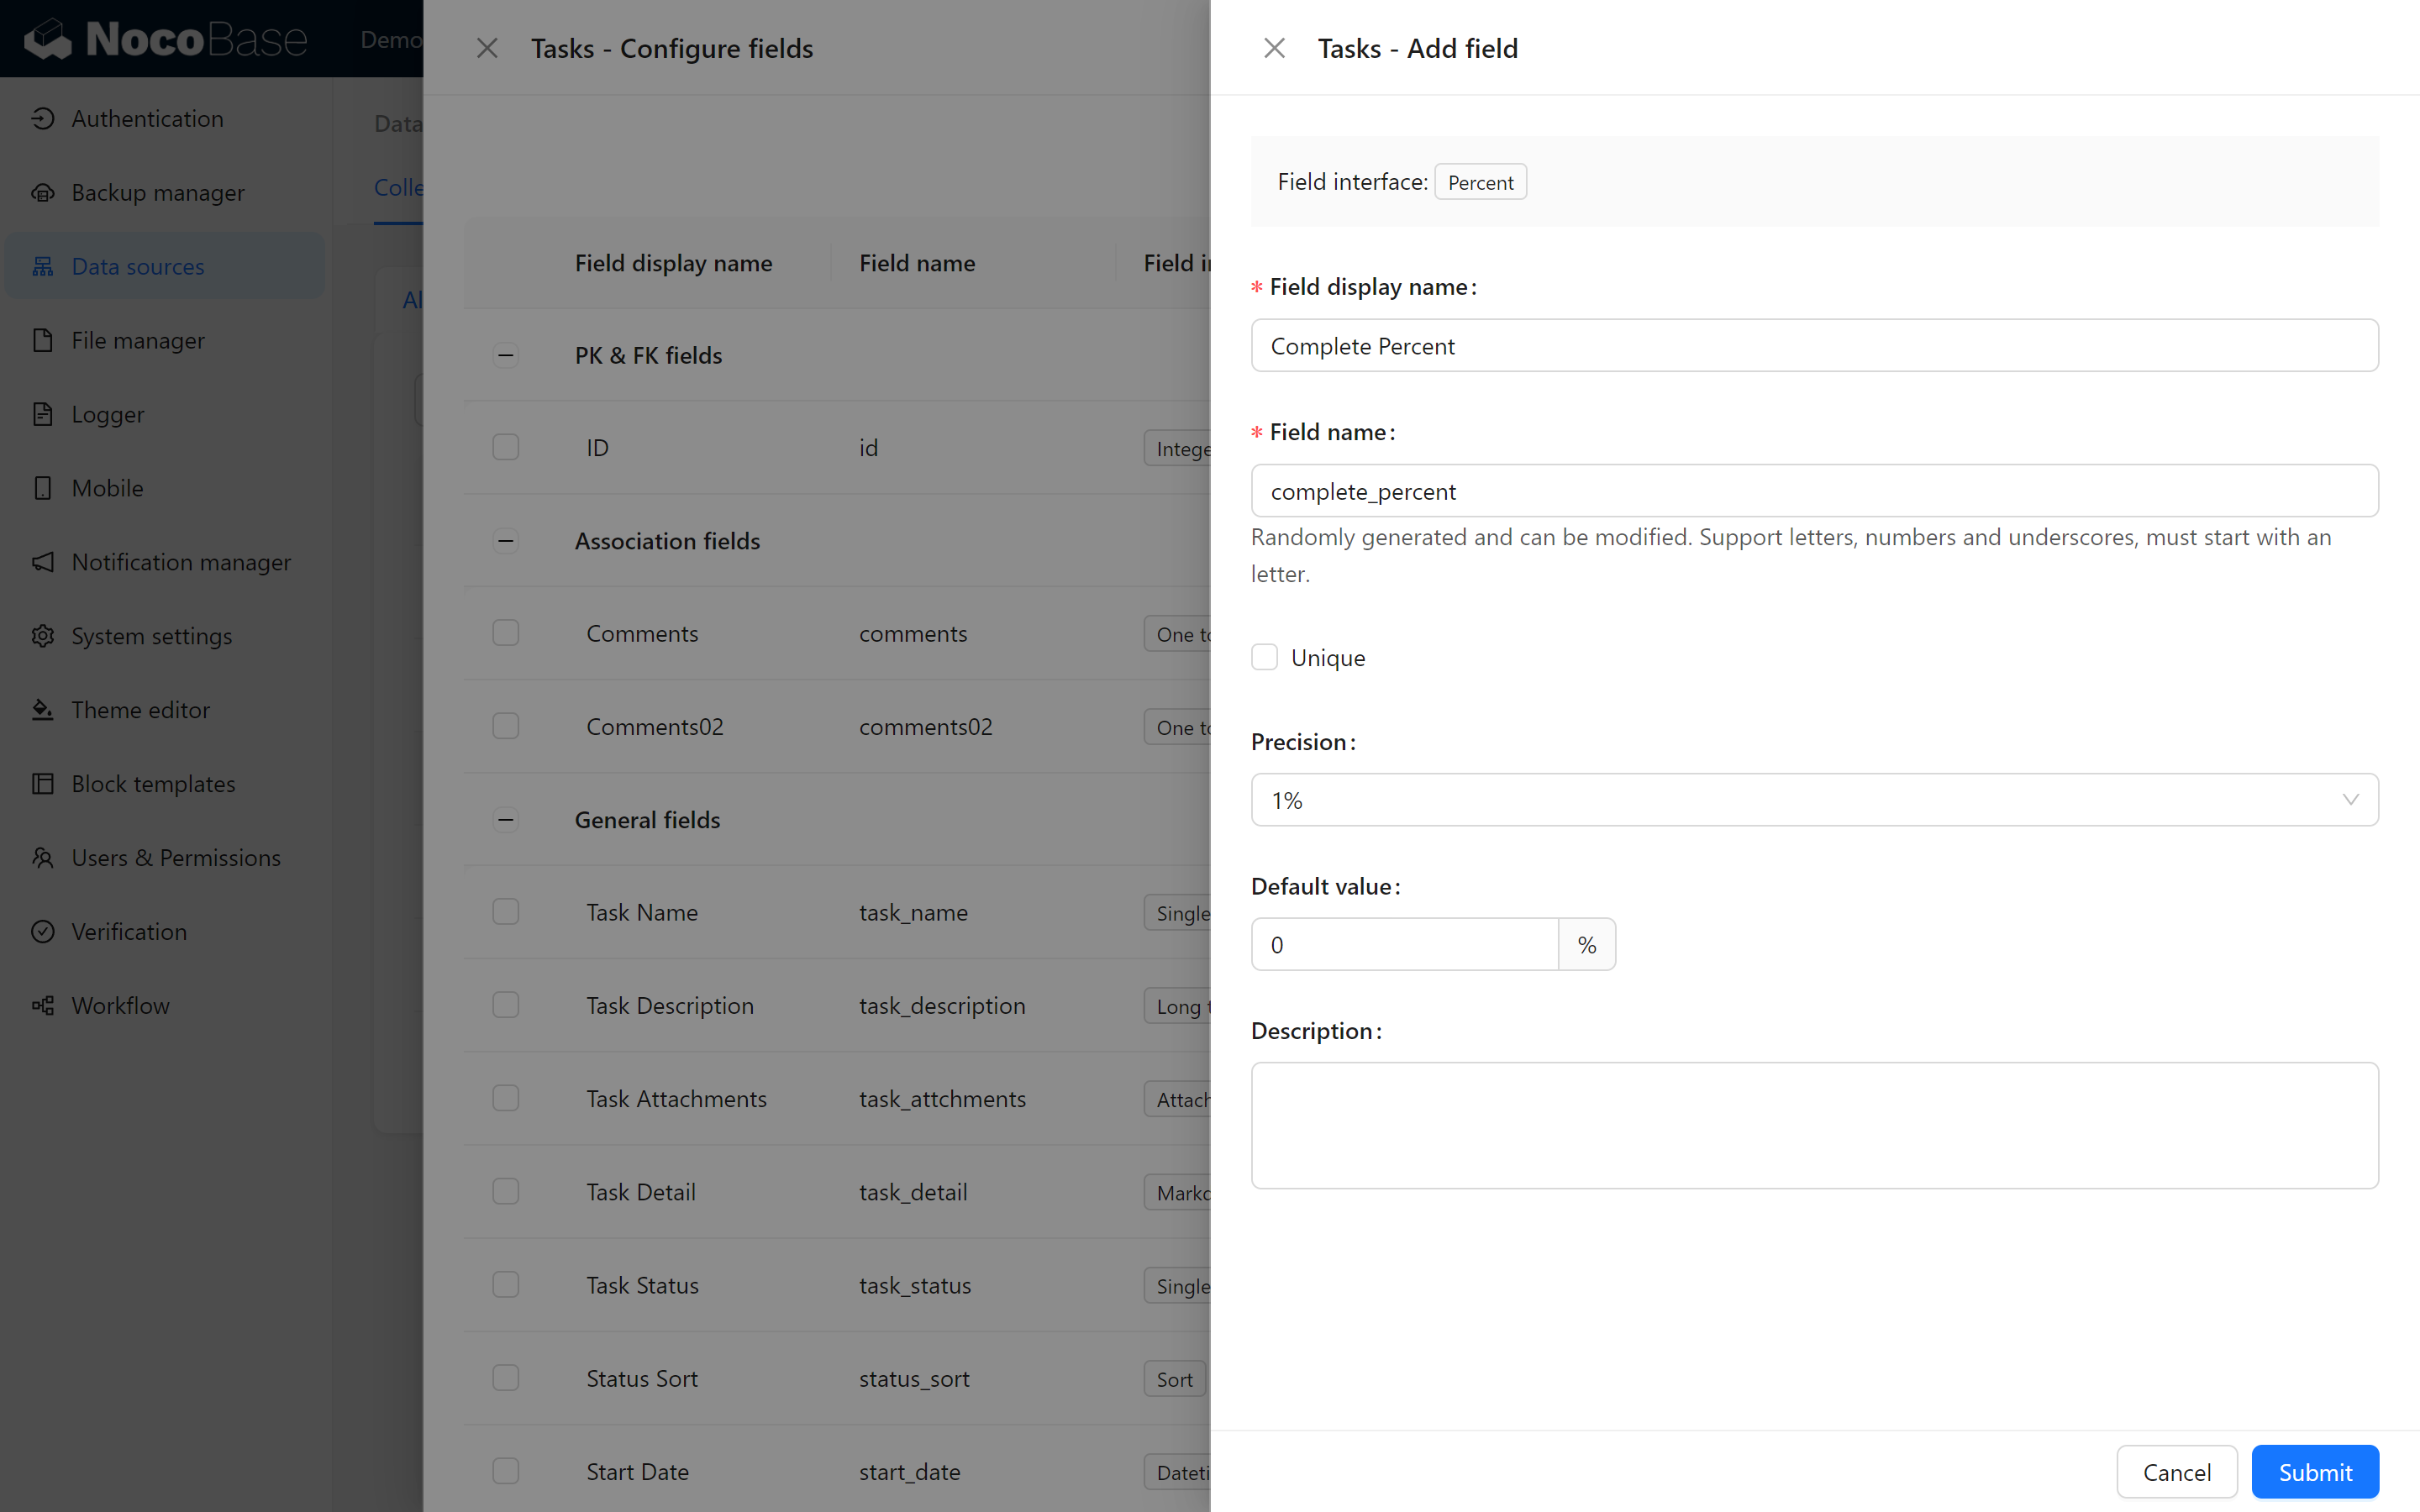
5.5.2 Adding a “Completion Percentage” Field
To show task progress effectively in the Gantt chart, we’ll need to add a new field named Completion Percentage (complete_percent), with a default value of 0%.
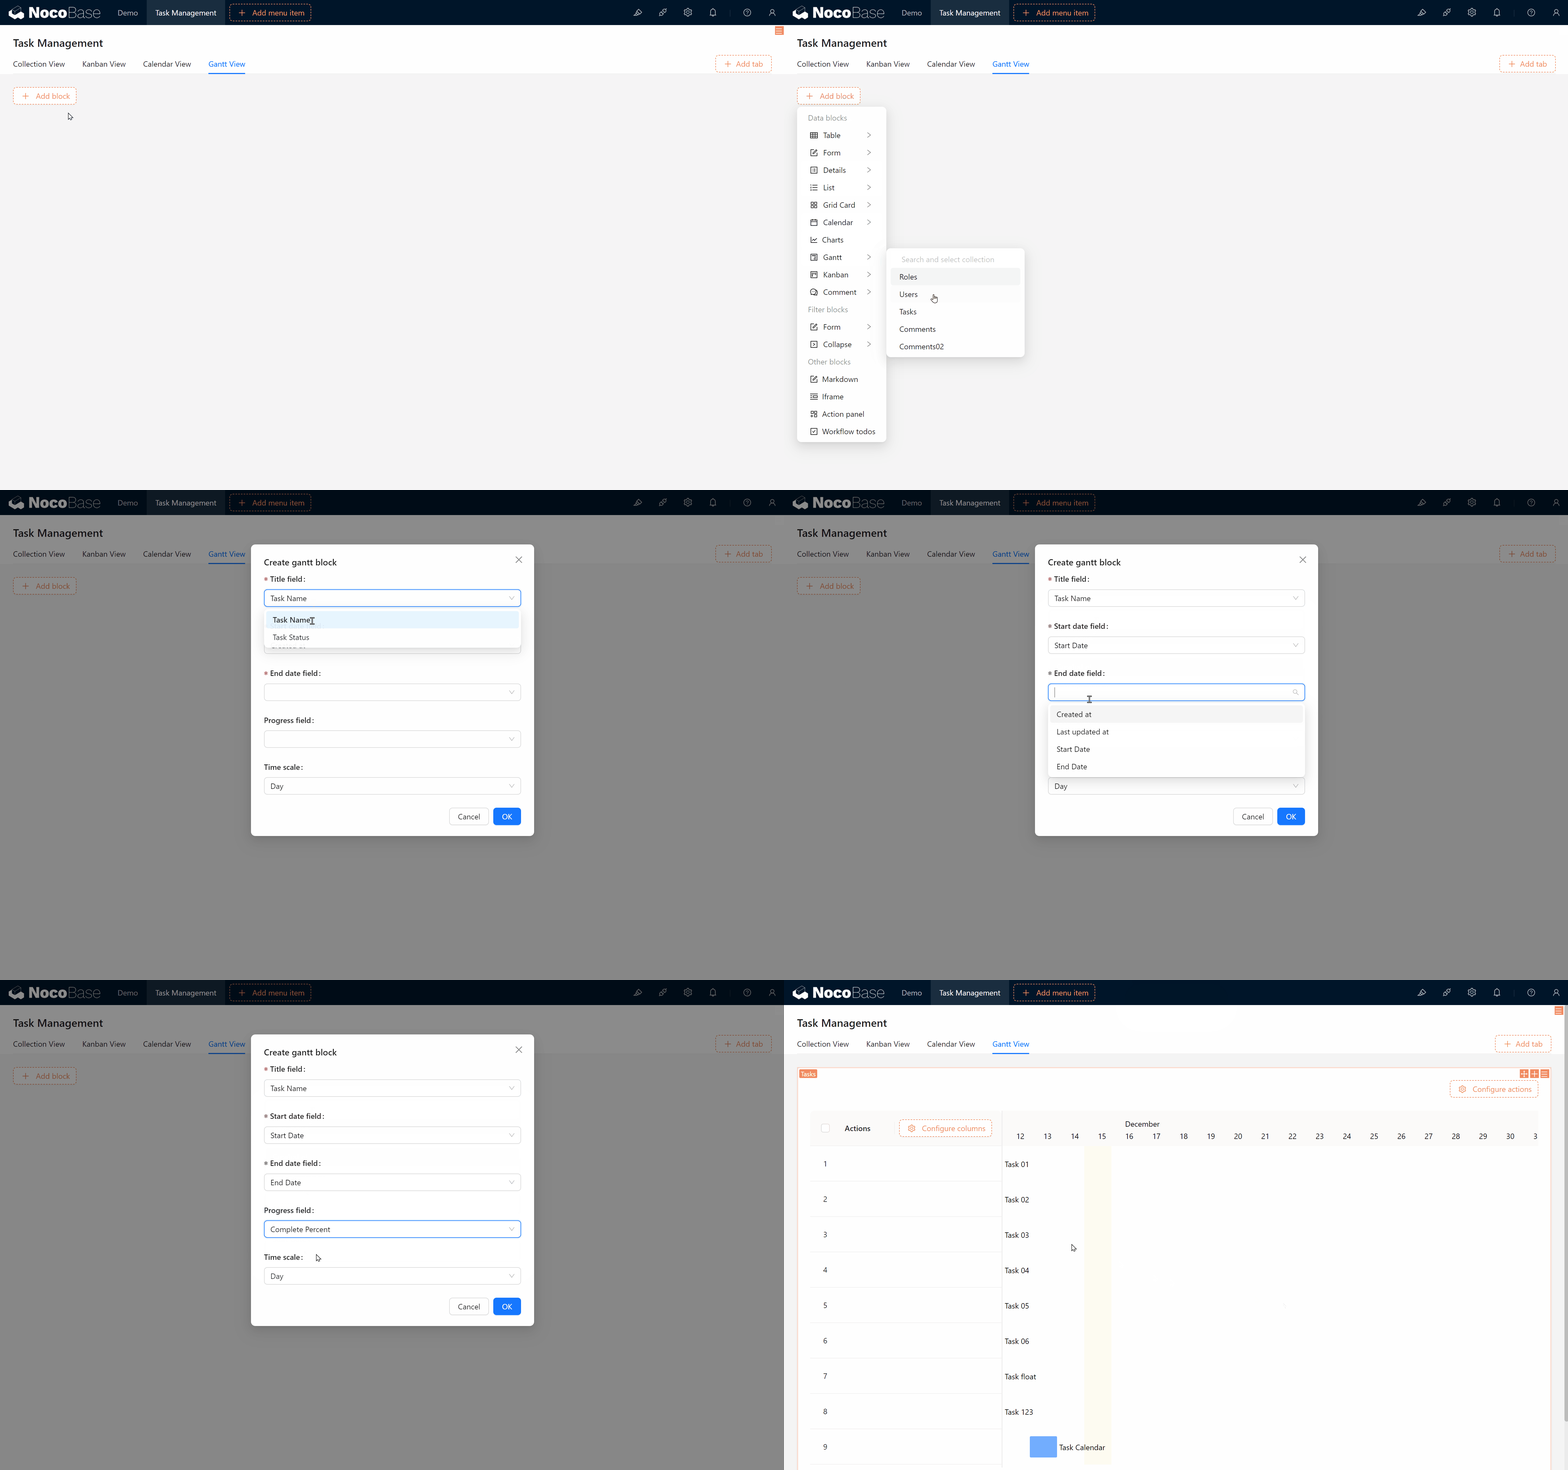
5.5.3 Creating the Gantt Block
In the Gantt View, create a Gantt block, select the task collection, and configure it with the start date, end date, and completion percentage fields.
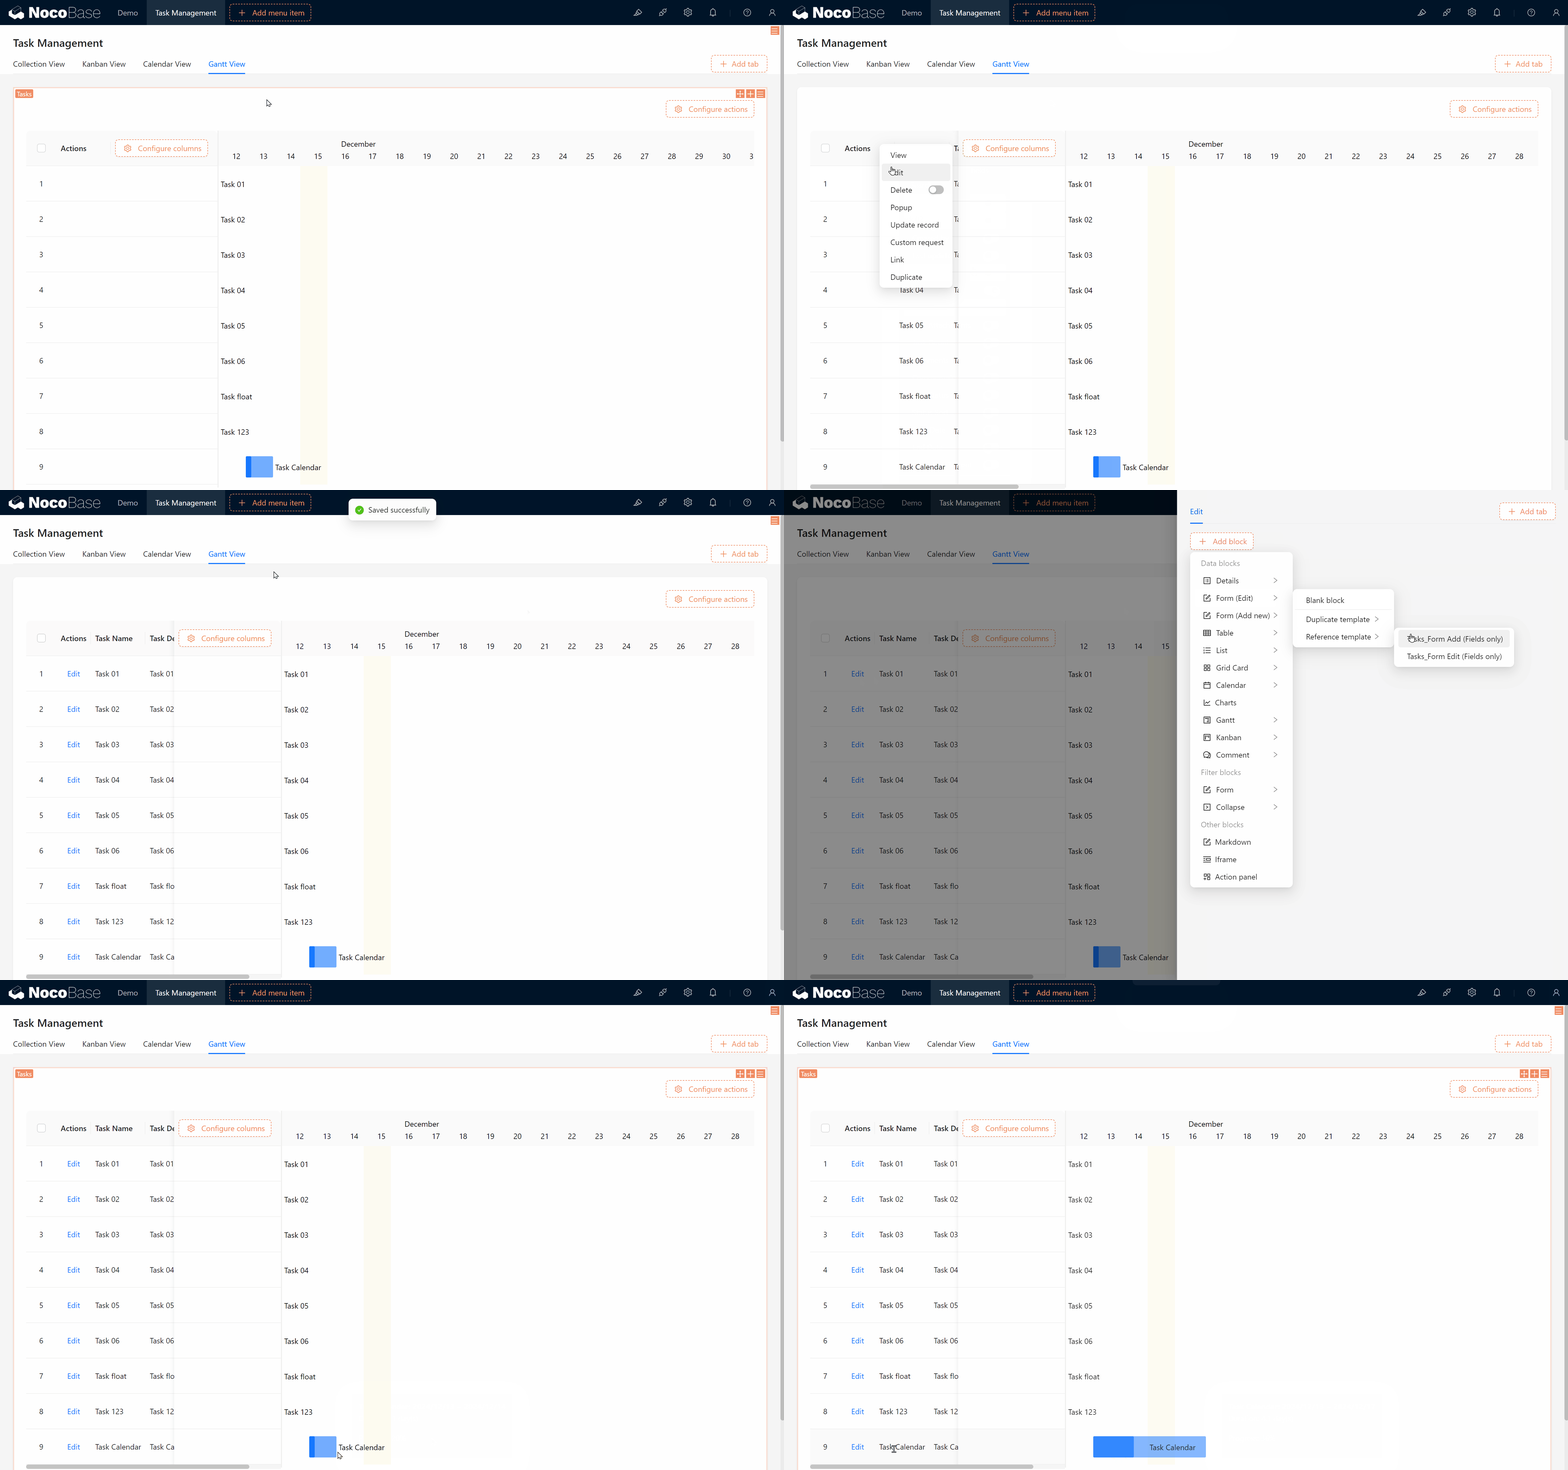
5.5.4 Using the Gantt Dragging Feature
In the Gantt view, you can adjust task progress and timelines by dragging, with the start date, end date, and completion percentage fields updating automatically as you make changes.
Summary
Fantastic! You now know how to use various blocks in NocoBase to display task data, including Kanban Block, Calendar Block, and Gantt Block. These blocks not only make task management more intuitive but also provide great flexibility.
But this is just the beginning! Imagine a team where different members have distinct roles — how can we ensure seamless collaboration and data security, allowing each person to see and edit only the content relevant to them?
Are you ready? Let’s move on to the next chapter: Chapter 6: User & Permissions.
Keep exploring and unleash your creativity! If you encounter any issues, don’t forget to consult the NocoBase Official Documentation or join the NocoBase Community for discussions.