
Review of the Last Section
Remember the challenge from the last section? We configured Status and Attachment fields for our task collection and displayed them in the task list. Let’s reveal the solution!
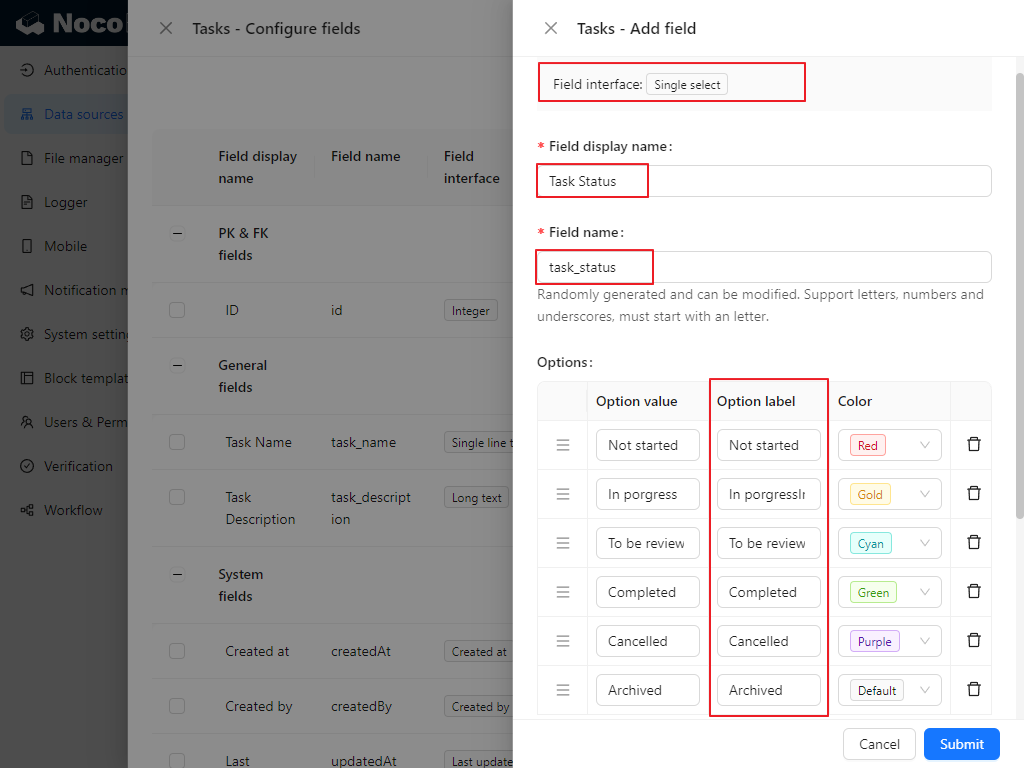
- Status Field Configuration:
- Select the Single select field and enter the following options: Not Started, In Progress, Under Review, Completed, Canceled, Archived. Feel free to choose colors you like to make the tasks more vibrant!
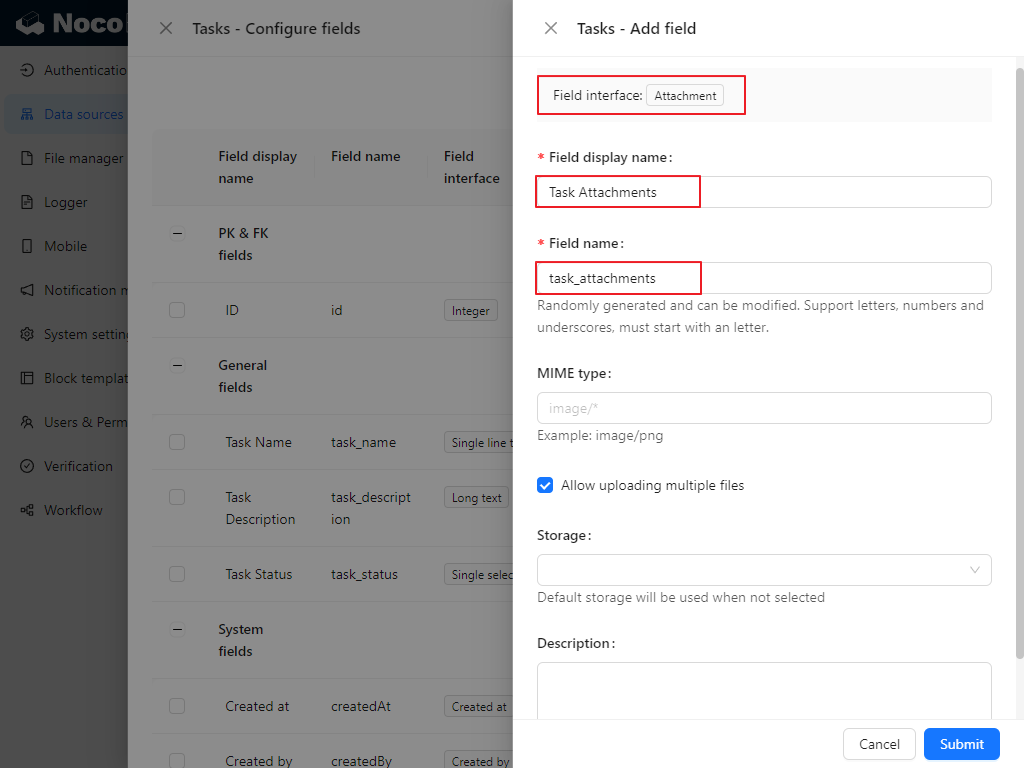
- Attachment Field Configuration:
- Create a new Attachment field, give it a name like “Attachment,” and hit submit. Simple as that!
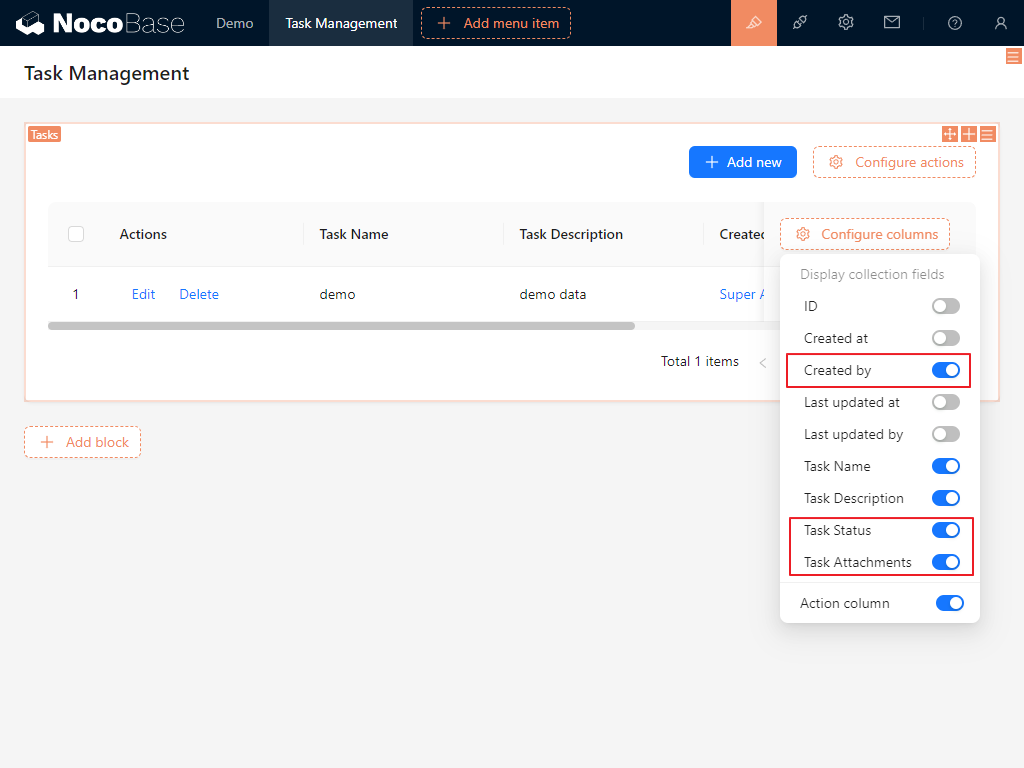
- Display Creator and Status in Task List:
- In “configure columns”, select the “Creator,” “Status,” and “Attachment” fields to show more critical information in the task list.
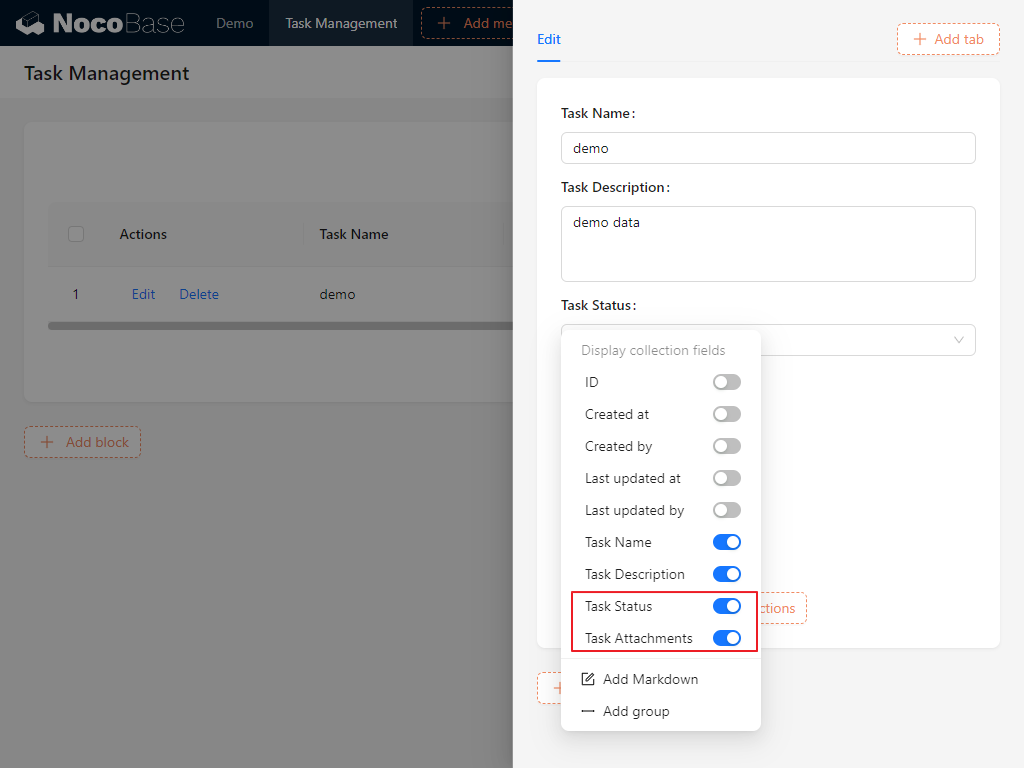
- Display Fields in Add and Edit Forms:
- Don’t forget to select the Status and Attachment fields in the pop-up form, so you can easily see these fields when adding or editing a task.
Well done! Keep practicing these steps, and you’ll become more comfortable with the core features of NocoBase. Each step builds a solid foundation for future task management. Let’s keep going!
4.1 Task Content and Comments: Interactive Task Management
So far, your task management system can handle basic task information. However, task management often requires more than a few lines of text; sometimes, we need richer content and real-time interaction between team members.
4.1.1 Markdown (Vditor): Making Task Content More Robust
You may have noticed NocoBase offers both Rich Text and Markdown editors, although these may not fully meet your needs. While the rich text editor is somewhat limited, the Markdown editor is easy to use but doesn’t support real-time preview.
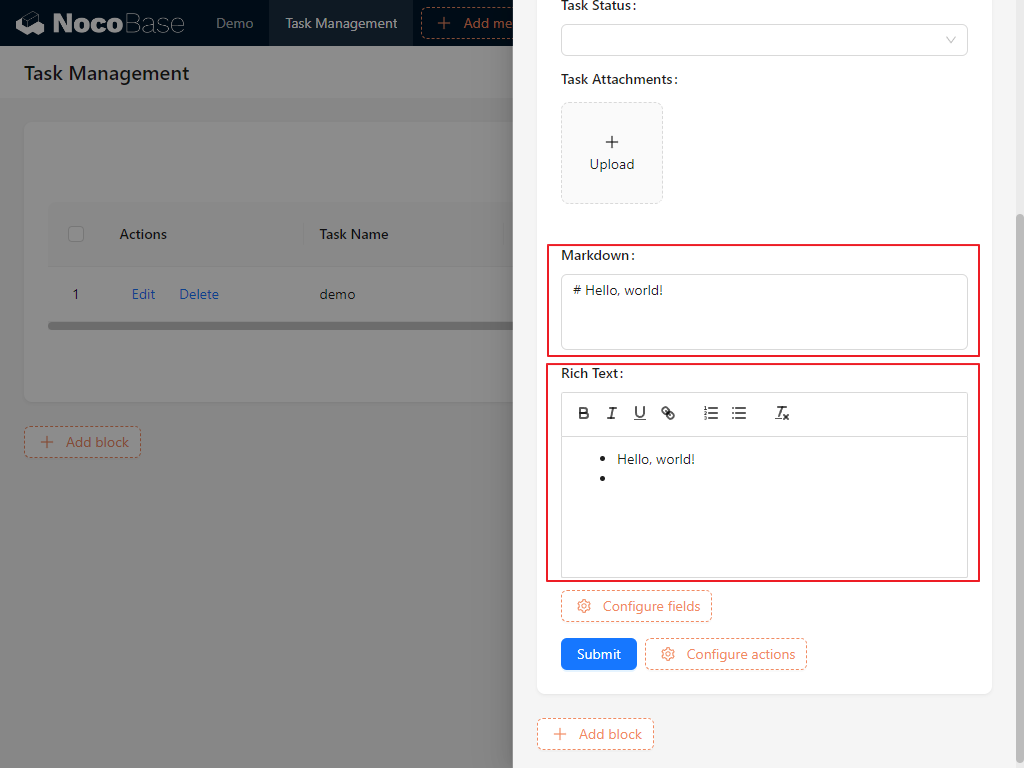
Is there an editor that supports both real-time preview and extensive features? Absolutely! Markdown (Vditor) is the most powerful text editor in NocoBase, offering real-time preview, image uploading, and even voice recording. Plus, it’s built into the system and completely free!
Markdown(Vditor): Used to store Markdown and render it using Vditor editor, supports common Markdown syntax such as list, code, quote, etc., and supports uploading images, recordings, etc.It also allows for instant rendering, where what you see is what you get.
Let’s walk through enabling this powerful editor step-by-step. Remember our plugin manager? That’s where it’s found!
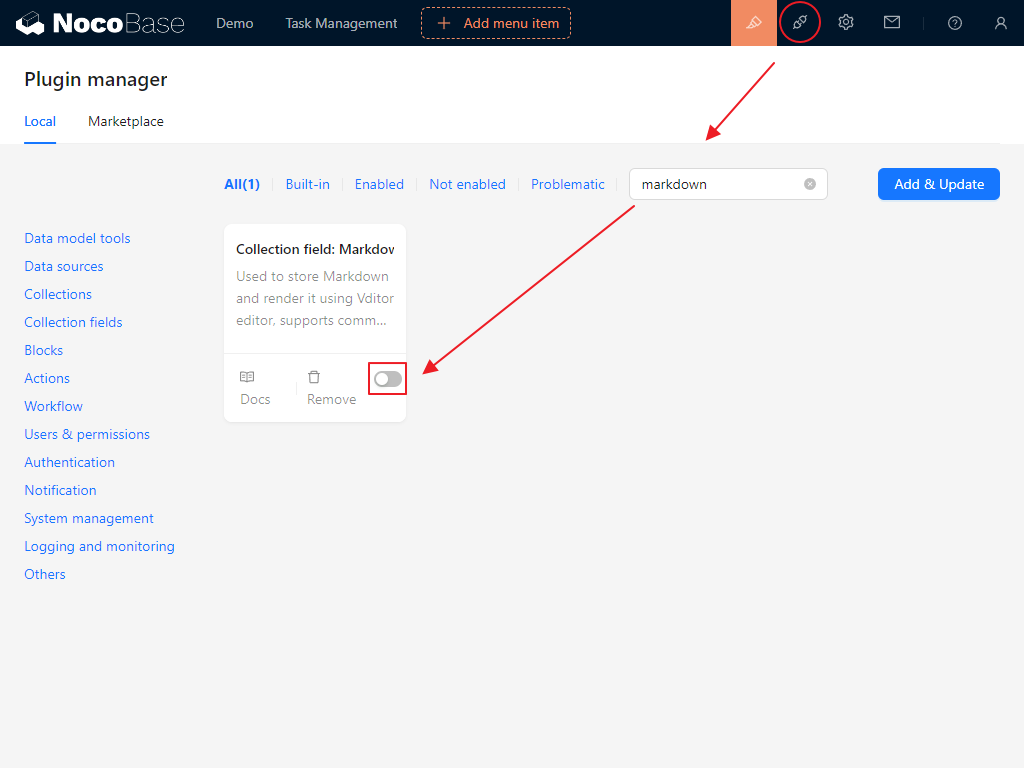
- Enabling the Markdown (Vditor) Plugin:
- Open the Plugin Manager in the upper right, search for “markdown” in the plugins, and enable the Markdown (Vditor). Don’t worry if the page briefly refreshes – it’ll be back in just a few seconds.
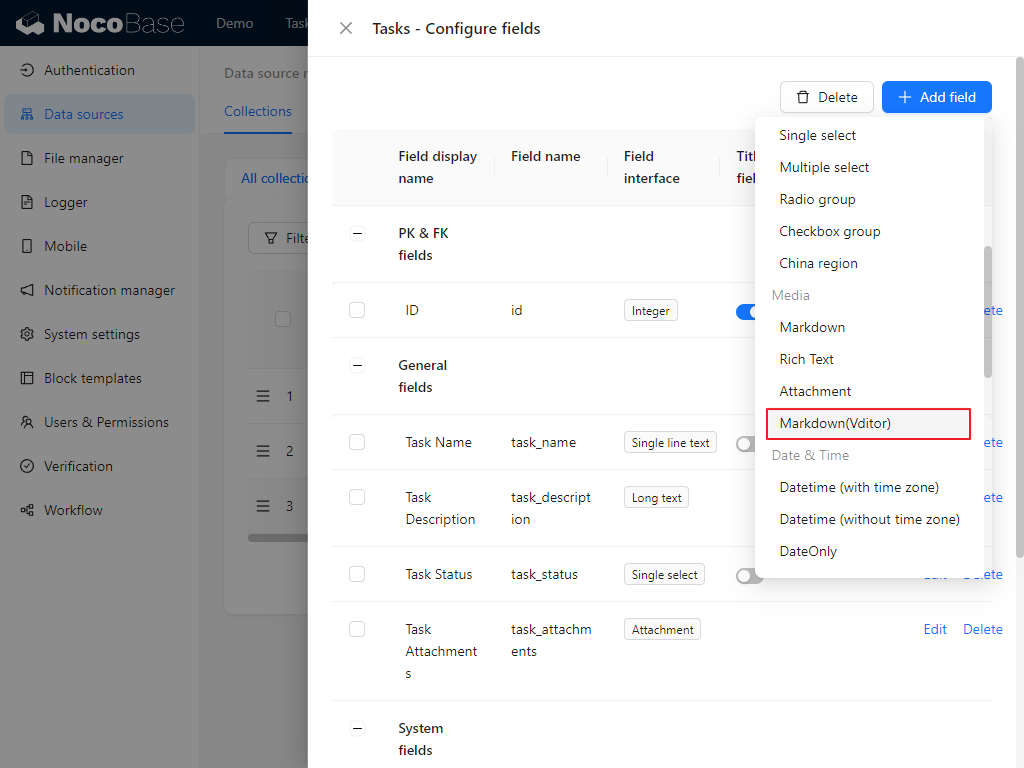
- Creating a Markdown Field:
- Return to the task collection, click “Add Field,” and our Markdown Pro Plus is ready to go!
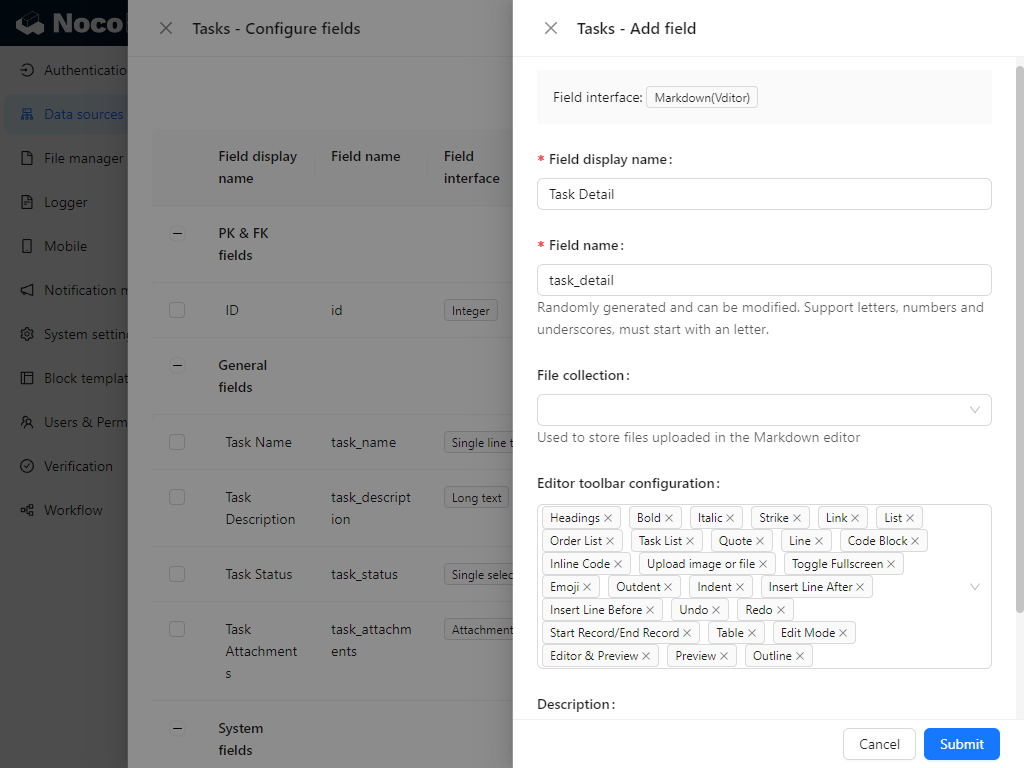
- Give it a name, such as “Task Details (task_detail),” and enable all available features.
- You may notice an option for “File collection.” Wondering if not selecting it affects file functionality? No worries; files will be stored in our default storage, so go ahead and use it.
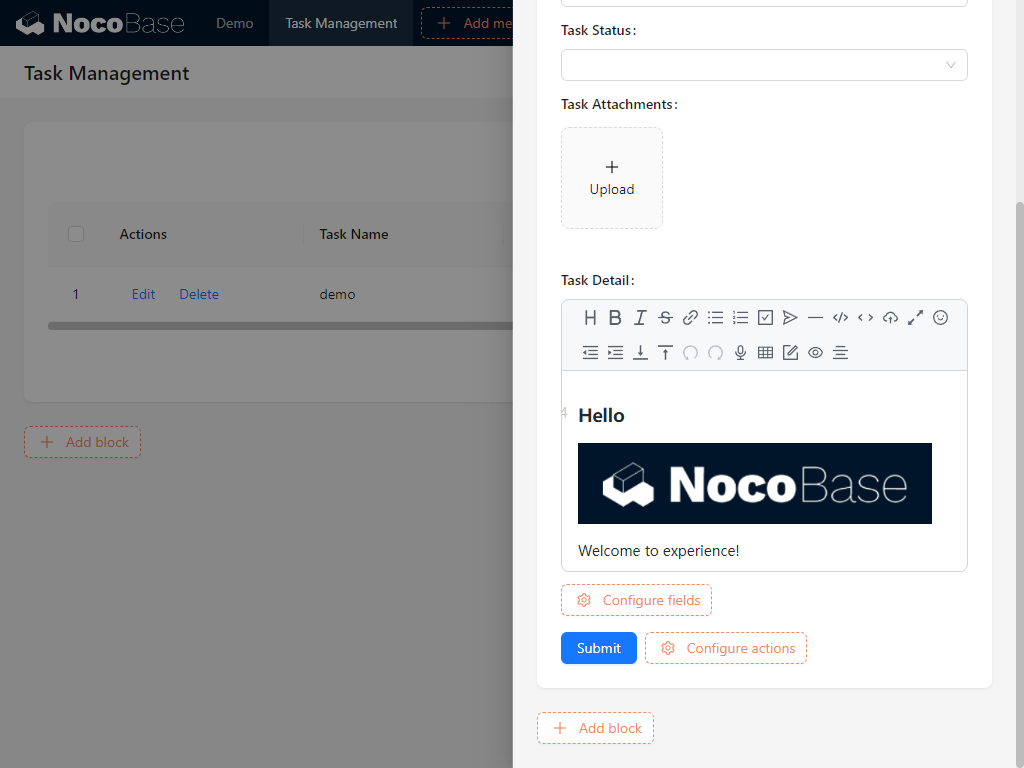
- Testing the Markdown Field:
- Now, return to the task management page and start drafting your first Markdown text! Try pasting an image or uploading a file – it’s quite powerful, isn’t it?
Your task collection is getting more feature-rich! With each step, your system’s capabilities expand. Next, let’s explore adjusting field arrangements for a cleaner interface.
4.1.2 Adjusting Field Layout
As fields increase in the task collection, the page layout might appear cluttered. Not to worry, as NocoBase’s flexibility allows you to rearrange fields easily.
Adjusting Field Positions:
- Hover over the cross icon in the upper right corner of the field, then click and drag it to your preferred position. Release to complete the adjustment. Isn’t the page instantly tidier?
This makes the layout more aligned with your preferences. Now, let’s add a comment function to the task collection to make team collaboration even easier.
4.2 Comment Function
Having a task description is helpful, but sometimes team members need to add comments, discuss issues, and record feedback. Let’s start implementing this together.
4.2.1 Method One: Using the Comment Plugin
4.2.1.1 Installing the Comment Plugin
Comments Plugin (Commercial Plugin)****: Provides comment collection template and block to add commenting functionality for any collection.
Note: When adding comments, be sure to link the target collection through a relationship field to prevent comment data conflicts.
In the Plugin Manager, upload and enable the Comments Plugin. Once the plugin is enabled, a new “Comments Collection” option will appear in the data source. Click Add new (Add & update)> Upload Plugin > Drag in the zip file > Submit. After searching for comments, you’ll see the comment plugin! After enabling it, enter the data source and see the Comments Collection option – installation successful!
4.2.1.2 Creating a Comments Collection
Switch to the data source and create a new comments data collection called Comments.
4.2.1.3 Exploring the Relationship Between the Comments and Task Collection
Now that we have a Comments Collection, you might wonder if we can simply add a comments section to the page. Not so fast – let’s think it through first: Each task should have its own comments section, and the relationship between comments and tasks should be many-to-one. So, how do we link comments to tasks?
Exactly! We’ll use a relationship field to create this connection in NocoBase.
NocoBase allows us to use relationship fields to establish links between collections at the data level, like building bridges that tightly connect related data.
Why Choose a Many-to-One Relationship?
Why are we choosing a many-to-one relationship instead of a one-to-many or another type? Think about it: Each task can have multiple comments, so multiple comments can point to the same task. For this, we’ll create a many-to-one field in the comments collection that links to the tasks in the task collection.
A clever thought might have occurred to you: Since the comments and tasks have a many-to-one relationship, can we also create a one-to-many field in the task collection that points to the comments collection? Exactly, well done! One-to-many and many-to-one are reciprocal relationships, so we can create a one-to-many field in the task collection that links to the comments collection. You’re doing great!
4.2.1.4 Setting Up the Many-to-One Relationship Field
Next, let’s create a many-to-one field in the comments collection to link it with the task collection. We can name this field Associated Task (belong_task). During configuration, note these key settings:
- Source Collection: From where is the relationship initiated? In this case, it’s the Comments Collection.
- Target Collection: Which collection are we linking to? Here, it’s the Task Collection.
Example for Foreign Keys and Target Collection Field Identification: Let’s clarify with an example:
Imagine you’re handling a stack of high school transcripts, and your job is to link each transcript to the student it belongs to. Let’s say a transcript has the following information:
- Name: Zhang San
- Class: Senior Class 35
- Exam ID: 202300000001
- ID Number: 111111111111
Now, let’s assume you want to use Name and Class to find Zhang San. However, since there might be many students named Zhang San in the same class, identifying them accurately can be challenging.
That’s where a unique identifier, such as the Exam ID, becomes useful. Using the exam ID, you can precisely identify each student’s transcript. For instance, if you search with the Exam ID “202300000001,” the school will quickly respond: “This transcript belongs to Zhang San, the one with glasses in row three of Senior Class 35.”
The same logic applies to setting up the comments relationship. A unique identifier from the task collection, like the ID, can be saved in the comments to link each comment to the corresponding task.
This concept of foreign keys is the core of implementing many-to-one relationships – simple, right?
In the comments collection, we save the unique task_id field from the task collection, binding comments to their associated tasks.
4.2.1.5 Handling Foreign Keys When Deleting
Once we set up the many-to-one relationship in NocoBase, we also need to consider what happens to the comments if a task is deleted. You have several options:
- CASCADE: When a task is deleted, all comments associated with it are also deleted.
- SET NULL (default setting): When a task is deleted, the comment data is retained, but the foreign key field is set to null.
- RESTRICT and NO ACTION: If a task has related comments, the system will prevent you from deleting it, ensuring no comments are lost.
4.2.1.6 Creating Reverse Relationships in the Task Collection
Finally, select Create Reverse Relationship Field in Target Collection to make it easy to view all related comments from within a task. This improves data management efficiency.
The location of relationship fields in NocoBase determines how data is accessed. To make the comments viewable directly from the task collection, we’ll create a one-to-many reverse relationship field in the task collection, linking it to the comments collection.
When you reopen the task collection, you’ll see a comments field marked with a one-to-many relationship, allowing you to easily view and manage all related comments!
4.3 Page Setup
4.3.1 Enabling the Comments Collection
Now comes an exciting moment: return to the edit popup, create a comment block, and check the needed features. Done!

4.3.2 Adjusting the Page
Let’s style the page layout. Hover over the top-right of the edit button, choose a wider popup, and use what we’ve learned to drag the comment block to the right side of the popup. Perfect!
Some of you may be wondering: “I want to set up comments too!” Don’t worry; I have another free option prepared for you.
4.2.2 Method Two: Creating a Custom Comments Collection
If you haven’t purchased the comments plugin, we can still set up a similar comments feature by creating a custom collection.
-
Create a New Comments collection:
- Create a Comments Collection (comments2), add a Comment Content (content) field (Markdown type), and an Associated Task (belong_task) field (many-to-one type).

- Create a Comments Collection (comments2), add a Comment Content (content) field (Markdown type), and an Associated Task (belong_task) field (many-to-one type).
-
Create a Comments List Block on the Page:
- In the edit popup for the task collection, add a List Block (our third type of block, which can display field details), select comments, and test it:
- In the edit popup for the task collection, add a List Block (our third type of block, which can display field details), select comments, and test it:
Summary
Now you know how to enrich task content with Markdown (Vditor) and add a comments feature to tasks! Your task management system now has a complete functional foundation – you’re one step closer to creating a professional task management tool!
Keep exploring and practicing; NocoBase has endless possibilities. If you run into any issues, don’t worry – I’ll be here to guide you through every step.
In the next chapter (Chapter 5: Tabs & Dynamic blocks), we’ll dive deeper into more block functions in NocoBase, helping you take your system to the next level. Keep up the great work!
Explore freely and unleash your creativity! If you encounter any challenges, don’t hesitate to consult the NocoBase Official Documentation or join the NocoBase Community for discussions.