この記事はLeandro Martinsによって作成され、最初にDeveloping a Plugin to Send WhatsApp Messages in NocoBaseに公開されました。
この記事の目的は、特定のニーズを満たすためにNocoBaseでプラグインを作成する手順を示すことです。この記事では、アーキテクチャ設計、基本構造の作成、プラグインの有効化、コレクションの定義と作成、エンドポイントの作成、設定インターフェースの構築、ワークフローとの統合、プラグインのエクスポートについて説明します。
この記事では、次の技術を使用します:NocoBase、PostgreSQL、Docker。これらのツールはすでに設定されていることを前提としています。インストール手順については、私が書いた別のガイドこちらを参照してください。
プラグインアーキテクチャ
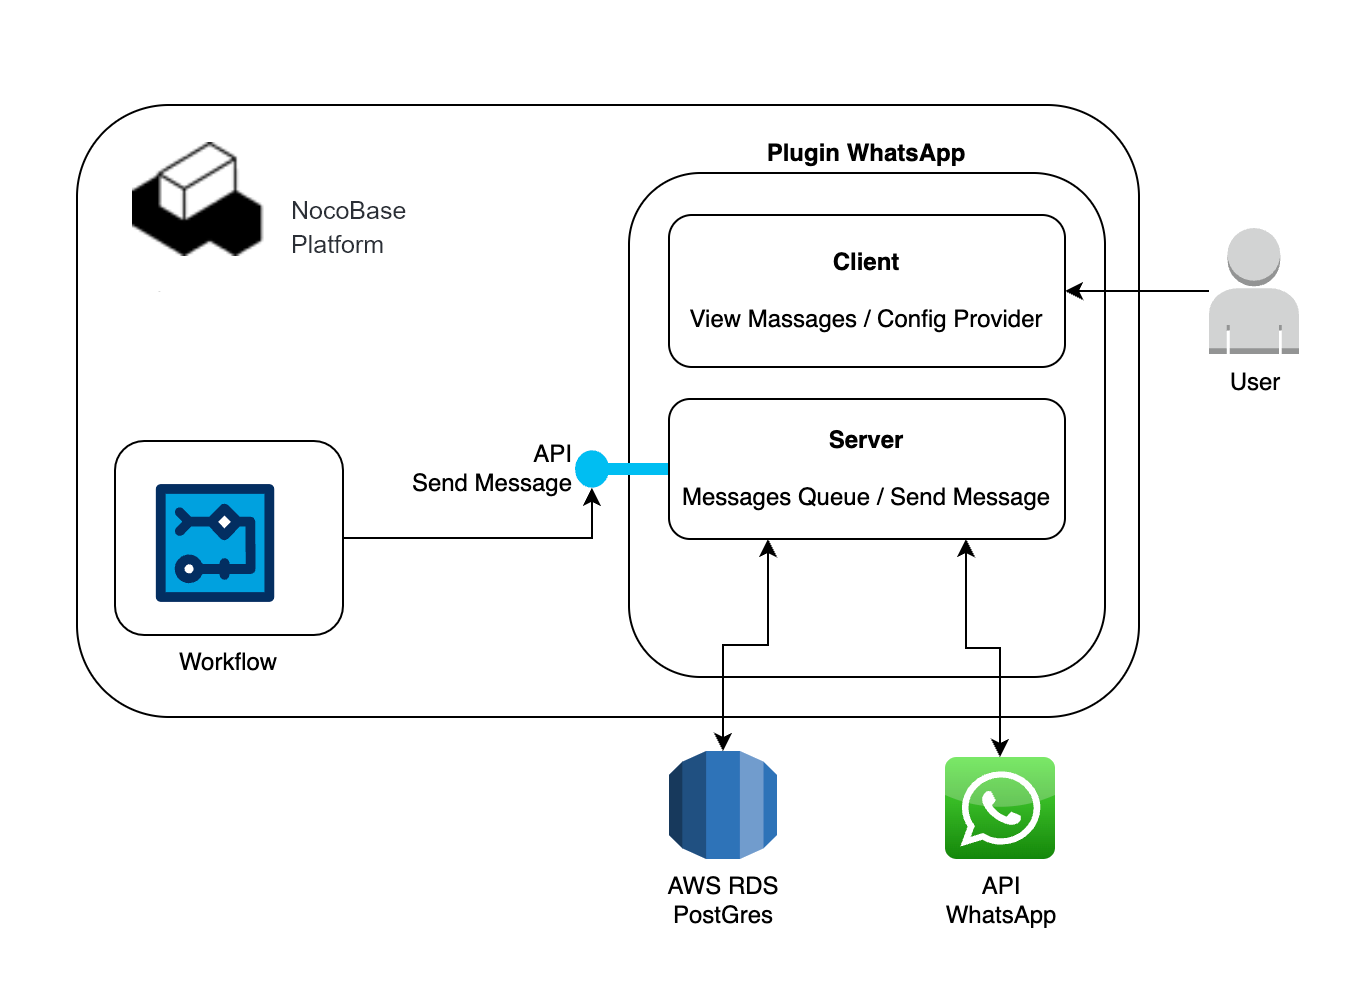
プラグイン構造の作成
プラグインを作成するには、以下のコマンドを実行するだけです。プラグインの構造、初期コード、コマンドの詳細についてはドキュメントを参照してください。
yarn pm create @my-project/plugin-whatsapp
作成後、生成されたファイルはpackagesフォルダー内のプラグインの名前で格納されます。ファイル構造を理解するために、こちらのマニュアルを参照できます。
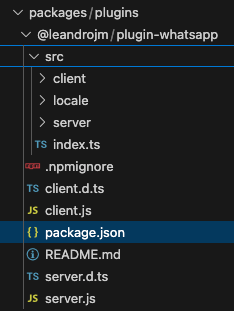
プラグインの有効化
プラグインを有効化するには、プラグイン画面に移動してトグルボタンを使用して有効化するか、以下のコマンドを実行します。
yarn pm enable @my-project/plugin-hello
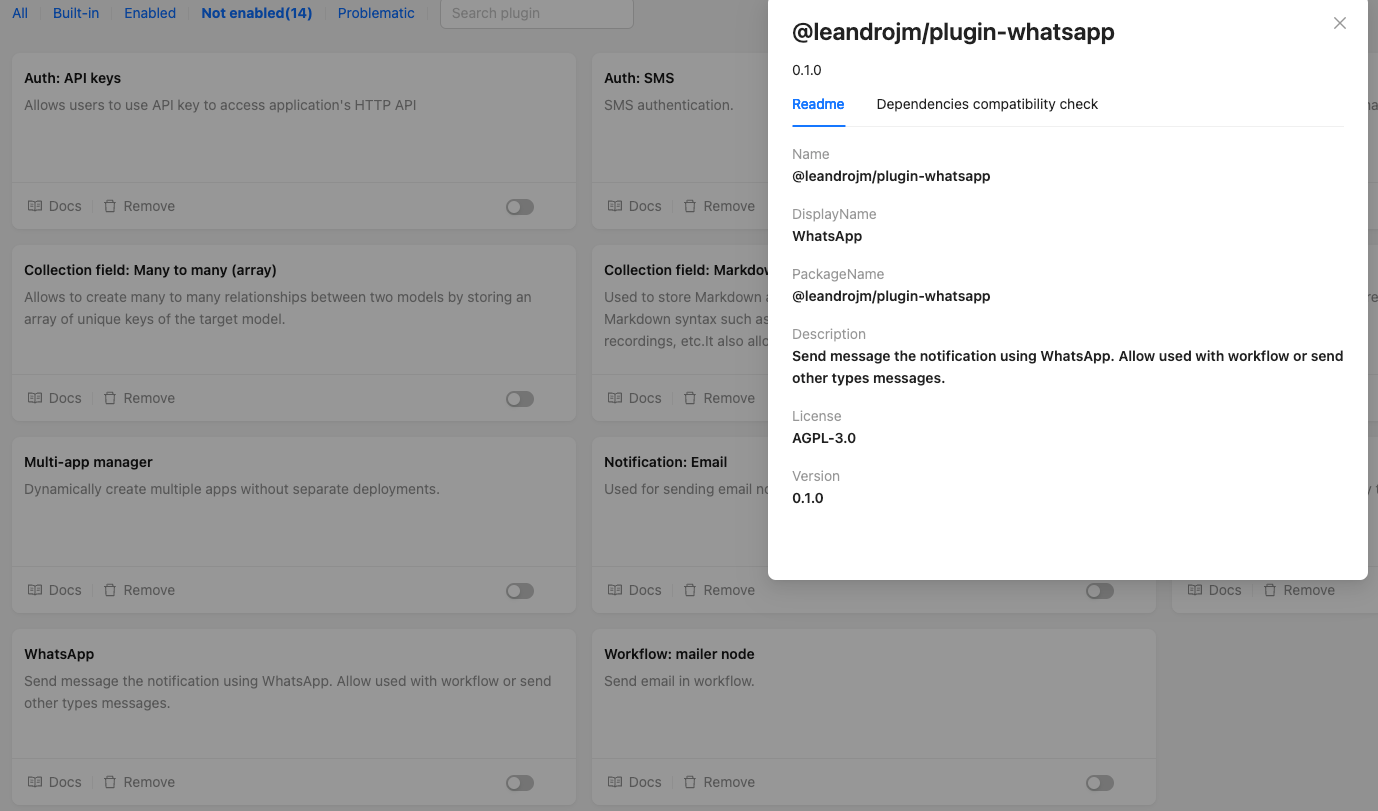
コレクションの作成
コレクションは、データベース内のテーブルに保存されるデータの構造を定義するため、非常に重要です。この例では、以下の2つのコレクションを作成しました。
- ProvideConfig
- API Key:WhatsApp APIにアクセスするためのMetaのAPIキー
- URL:API URL
- Cell Phone From:WhatsApp Businessの電話番号
- MessageQueue
- Content:メッセージ内容
- Status:保留中または完了
NocoBaseでは、コレクションは/src/server/collections/フォルダーに格納されています。基本構造は以下のようになります。詳細についてはドキュメントを参照してください。
##File: ProvideConfig
import { defineCollection } from '@nocobase/database';

export default defineCollection({
  name: 'ProvideConfig',
  fields: [
    { type: 'string', name: 'api_key' },
    { type: 'string', name: 'url' },
    { type: 'string', name: 'cell_phone_from' },
  ],
},
);

##File: MessageQueue
import { defineCollection } from '@nocobase/database';

export default defineCollection({
  name: 'MessageQueue',
  fields: [
    { type: 'string', name: 'content' },
    { type: 'string', name: 'status' }
  ],
},
);
エンドポイントの作成
エンドポイントは、外部システムがアプリケーション内のアクションと対話するために使用され、システム間の統合を実現します。この場合、WhatsApp APIを呼び出してメッセージを非同期に送信するエンドポイントを作成します。
エンドポイントを作成するには、/src/server/plugin.tsファイルを使用し、loadメソッド内にコードを追加します。以下の例を参照してください。ACL(アクセス制御リスト)では、エンドポイントの権限を定義します。resourceManagerを使用して、エンドポイントをそのメソッドとともに登録します。設定が完了すると、エンドポイントは以下のURLで利用可能になります:
http://localhost:13001/api/whatsapp:sendMessage
import { Plugin } from '@nocobase/server';

export class PluginHelloServer extends Plugin {

  async afterAdd() {}

  async beforeLoad() {}

  async load() {
    this.app.acl.allow('whatsapp', '*', 'public');

    this.app.resourceManager.define({
      name: 'whatsapp',
      actions: {
        async sendMessage(ctx, next) {

          //Save message in the queu status: pending

          //Recovery API Whataap paramters in database;

          //Try send message whats using API

          // If OK, update status: done Else: update status: error
        }
      }
    });

  }

...
設定インターフェースの作成
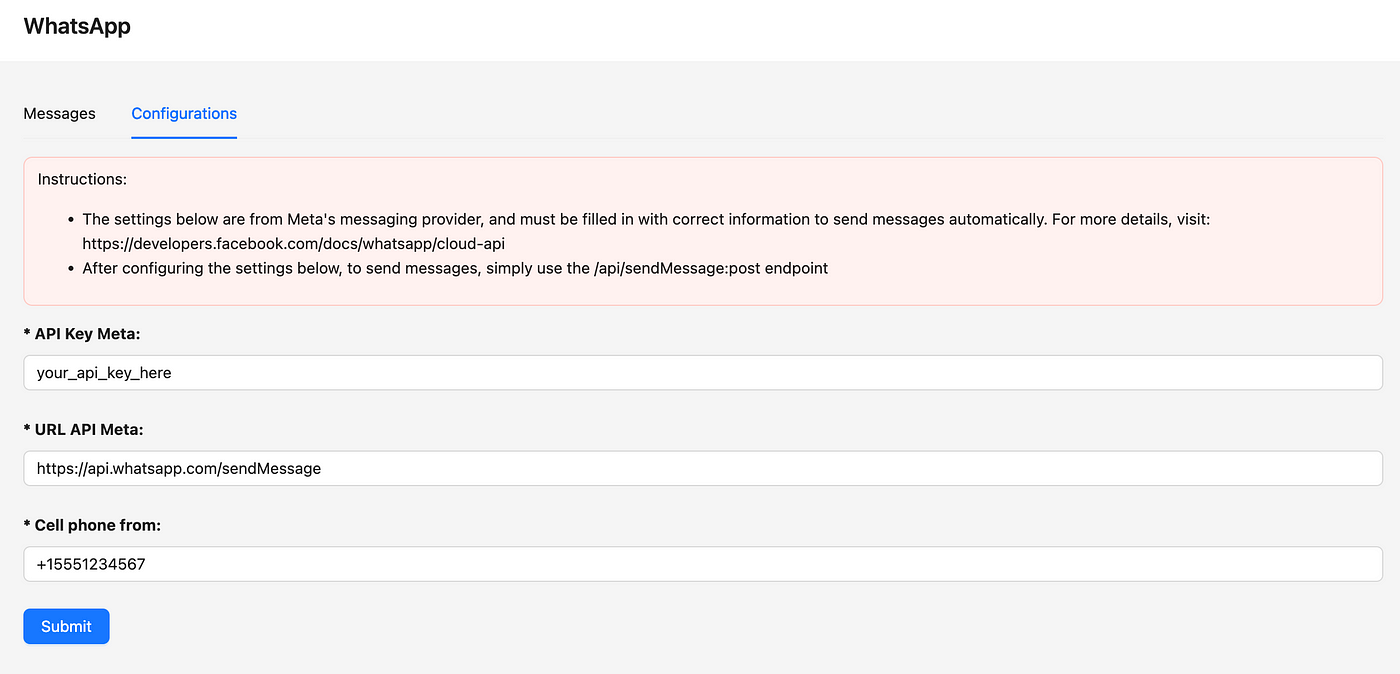
NocoBaseは、ReactとAnt Designを使用してインターフェースを作成できます。この例では、プラグインの設定エリアにインターフェースを作成します。このインターフェースでは、WhatsApp APIの設定を定義し、送信されたメッセージとそのステータスを表示できるようにします。
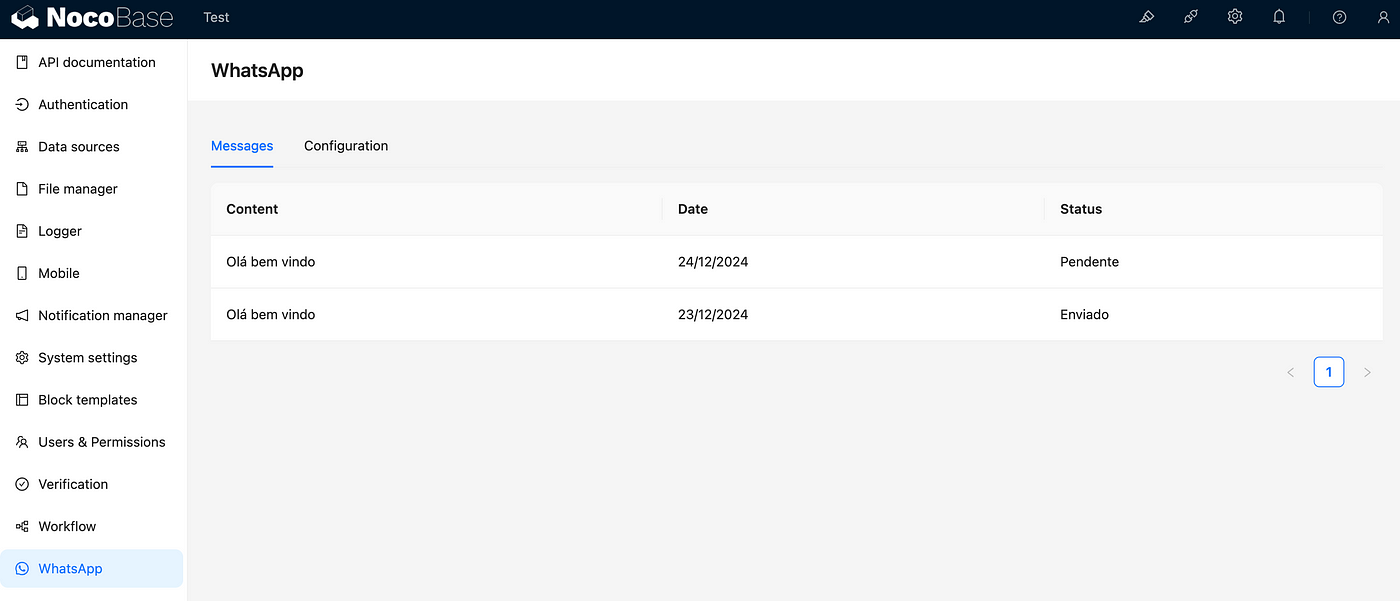
/src/clientフォルダーでは、ReactとAnt Designを使用してインターフェースを作成できます。以下のコードは、画像に表示されている画面を作成するために必要な簡単な構造を示しています。詳細については、メニュー、画面、ルートの作成に関する情報を含むこちらのリンクを参照してください。
##File: index.tsx
import { Plugin } from '@nocobase/client';
import { Alert, Button, Form, Input, Table, Tabs, TabsProps } from 'antd';
import React, { useState } from 'react';

/**
 *
 */
export class PluginWhatsappClient extends Plugin {

  async afterAdd() {
    // await this.app.pm.add()
  }

  async beforeLoad() {
  }

  async load() {

    // this.app.addComponents({})
    // this.app.addScopes({})
    // this.app.addProvider()
    // this.app.addProviders()
    // this.app.router.add()

    const PluginWhatsAppTabs = () => {

      const [apiKey, setApiKey] = useState();
      const [url, setUrl] = useState();
      const [cellPhoneFrom, setCellPhoneFrom] = useState();

      const onChange = async (key: string) => {

        //Retrive the data from api and set in inputs.
        const { data } = await this.app.apiClient.request({ url: 'ProvideConfig:get', params: { filterByTk: 1 } });
        setApiKey(data.data.api_key);
        setUrl(data.data.url);
        setCellPhoneFrom(data.data.celular_from);
      };

      const onClickSubmit = () => {

        //Action for update input in DB using API.
        console.log('Ok');
      }

      //Mock data with messages
      const dataSource = [
        {
          key: '1',
          content: 'Olá bem vindo',
          date: '24/12/2024',
          status: 'Pendente',
        },
        {
          key: '2',
          content: 'Olá bem vindo',
          date: '23/12/2024',
          status: 'Enviado',
        }
      ];

      const columns = [
        {
          title: 'Content',
          dataIndex: 'content',
          key: 'content',
        },
        {
          title: 'Date',
          dataIndex: 'date',
          key: 'date',
        },
        {
          title: 'Status',
          dataIndex: 'status',
          key: 'status',
        },
      ];

      const instructions = (<><p>Instructions:</p>
        <ul>
          <li>The settings below are from Meta's messaging provider, and must be filled in with correct information to send messages automatically. For more details, visit: https://developers.facebook.com/docs/whatsapp/cloud-api</li>
          <li>After configuring the settings below, to send messages, simply use the /api/sendMessage:post endpoint</li>
        </ul>
      </>);

      const itemsTabs: TabsProps['items'] = [
        {
          key: '1',
          label: 'Messages',
          children: (<Table dataSource={dataSource} columns={columns} />),
        },
        {
          key: '2',
          label: 'Configurations',
          children: (<>
            <p><Alert message={instructions} type="error" /></p>
            <Form layout="vertical">
              <Form.Item label="* API Key Meta:" style={{ fontWeight: 'bold' }}>
                <Input placeholder="xxxxxxxxxx" value={apiKey} />
              </Form.Item>
              <Form.Item label="* URL API Meta:" style={{ fontWeight: 'bold' }}>
                <Input placeholder="domain.com..." value={url} />
              </Form.Item>
              <Form.Item label="* Cell phone from:" style={{ fontWeight: 'bold' }}>
                <Input placeholder="5554899991234" value={cellPhoneFrom} />
              </Form.Item>
              <Form.Item>
                <Button type="primary" onClick={onClickSubmit}>Submit</Button>
              </Form.Item>
            </Form></>
          ),
        }
      ];

      return (<Tabs defaultActiveKey="1" items={itemsTabs} onChange={onChange}/>)

    }

    this.app.pluginSettingsManager.add('whatsapp', {
      title: 'WhatsApp',
      icon: 'WhatsAppOutlined',
      Component: PluginWhatsAppTabs,
      sort: 100,
    });
  }
}

export default PluginWhatsappClient;
上記のコードは、作成したプラグインの画面を生成します。コードの一部は簡潔にするためにコメントアウトされています。
NocoBaseワークフローとの統合
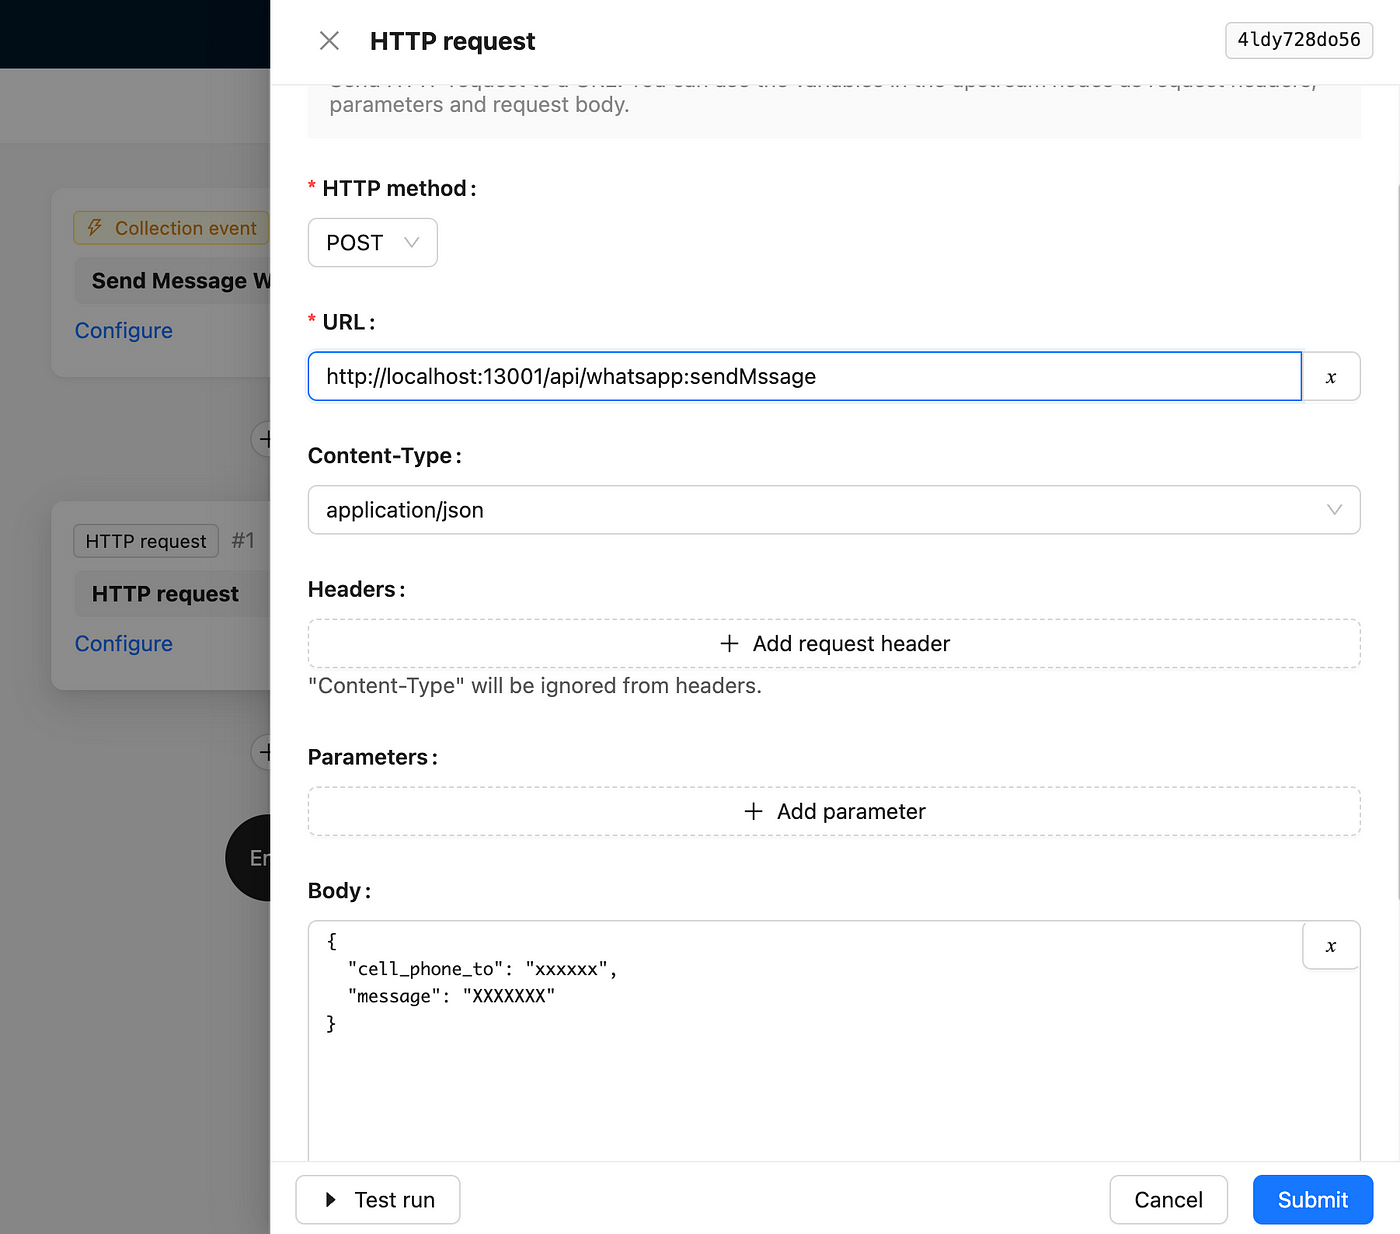
プラグインで作成したエンドポイントを使用してメッセージを送信する方法は複数あります。その一つが、NocoBaseワークフロー内でエンドポイントをトリガーする方法です。基本的には、「HTTPリクエスト」タイプのワークフローを作成し、データを以下のように渡すことです。
プラグインをファイルとしてエクスポート
作成したプラグインをエクスポートするには、以下のコマンドを実行するだけです。これにより、他のNocoBaseインスタンスにインストールできる.tarファイルが生成されます。詳細については、ドキュメントを参照してください。
yarn build @my-project/plugin-hello
yarn nocobase tar @my-project/plugin-hello
結論
この記事の目的は、NocoBaseでプラグインを作成するプロセスと基本構造を示すことでした。コードの一部は書き換えや改善が可能です。近いうちに、このプロジェクトをリポジトリに追加し、修正したプラグインをコミュニティと共有する予定です。
関連文献: