本文由 Leandro Martins 编写,最初发布于 Developing a Plugin to Send WhatsApp Messages in NocoBase。
本文的目标是展示在 NocoBase 中创建插件的步骤,以满足特定需求。我们将涵盖架构设计、创建基础结构、激活插件、定义和创建集合、创建端点、构建配置界面、与工作流集成以及导出插件等内容。
本文将使用以下技术:NocoBase、PostgreSQL 和 Docker。这些工具应该已经配置好。有关安装说明,请参考我编写的指南。
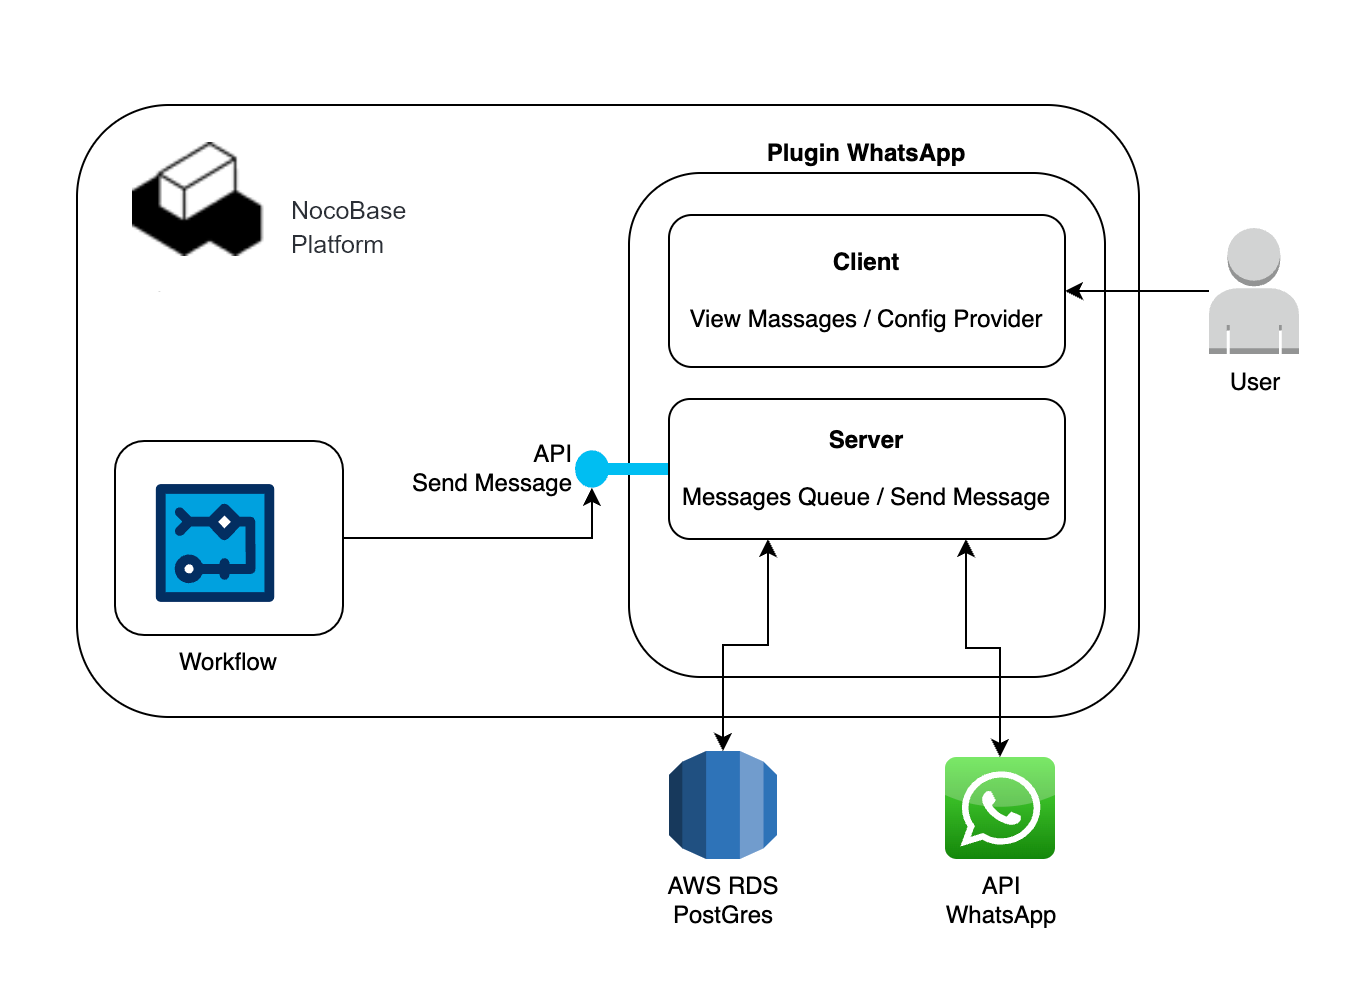
插件架构
创建插件结构
要创建插件,只需运行以下命令。有关插件结构、初始代码和命令的更多细节,请参阅文档。
yarn pm create @my-project/plugin-whatsapp
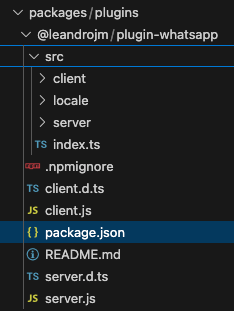
创建后,生成的文件将位于 packages 文件夹下,插件的名称如下面的图片所示。为了更好地理解文件夹结构,您可以参考手册这里。
激活插件
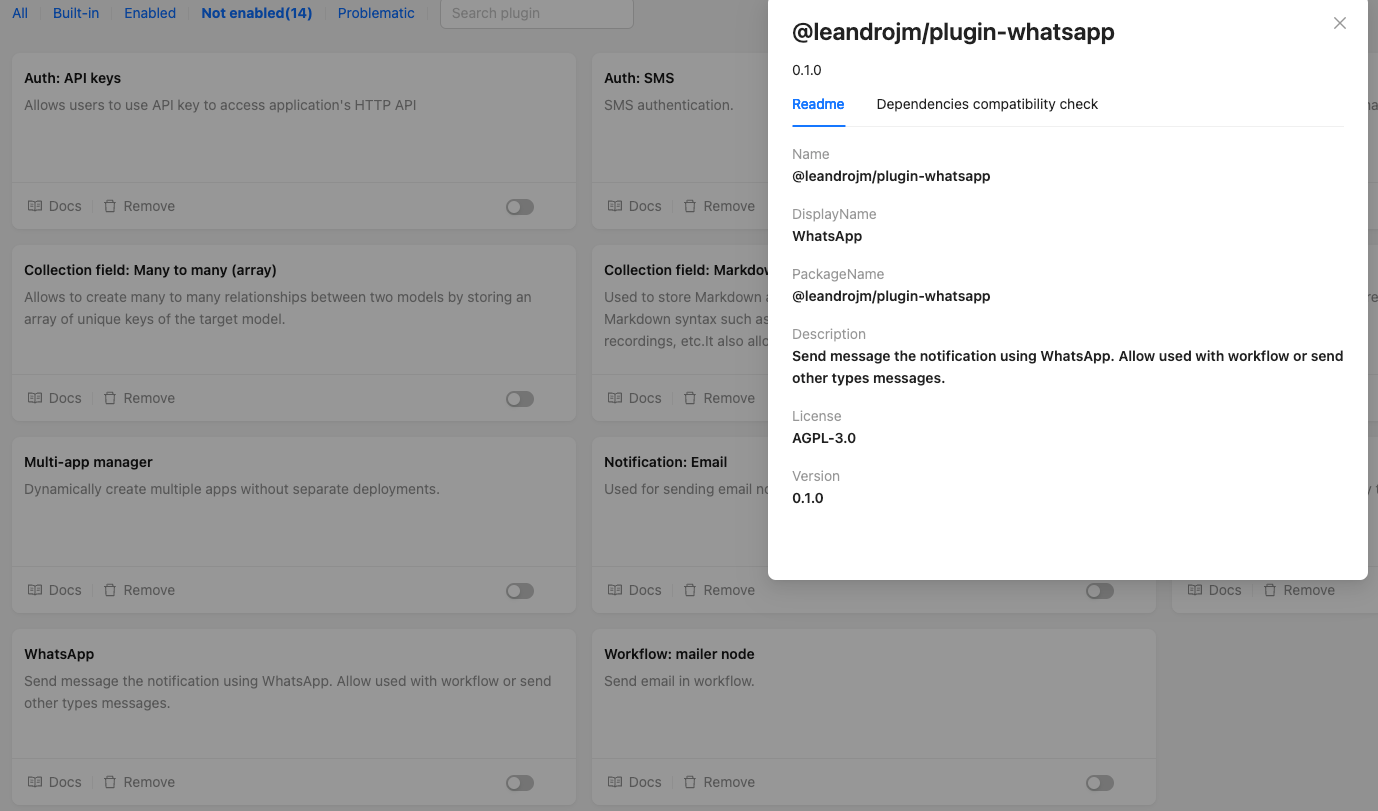
要激活插件,您可以进入插件屏幕并使用切换按钮启用它,如下图所示,或者运行以下命令。
yarn pm enable @my-project/plugin-hello
创建集合
集合非常重要,因为它们定义了存储在数据库表中的数据结构。在这个示例中,我创建了两个集合,如下所述。
- ProvideConfig
- API Key:用于访问 WhatsApp API 的 Meta API 密钥
- URL:API URL
- Cell Phone From:WhatsApp Business 电话号码
- MessageQueue
- Content:消息内容
- Status:待处理或已完成
在NocoBase中,集合位于/src/server/collections/文件夹中。基本结构如下所示。有关更多详细信息,请参阅文档这里。
##File: ProvideConfig
import { defineCollection } from '@nocobase/database';

export default defineCollection({
  name: 'ProvideConfig',
  fields: [
    { type: 'string', name: 'api_key' },
    { type: 'string', name: 'url' },
    { type: 'string', name: 'cell_phone_from' },
  ],
},
);

##File: MessageQueue
import { defineCollection } from '@nocobase/database';

export default defineCollection({
  name: 'MessageQueue',
  fields: [
    { type: 'string', name: 'content' },
    { type: 'string', name: 'status' }
  ],
},
);
创建端点
端点允许外部系统与您的应用程序中的操作进行交互,从而实现它们之间的集成。在此案例中,我们将创建一个端点,以安排异步调用 WhatsApp API 来发送消息。
要创建端点,您可以使用/src/server/plugin.ts文件,并将代码添加到load方法中,如下面的示例所示。在ACL(访问控制列表)中,您定义了端点的权限。使用resourceManager,您可以注册端点及其方法。配置完成后,端点将在以下位置可用:配置完成后,端点将在以下位置可用:
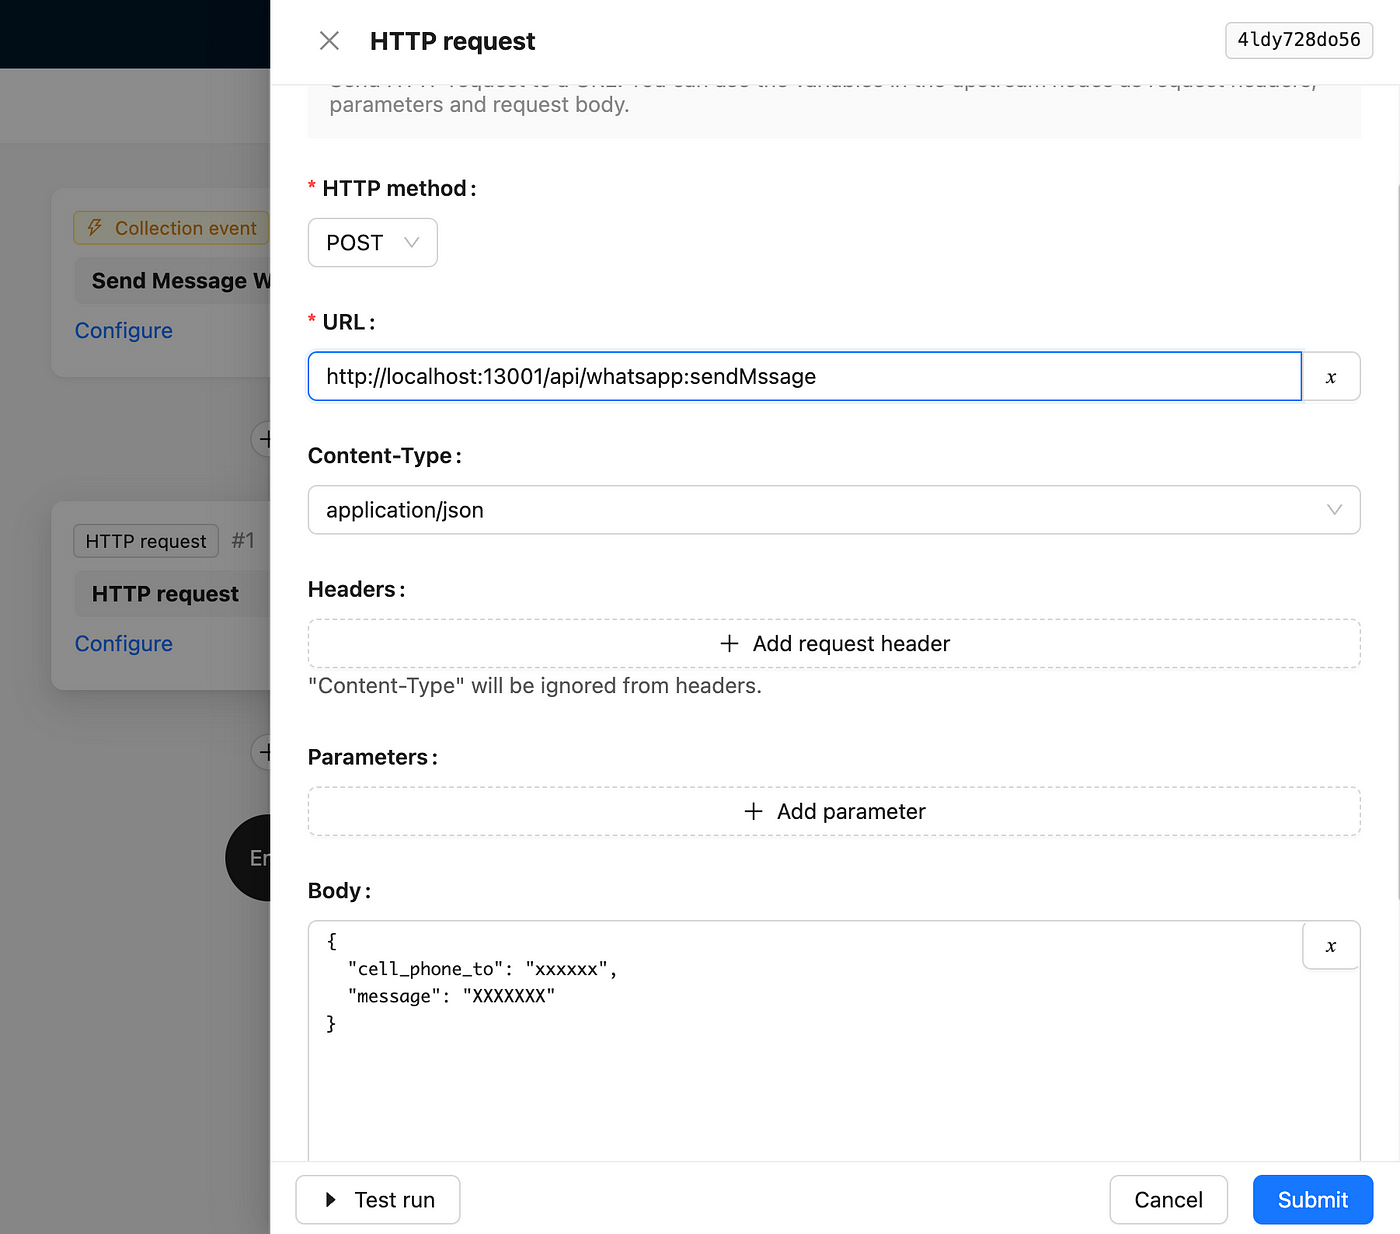
http://localhost:13001/api/whatsapp:sendMessage
import { Plugin } from '@nocobase/server';

export class PluginHelloServer extends Plugin {

  async afterAdd() {}

  async beforeLoad() {}

  async load() {
    this.app.acl.allow('whatsapp', '*', 'public');

    this.app.resourceManager.define({
      name: 'whatsapp',
      actions: {
        async sendMessage(ctx, next) {

          //Save message in the queu status: pending

          //Recovery API Whataap paramters in database;

          //Try send message whats using API

          // If OK, update status: done Else: update status: error
        }
      }
    });

  }

...
创建配置界面
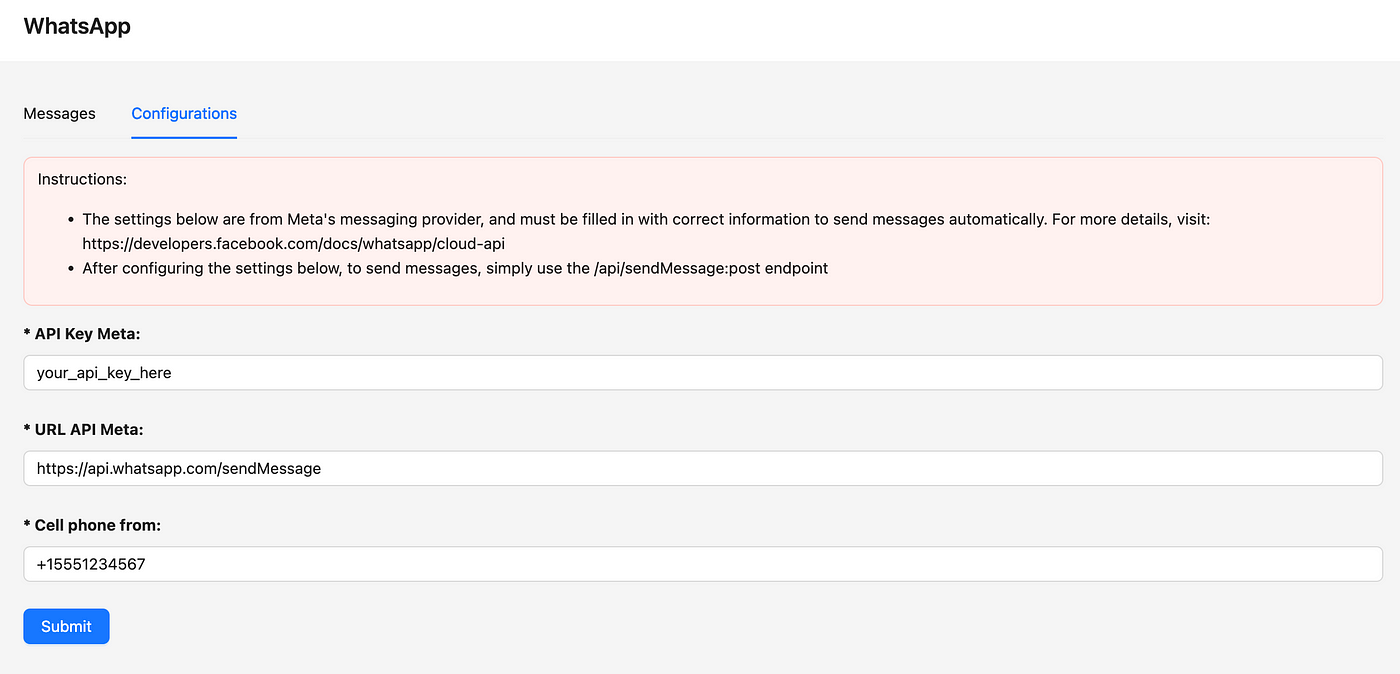
NocoBase 允许您使用 React 和 Ant Design 创建界面。在这个例子中,我将在插件的设置区域创建一个界面。该界面将使您能够定义 WhatsApp API 设置,并查看已发送的消息及其状态,如下图所示。
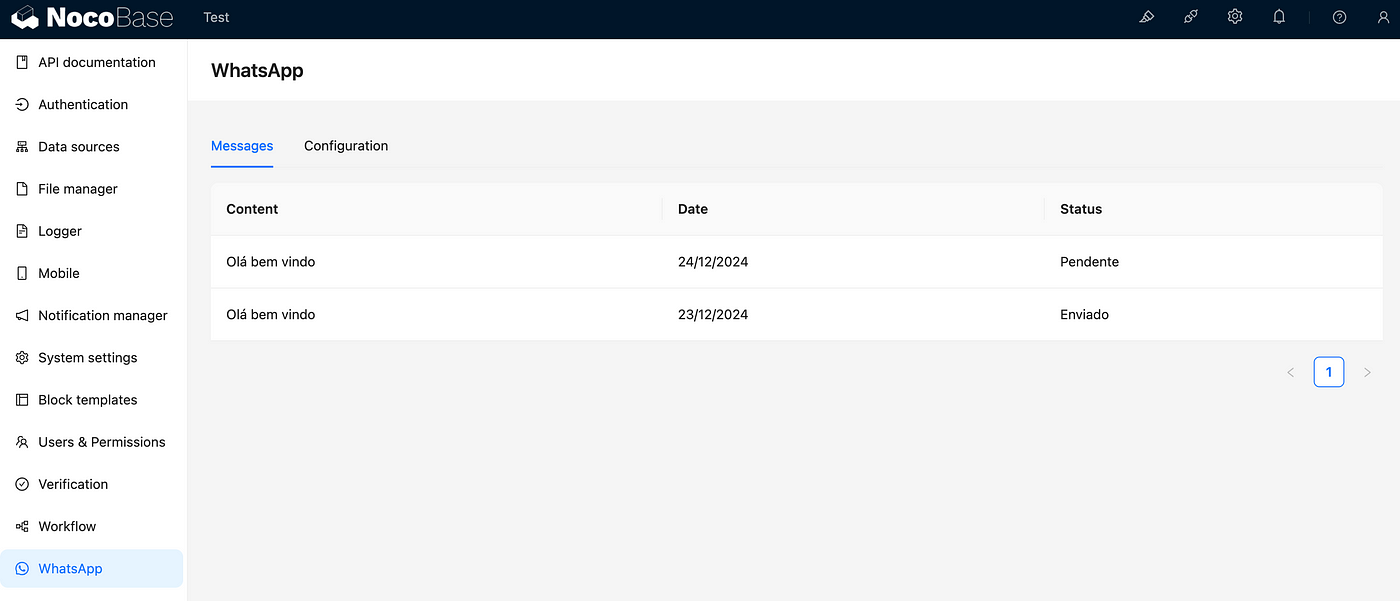
在/src/client文件夹中,您可以使用 React 和 Ant Design 创建界面。下面的代码展示了创建屏幕所需的简单结构。有关更多详细信息,您可以查看此链接,其中包含创建菜单、屏幕和路由的信息。
##File: index.tsx
import { Plugin } from '@nocobase/client';
import { Alert, Button, Form, Input, Table, Tabs, TabsProps } from 'antd';
import React, { useState } from 'react';

/**
 *
 */
export class PluginWhatsappClient extends Plugin {

  async afterAdd() {
    // await this.app.pm.add()
  }

  async beforeLoad() {
  }

  async load() {

    // this.app.addComponents({})
    // this.app.addScopes({})
    // this.app.addProvider()
    // this.app.addProviders()
    // this.app.router.add()

    const PluginWhatsAppTabs = () => {

      const [apiKey, setApiKey] = useState();
      const [url, setUrl] = useState();
      const [cellPhoneFrom, setCellPhoneFrom] = useState();

      const onChange = async (key: string) => {

        //Retrive the data from api and set in inputs.
        const { data } = await this.app.apiClient.request({ url: 'ProvideConfig:get', params: { filterByTk: 1 } });
        setApiKey(data.data.api_key);
        setUrl(data.data.url);
        setCellPhoneFrom(data.data.celular_from);
      };

      const onClickSubmit = () => {

        //Action for update input in DB using API.
        console.log('Ok');
      }

      //Mock data with messages
      const dataSource = [
        {
          key: '1',
          content: 'Olá bem vindo',
          date: '24/12/2024',
          status: 'Pendente',
        },
        {
          key: '2',
          content: 'Olá bem vindo',
          date: '23/12/2024',
          status: 'Enviado',
        }
      ];

      const columns = [
        {
          title: 'Content',
          dataIndex: 'content',
          key: 'content',
        },
        {
          title: 'Date',
          dataIndex: 'date',
          key: 'date',
        },
        {
          title: 'Status',
          dataIndex: 'status',
          key: 'status',
        },
      ];

      const instructions = (<><p>Instructions:</p>
        <ul>
          <li>The settings below are from Meta's messaging provider, and must be filled in with correct information to send messages automatically. For more details, visit: https://developers.facebook.com/docs/whatsapp/cloud-api</li>
          <li>After configuring the settings below, to send messages, simply use the /api/sendMessage:post endpoint</li>
        </ul>
      </>);

      const itemsTabs: TabsProps['items'] = [
        {
          key: '1',
          label: 'Messages',
          children: (<Table dataSource={dataSource} columns={columns} />),
        },
        {
          key: '2',
          label: 'Configurations',
          children: (<>
            <p><Alert message={instructions} type="error" /></p>
            <Form layout="vertical">
              <Form.Item label="* API Key Meta:" style={{ fontWeight: 'bold' }}>
                <Input placeholder="xxxxxxxxxx" value={apiKey} />
              </Form.Item>
              <Form.Item label="* URL API Meta:" style={{ fontWeight: 'bold' }}>
                <Input placeholder="domain.com..." value={url} />
              </Form.Item>
              <Form.Item label="* Cell phone from:" style={{ fontWeight: 'bold' }}>
                <Input placeholder="5554899991234" value={cellPhoneFrom} />
              </Form.Item>
              <Form.Item>
                <Button type="primary" onClick={onClickSubmit}>Submit</Button>
              </Form.Item>
            </Form></>
          ),
        }
      ];

      return (<Tabs defaultActiveKey="1" items={itemsTabs} onChange={onChange}/>)

    }

    this.app.pluginSettingsManager.add('whatsapp', {
      title: 'WhatsApp',
      icon: 'WhatsAppOutlined',
      Component: PluginWhatsAppTabs,
      sort: 100,
    });
  }
}

export default PluginWhatsappClient;
上面的代码会为创建的插件生成下面的屏幕。为了简洁起见,某些部分已被注释掉。
与 NocoBase 工作流集成
有多种方法可以在工作流中触发插件中创建的端点来发送消息。一个常见的方法是在 NocoBase 工作流中创建一个“HTTP 请求”类型的工作流,并传递数据,如下图所示。
将插件导出为文件
要导出创建的插件,只需运行以下命令。这将生成一个.tar文件,可以在其他 NocoBase 实例中安装。有关更多详细信息,您可以参考文档.
yarn build @my-project/plugin-hello
yarn nocobase tar @my-project/plugin-hello
结论
本文的目的是展示在 NocoBase 中创建插件的过程和基本结构。代码的某些部分可以进行重写和改进。很快,我计划将该项目添加到一个代码库,并与社区共享修订后的插件。
相关阅读: